
")
Chocolate Peppermint Cookie Cups: 5 Irresistible Bites
Oh, the holidays! They bring with them a magical feeling, and what better way to capture that joy than with a truly delightful treat? Today, we’re diving into the wonderful world of holiday baking to create something truly special: Chocolate Peppermint Cookie Cups: 5 Irresistible Bites. These little wonders are not just cookies; they’re tiny cups of pure festive bliss, combining rich chocolate with a refreshing hint of peppermint.
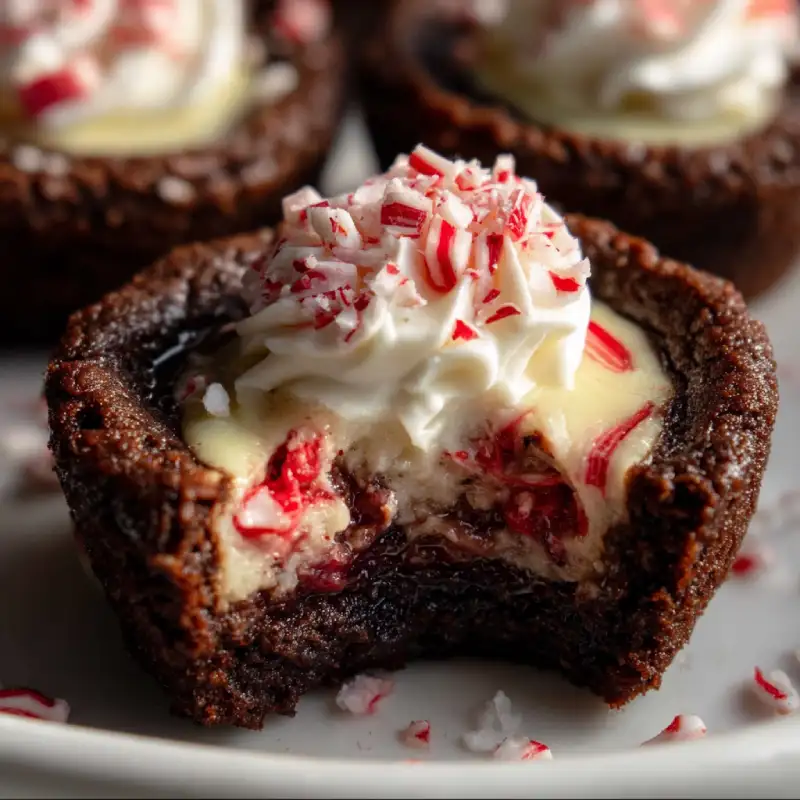
Imagine a chewy, chocolatey base, filled with a smooth ganache-like center, and crowned with crushed peppermint. They’re easy to make, incredibly delicious, and absolutely perfect for sharing with loved ones (or hoarding for yourself, we won’t tell!). Get ready to impress everyone with these stunning and scrumptious mini desserts.
Table of Contents
- 1. Introducing the Ultimate Holiday Treat: Chocolate Peppermint Cookie Cups
- 2. Why You’ll Devour These Chocolate Peppermint Cookie Cups: 5 Irresistible Bites
- 3. Gather Your Ingredients for Chocolate Peppermint Magic
- 4. How to Make Chocolate Peppermint Cookie Cups: A Step-by-Step Guide
- 4.1. Step 1: Prepare the Cookie Dough
- 4.2. Step 2: Shape and Bake the Cookie Cups
- 4.3. Step 3: Melt the Chocolate and Add Peppermint
- 4.4. Step 4: Assemble and Chill
- 5. Pro Tips and Delicious Variations for Your Cookie Cups
- 6. Serving and Storage Suggestions for Perfect Cookie Cup Enjoyment
- 7. Chocolate Peppermint Cookie Cups Recipe Card
1. Introducing the Ultimate Holiday Treat: Chocolate Peppermint Cookie Cups
The scent of peppermint and chocolate is synonymous with holiday cheer, isn’t it? These delightful cookie cups perfectly encapsulate that festive spirit in every single bite. They’re an elegant alternative to traditional Christmas cookies, offering a rich flavor and a beautiful presentation that’s sure to impress.
Whether you’re looking for a standout treat for your holiday party or a cozy baking project on a chilly afternoon, these mini desserts are your answer. Get ready to fill your kitchen with the irresistible aroma of chocolate and mint!
2. Why You’ll Devour These Chocolate Peppermint Cookie Cups: 5 Irresistible Bites
These aren’t just any holiday treat; these Chocolate Peppermint Cookie Cups: 5 Irresistible Bites are designed for maximum enjoyment. First, their individual size makes them perfect for easy serving and portion control – though we can’t promise you’ll stop at just one!
Secondly, the combination of a soft, chewy cookie base with a creamy chocolate filling and crunchy peppermint topping is simply divine. It’s a textural dream! Thirdly, they look absolutely gorgeous on any dessert platter, making them ideal for holiday gatherings. Fourth, they’re surprisingly simple to make, even for novice bakers. And finally, the refreshing burst of peppermint perfectly cuts through the richness of the chocolate, creating a balanced and utterly addictive flavor profile.
3. Gather Your Ingredients for Chocolate Peppermint Magic
To create these magical peppermint desserts, you’ll need a few pantry staples and a couple of special additions. Make sure your butter is softened and your eggs are at room temperature for the best results.
- 1/2 cup (113g) unsalted butter, softened
- 1/2 cup (100g) granulated sugar
- 1/4 cup (50g) packed light brown sugar
- 1 large egg
- 1 teaspoon vanilla extract
- 1 1/4 cups (150g) all-purpose flour
- 1/2 cup (45g) unsweetened cocoa powder
- 1/2 teaspoon baking soda
- 1/4 teaspoon salt
- 4 ounces (113g) semi-sweet chocolate, finely chopped
- 1/4 cup (60ml) heavy cream
- 1/2 teaspoon peppermint extract (or to taste)
- 1/2 cup (about 70g) crushed peppermint candies or candy canes, for topping
4. How to Make Chocolate Peppermint Cookie Cups: A Step-by-Step Guide
Let’s get baking! This easy cookie recipe is broken down into simple steps to ensure perfect chocolate cookies every time. Follow along closely, and you’ll have a batch of festive treats in no time.
4.1. Step 1: Prepare the Cookie Dough
- Preheat your oven to 350°F (175°C). Lightly grease a 24-cup mini muffin tin or line with paper liners.
- In a large bowl, cream together the softened butter, granulated sugar, and brown sugar until light and fluffy. This takes about 2-3 minutes with an electric mixer.
- Beat in the egg and vanilla extract until well combined, scraping down the sides of the bowl as needed.
- In a separate bowl, whisk together the flour, cocoa powder, baking soda, and salt. Gradually add the dry ingredients to the wet ingredients, mixing on low speed until just combined and a soft dough forms. Do not overmix.
4.2. Step 2: Shape and Bake the Cookie Cups
- Roll the cookie dough into 1-inch balls. Place one ball into each cup of the prepared mini muffin tin.
- Bake for 8-10 minutes, or until the edges are set. While still warm, use the back of a small spoon or a tart shaper to gently press down the center of each cookie, creating a “cup” indentation.
- Let the cookie cups cool in the muffin tin for 5 minutes before carefully transferring them to a wire rack to cool completely.
4.3. Step 3: Melt the Chocolate and Add Peppermint
- While the cookies cool, prepare the chocolate filling. Place the finely chopped semi-sweet chocolate in a heatproof bowl.
- In a small saucepan, heat the heavy cream over medium heat until it just begins to simmer. Do not boil.
- Pour the hot cream over the chopped chocolate. Let it sit for 2-3 minutes to melt the chocolate. For tips on perfectly melting chocolate, check out this guide.
- Whisk gently until the chocolate is smooth and glossy. Stir in the peppermint extract.
4.4. Step 4: Assemble and Chill
- Once the cookie cups are completely cool, spoon or pipe the chocolate peppermint filling into each cup, filling it almost to the brim.
- Immediately sprinkle the crushed peppermint candies over the top of the chocolate filling.
- Place the filled cookie cups in the refrigerator for at least 30 minutes, or until the chocolate filling has set.
5. Pro Tips and Delicious Variations for Your Cookie Cups
To make your Chocolate Peppermint Cookie Cups even more spectacular, consider these pro tips! Always use good quality chocolate for the filling; it truly makes a difference in flavor and texture. Don’t overbake the cookies, as they will continue to set as they cool, ensuring a perfectly chewy base.
Feeling creative? Try adding a few drops of red food coloring to the chocolate filling for a vibrant pop of color. You could also swirl in a bit of white chocolate or sprinkle with edible glitter for extra sparkle. For a non-peppermint version, skip the peppermint extract and use orange zest or raspberry extract for different festive treats.
6. Serving and Storage Suggestions for Perfect Cookie Cup Enjoyment
These mini desserts are best served chilled or at room temperature. Arrange them on a festive platter for a stunning display at your next holiday gathering. They make fantastic edible gifts, too!
Store leftover Chocolate Peppermint Cookie Cups in an airtight container in the refrigerator for up to 5 days. For longer storage, you can freeze the cookie cups (without the crushed peppermint, if possible) for up to 1 month. Thaw in the refrigerator, then add fresh crushed peppermint before serving. See others recipes here .
7. Chocolate Peppermint Cookie Cups Recipe Card
Yields: 24 mini cookie cups Prep time: 20 minutes Cook time: 10 minutes Chill time: 30 minutes
Ingredients:
- 1/2 cup (113g) unsalted butter, softened
- 1/2 cup (100g) granulated sugar
- 1/4 cup (50g) packed light brown sugar
- 1 large egg
- 1 teaspoon vanilla extract
- 1 1/4 cups (150g) all-purpose flour
- 1/2 cup (45g) unsweetened cocoa powder
- 1/2 teaspoon baking soda
- 1/4 teaspoon salt
- 4 ounces (113g) semi-sweet chocolate, finely chopped
- 1/4 cup (60ml) heavy cream
- 1/2 teaspoon peppermint extract (or to taste)
- 1/2 cup (about 70g) crushed peppermint candies or candy canes, for topping
Instructions:
- Preheat oven to 350°F (175°C). Grease a 24-cup mini muffin tin.
- Cream butter, granulated sugar, and brown sugar until fluffy. Beat in egg and vanilla.
- Whisk flour, cocoa powder, baking soda, and salt. Gradually add to wet ingredients, mixing until just combined.
- Roll dough into 1-inch balls, place in muffin tin. Bake 8-10 minutes. Press centers with a spoon to form cups while warm. Cool completely.
- For filling, place chopped chocolate in a bowl. Heat heavy cream to a simmer, then pour over chocolate. Let sit 2-3 minutes, then whisk until smooth. Stir in peppermint extract.
- Spoon filling into cooled cookie cups. Sprinkle with crushed peppermint candies.
- Refrigerate for at least 30 minutes, or until filling is set.
Foire Aux Questions
Can I make these Chocolate Peppermint Cookie Cups ahead of time?
Absolutely! These cookie cups are an excellent make-ahead dessert. You can prepare them up to 2-3 days in advance and store them in an airtight container in the refrigerator. The flavors often meld even better after a day, making them perfect for holiday party prep.
What if I don’t have a mini muffin tin?
While a mini muffin tin is ideal for the “cup” shape, you can adapt the recipe using a regular-sized muffin tin. The cookies will be larger, so you’ll need to adjust the baking time (likely 10-12 minutes) and you might yield fewer cookie cups. You’ll also want to use a larger spoon or the back of a shot glass to create the indentation.
Can I use different types of chocolate for the filling?
Yes, you can experiment with different chocolates! Dark chocolate will give a more intense, less sweet flavor, while milk chocolate will result in a sweeter, creamier filling. You can also use white chocolate for a striking visual contrast, though you might need to adjust the peppermint extract slightly to match the chocolate’s flavor profile. Always ensure the chocolate is good quality for the best results.