
")
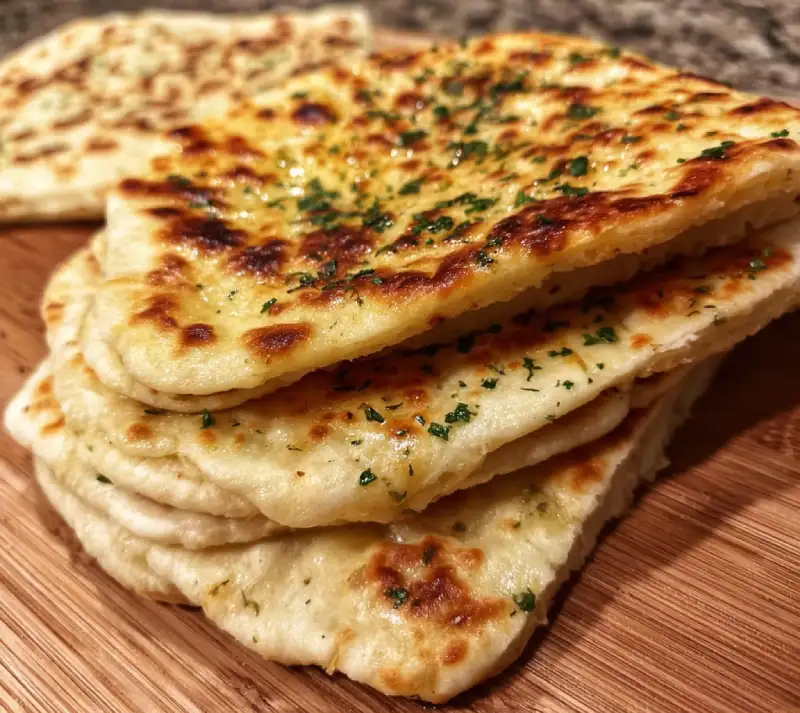
Table of Contents
- My Go-To Greek Yogurt Turkish Flatbread Recipe
- How This Recipe Works: The Science of Soft and Flavorful Flatbread
- Ingredients and Smart Substitutions
- Step-by-Step Instructions: Your Visual Guide to Perfect Flatbread
- Expert Tips for Success Every Time
- What to Serve With Your Greek Yogurt Turkish Flatbread
- Storing and Reheating Your Flatbread
- Frequently Asked Questions About Greek Yogurt Flatbread
My Go-To Greek Yogurt Turkish Flatbread Recipe
Oh, prepare to have your culinary world rocked! This Greek Yogurt Turkish Flatbread isn’t just a recipe; it’s an experience. Imagine sinking your teeth into a warm, pillowy soft flatbread with a delicate chew and a subtle tang that perfectly complements almost any meal. It’s light yet satisfying, and ridiculously versatile. I’ve made countless flatbreads in my kitchen, but this one, my friends, truly stands out from the crowd. If you love baking and are looking for something that’s both impressive and surprisingly easy, you’ve found your next obsession. I promise you’ll be making this on repeat! And for those who are always looking for new and exciting good recipes to try, this is definitely one to add to your repertoire. It’s the kind of comforting, homemade goodness that brings everyone to the table.
Why I Love This Recipe (And You Will Too!)
There’s a special magic in baking bread, and this Greek Yogurt Turkish Flatbread captures it beautifully. It’s incredibly forgiving, making it perfect for both seasoned bakers and complete novices. The texture is what really sets it apart – it’s soft and tender on the inside with just the right amount of golden crust on the outside. Plus, it comes together with minimal fuss, using ingredients you likely already have in your pantry. It’s a fantastic alternative to traditional bread and elevates any meal.
The Magic of Greek Yogurt in Flatbread
Greek yogurt is the secret weapon here! It’s not just for breakfast parfaits. In this flatbread, it contributes to an amazing tenderness, a slight but delightful tang, and also helps the dough stay moist and pliable. It’s that extra special something that makes this Turkish flatbread incredibly flavorful and ensures it doesn’t dry out too quickly.
How This Recipe Works: The Science of Soft and Flavorful Flatbread
Baking is a beautiful blend of art and science, and understanding a little bit of the ‘how’ makes the ‘why’ even more satisfying when your Greek Yogurt Turkish Flatbread comes out perfectly every time.
Achieving That Perfect Chewy Texture
The gentle kneading in this recipe helps to develop the gluten in the flour without overworking it. This gluten structure is what gives our flatbread that characteristic chewiness. The hydration from the water and Greek yogurt plays a crucial role in maintaining elasticity and preventing a dense, brick-like texture.
The Role of Greek Yogurt in the Dough
Beyond flavor, Greek yogurt does wonders for the dough. Its acidity helps to tenderize the gluten, resulting in a softer crumb. The fat content (especially with full-fat yogurt) enriches the dough, making it more pliable and contributing to a moist, rich taste. It’s a true multi-tasker!
Flavor Profile: Mild, Slightly Tangy, and Versatile
The flavor of this Greek Yogurt Turkish Flatbread is wonderfully balanced. It’s not overwhelmingly sour; instead, you get a mild, subtle tang from the yogurt that brightens the overall taste. This makes it incredibly versatile – perfect for soaking up rich stews, accompanying fresh salads, or simply enjoying with a drizzle of olive oil.
Ingredients and Smart Substitutions
Here is what you need and why each ingredient plays a vital role in creating the most delicious Greek Yogurt Turkish Flatbread:
Strong White Bread Flour or All-Purpose Flour: I prefer strong white bread flour for a chewier texture, but good quality all-purpose flour works beautifully too. For something a little lighter, you could try a 50/50 mix with cake flour, but stick to the base for the signature Turkish flatbread feel.
Full-Fat Greek Yogurt: This is a non-negotiable for the best results! The fat contributes to the rich flavor and incredibly tender crumb. While a lower-fat option might work, it won’t yield the same luxurious texture or flavor. Avoid flavored yogurts, obviously!
Active Dry Yeast: This is our leavening agent, responsible for the beautiful rise and airy pockets. You can substitute instant yeast: simply mix it directly with the dry ingredients and skip the activation step by using warm water directly in your mix. Just make sure your yeast isn’t expired!
Warm Water: The goldilocks temperature – not too hot to kill the yeast, not too cold to inhibit its activity. About 105-115°F (40-46°C) is ideal for activating active dry yeast. This is crucial for a good rise!
Olive Oil: Adds a lovely Mediterranean flavor and helps to tenderize the dough, keeping it moist. A good quality extra virgin olive oil will shine through. You can use another mild oil like vegetable or canola in a pinch, but you might miss that signature olive oil richness.
Salt and Sugar: Salt brings out all the flavors and controls yeast activity. Sugar offers a touch of sweetness, balances the tang of the yogurt, and provides food for the yeast, helping it to activate faster and produce a more golden crust.
Optional Add-ins for Extra Flavor: Feel free to get creative! A sprinkle of za’atar, dried oregano, or even some finely chopped fresh herbs like rosemary or thyme can elevate your flatbread to new heights. A dash of garlic powder in the dough is also fantastic!
Step-by-Step Instructions: Your Visual Guide to Perfect Flatbread
Follow these step-by-step instructions to create truly amazing Greek Yogurt Turkish Flatbread. It’s easier than you think!
1. Activate the Yeast: Don’t Skip This Step
In a large bowl, combine the warm water, sugar, and active dry yeast. Give it a gentle stir and let it sit for 5-10 minutes. You should see a foamy layer on top – this means your yeast is alive and ready to work its magic! If it doesn’t foam, your yeast might be old or the water temperature was off; it’s best to start again.
2. Mix the Dough: Developing Gluten
Add the Greek yogurt, olive oil, salt, and half of the flour to the foamy yeast mixture. Mix with a wooden spoon or a stand mixer with a dough hook until just combined. Gradually add the remaining flour, a little at a time, until a shaggy dough forms. Turn the dough out onto a lightly floured surface and knead for 5-7 minutes, or mix in a stand mixer for 4-5 minutes, until the dough is smooth, elastic, and no longer sticky. It should bounce back when gently poked. Be careful not to add too much flour during kneading!
3. First Rise: Creating Air Pockets
Lightly grease a clean bowl with a little olive oil. Place the dough in the bowl, turning it once to coat. Cover the bowl tightly with plastic wrap or a clean kitchen towel. Let the dough rise in a warm, draft-free place for 1 to 1.5 hours, or until it has doubled in size. This slow rise is crucial for developing flavor and texture. On a cold day, I often place my bowl in a slightly warmed (but turned off!) oven.
4. Divide and Shape: Get Even Flatbreads
Gently punch down the risen dough to release the air. Turn it out onto a lightly floured surface and divide it into 6-8 equal pieces (depending on your desired flatbread size). Roll each piece into a smooth ball. Now, gently flatten each ball with your hands or a rolling pin into an oval or round shape, about 1/4 inch thick. Don’t worry about perfection; rustic shapes are charming!
5. Second Rise: The Final Proof
Place the shaped flatbreads on a baking sheet lined with parchment paper, leaving some space between them. Cover loosely with a clean kitchen towel and let them rest for another 15-20 minutes. This short second rise helps them become extra airy and soft when baked.
6. Baking for Golden Perfection
Preheat your oven to 400°F (200°C) with a baking stone or an inverted baking sheet inside, if you have one, to get it piping hot. Carefully transfer the flatbreads to the hot baking surface. Bake for 8-12 minutes, or until puffed up and golden brown on top. They should have lovely charred spots, which add to the flavor. You might need to rotate them halfway through for even baking. For an even crispier exterior, you can brush them lightly with olive oil before baking.
7. Resting: Allowing Flavors to Mingle
Once baked, transfer the flatbreads to a wire rack. While still warm, you can brush them with a little melted butter or olive oil for extra richness and shine. Cover them lightly with a clean towel for a few minutes. This resting period allows the steam to redistribute, keeping them soft and preventing them from drying out too quickly.
Expert Tips for Success Every Time
- Don’t Over-Flour Your Dough: Resist the urge to add too much flour during kneading or shaping. A slightly sticky dough will yield a much softer, more tender flatbread. Use just enough flour to prevent sticking.
- The Importance of Warmth for Rising: Yeast loves warmth! Ensure your rising environment is cozy (around 70-80°F or 21-27°C). A turned-off oven with the light on, or a warm spot near a sunny window, works wonders for a good rise.
- Preheating Your Baking Surface (For Best Results): A preheated baking stone or inverted baking sheet creates a burst of heat when the dough hits it, helping the flatbread puff up beautifully and develop a crispier bottom crust. This is a game-changer!
- Watch for Bubbles, Not Just Color: As your flatbreads bake, they should start to bubble up. These large bubbles indicate that the dough is working its magic! While a golden-brown color is desirable, the puffing is a great indicator of a successful bake.
- Adjusting Baking Time for Your Oven: Every oven is different. Pay attention to your first batch. If they brown too quickly, lower the temperature slightly. If they’re not browning enough, increase it. Get to know your oven!
What to Serve With Your Greek Yogurt Turkish Flatbread
This Greek Yogurt Turkish Flatbread is truly a blank canvas for so many incredible dishes. Its mild, tangy flavor makes it the perfect accompaniment for almost anything!
Dips and Spreads: Hummus, Tzatziki, Baba Ghanoush
Is there anything better than warm flatbread with a creamy dip? It’s a match made in heaven! Serve it with classic hummus, refreshing tzatziki, smoky baba ghanoush, or even a simple olive oil and balsamic vinegar dip.
Grilled Meats and Kebabs
Whether it’s succulent lamb kebabs, chicken shish tawook, or grilled halloumi, this flatbread is perfect for wrapping up all those juicy flavors. It acts as a wonderful absorbent vehicle for marinades and pan juices.
Soups and Stews
Forget the crusty bread; this soft flatbread is ideal for mopping up every last drop of your favorite lentil soup, hearty beef stew, or a fragrant Moroccan tagine. The slight tang cuts through richness beautifully.
Salads and Vegetarian Dishes
Pair it with a fresh, vibrant tabbouleh, a hearty Greek salad, or a plate of roasted vegetables. For a lighter meal, tear pieces of the flatbread and toss them into a panzanella-style salad.
Breakfast and Brunch Ideas
Don’t limit this flatbread to dinner! It’s fantastic for breakfast or brunch. Serve it with eggs, feta cheese, olives, and sliced tomatoes for a traditional Turkish breakfast spread. A smear of cream cheese and a sprinkle of everything bagel seasoning is also surprisingly delicious!
Storing and Reheating Your Flatbread
You’ve put in the effort to make this incredible Greek Yogurt Turkish Flatbread, so let’s make sure it stays delicious for as long as possible!
How to Store Freshly Baked Flatbread
Once completely cooled, store your flatbreads in an airtight container or a large zip-top bag at room temperature for up to 2-3 days. While they are at their absolute best on the day they are baked, they retain their softness well if stored properly.
Best Practices for Freezing Flatbread
This flatbread freezes wonderfully! Once baked and completely cooled, stack the flatbreads with a piece of parchment paper between each one to prevent sticking. Wrap the stack tightly in plastic wrap, then place it in a freezer-safe bag. They will keep in the freezer for up to 2-3 months. Thaw at room temperature for a couple of hours before reheating.
Reheating for Optimal Texture and Flavor
To bring your stored or thawed flatbreads back to life, you have a few options. My favorite method is to quickly warm them in a dry skillet over medium heat for about 30 seconds to 1 minute per side until heated through and slightly pliable. You can also pop them in a preheated 350°F (175°C) oven for 3-5 minutes, or use a toaster oven. Avoid the microwave, as it tends to make them rubbery.
Frequently Asked Questions About Greek Yogurt Flatbread
Can I use regular yogurt instead of Greek yogurt?
Why is my flatbread tough?
How thick should I roll the dough?
Can I make this recipe without yeast?
What’s the best way to get a crispy exterior?
Greek Yogurt Turkish Flatbread
- Total Time: 1 hour 10 minutes
- Yield: 6-8 flatbreads
Description
Unlock the secret to incredibly soft and flavorful flatbread using Greek yogurt. This recipe yields a subtly tangy, tender bread perfect for sopping up dips or accompanying any meal.
Ingredients
- 3 cups (360g) strong white bread flour or all-purpose flour, plus more for dusting
- 1 cup (240g) full-fat Greek yogurt
- 1/2 cup (120ml) warm water (105-115°F / 40-46°C)
- 2 1/4 teaspoons (1 packet) active dry yeast
- 1 tablespoon olive oil, plus more for greasing
- 1 teaspoon salt
- 1 teaspoon granulated sugar
Instructions
- 1. Activate Yeast: In a large bowl, combine warm water, sugar, and yeast. Let sit 5-10 minutes until foamy.
- 2. Mix Dough: Add Greek yogurt, olive oil, salt, and half the flour to the yeast mixture. Mix, then gradually add remaining flour until a shaggy dough forms.
- 3. Knead: Turn dough onto a lightly floured surface and knead for 5-7 minutes until smooth and elastic.
- 4. First Rise: Lightly grease a bowl, place dough in it, turn to coat. Cover and let rise in a warm place for 1-1.5 hours until doubled.
- 5. Divide & Shape: Punch down dough, divide into 6-8 pieces. Roll each piece into a 1/4-inch thick oval or round shape.
- 6. Second Rise: Place shaped flatbreads on parchment-lined baking sheets, cover loosely, and let rest for 15-20 minutes.
- 7. Bake: Preheat oven to 400°F (200°C) with a baking stone or inverted baking sheet. Transfer flatbreads to hot surface and bake for 8-12 minutes until puffed and golden brown.
- 8. Rest: Transfer to a wire rack. Brush with melted butter or olive oil if desired. Cover lightly with a towel for a few minutes before serving.
- Prep Time: 30 mins
- Cook Time: 40 mins