
")
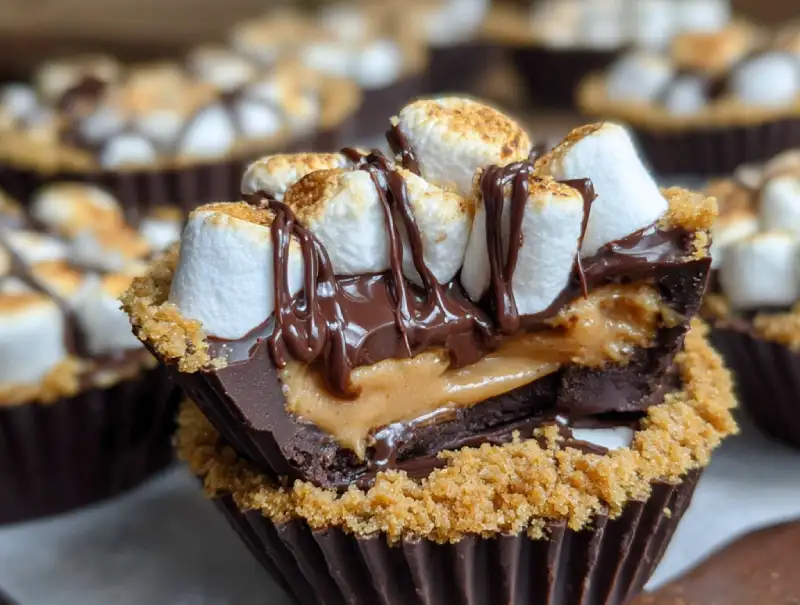
Table of Contents
- Introduction: Your New Favorite S’mores Treat
- How (and Why) These S’mores Peanut Butter Cups Work
- Ingredients and Smart Substitutions
- Step-by-Step: Crafting Your S’mores Peanut Butter Cups
- Pro Tips for S’mores Peanut Butter Cup Success
- What to Serve With Your S’mores Peanut Butter Cups
- Storing and Reheating Your Sweet Treats
- S’mores Peanut Butter Cups: Your Questions Answered
Introduction: Your New Favorite S’mores Treat
Imagine sinking your teeth into a rich, decadent chocolate shell, giving way to a creamy, dreamy peanut butter filling, studded with crunchy graham cracker pieces, and topped with a perfectly toasted marshmallow. That, my friends, is the magic of these S’mores Peanut Butter Cups. They are the ultimate union of two beloved treats, delivering an explosion of sweet, salty, crunchy, and chewy all in one glorious bite. If you’re a s’mores fanatic or a peanut butter cup devotee, prepare to have your taste buds absolutely blown away. I’ve taken the nostalgic flavors of a campfire classic and elevated them into a sophisticated, yet incredibly easy-to-make dessert that will have everyone begging for the recipe. You can See more good recipes here , but trust me, this one is a game-changer.
My journey to the perfect S’mores Peanut Butter Cup began with a craving. I adore both s’mores and peanut butter cups, and one evening, as I pondered my next dessert creation, a lightbulb moment occurred: why not combine them? It took a few attempts to get the ratios just right – ensuring the graham cracker layer had enough crunch without being too dense, perfecting the peanut butter filling’s consistency, and achieving that ideal toasted marshmallow top without melting everything beneath it. But after much delicious experimentation, I’ve finally cracked the code, and I’m beyond excited to share this masterpiece with you.
How (and Why) These S’mores Peanut Butter Cups Work
Layered Texture Perfection: Crunchy, Creamy, Chewy
What sets these S’mores Peanut Butter Cups apart is the incredible symphony of textures. You get the initial snap of the chocolate, the velvety smoothness of the peanut butter, the joyful crunch of the graham cracker, and the soft, slightly gooey chew of the toasted marshmallow. Each layer contributes to an experience that’s anything but one-note.
Flavor Fusion: The Classic S’mores Experience, Elevated
We’re not just adding peanut butter to s’mores; we’re meticulously crafting a flavor profile where each component shines while contributing to the overall harmony. The salty peanut butter cuts through the sweetness, the graham cracker adds an earthy, biscuity note, and the toasted marshmallow brings that quintessential campfire finish. It’s truly the classic s’mores, but with a gourmet twist.
No-Bake Simplicity, Big Flavor Impact
While these cups look incredibly impressive, the vast majority of the work is no-bake, making them accessible to even the most novice bakers. The biggest challenge is patience while they chill – but trust me, it’s worth it for the big flavor payoff and clean results.
Ingredients and Smart Substitutions
The Chocolate Layer: Why High-Quality Matters
Chocolate Melting Wafers or High-Quality Chocolate Chips: For the best results, use good quality melting wafers (like Ghirardelli or Guittard) or chopping up a good baking bar. They melt smoothly and set up beautifully, giving you that satisfying snap. Regular chocolate chips can work but often contain stabilizers that make them harder to achieve a super smooth melt, and they may be less stable at room temperature. King Arthur Baking has some great tips on choosing the right chocolate.
The Peanut Butter Filling: Creamy vs. Crunchy, Your Choice
Creamy Peanut Butter: I recommend classic creamy peanut butter (like Jif or Skippy) for the smoothest, most indulgent filling. Natural peanut butter can be used, but it might result in a slightly greasier filling and a different texture due to oil separation. Avoid chunky for the filling itself, as we’re adding graham cracker crunch separately.
Graham Cracker Crunch: The Key to S’mores Authenticity
Graham Cracker Crumbs: These are non-negotiable for that authentic s’mores experience! You can buy pre-crushed crumbs or crush your own in a food processor or by hand in a bag with a rolling pin. They provide essential texture and flavor.
Marshmallow Fluff: Stability and Sweetness
Marshmallow Fluff (or Creme): This is crucial for the top layer. Unlike regular marshmallows, fluff holds its shape beautifully when toasted and provides that gooey, sweet finish without melting away into nothing. It’s much easier to work with in this context than trying to melt and shape individual marshmallows.
Butter and Shortening: The Role in Texture
Unsalted Butter: Essential for both the chocolate mixture (to help with smoothness and setting) and the peanut butter filling (for richness and binding). Always use unsalted to control the salt content. You can always add more salt if you like a saltier peanut butter flavor.
Vegetable Shortening (optional, for chocolate coating): A small amount can be added to your melting chocolate to make it silkier and easier to work with, resulting in a thinner, snappier shell. It’s not strictly necessary if you’re using high-quality melting wafers, but it’s a good trick for chocolate chips or baking bars.
Step-by-Step: Crafting Your S’mores Peanut Butter Cups
1. Prep Your Muffin Tin
Line a standard 12-cup muffin tin with paper or foil cupcake liners. Foil liners tend to peel away more cleanly from chocolate, but paper will also work. Spraying them lightly with non-stick spray, even if you use foil, can help ensure they release effortlessly.
2. Melt Your Chocolate Base
In a microwave-safe bowl, combine your chocolate melting wafers (or chopped chocolate) with a tablespoon of butter (and optional shortening). Microwave on 50% power in 30-second intervals, stirring well after each, until smooth and completely melted. Alternatively, use a double boiler over simmering water for a more controlled melt. Pour about 1-2 tablespoons of melted chocolate into the bottom of each lined cup and spread it lightly up the sides with the back of a spoon. Pop the tin in the fridge for 10-15 minutes to set.
3. Mix the Peanut Butter Filling
While the chocolate is chilling, combine the creamy peanut butter, powdered sugar, graham cracker crumbs, and softened butter in a medium bowl. Mix until well combined and a thick, pliable dough forms. If it’s too sticky, add a little more powdered sugar; if too dry, add a tiny bit more melted butter or a splash of milk. You want it to be firm enough to roll.
4. Assemble the Layers
Remove the chilled chocolate shells from the fridge. Take spoonfuls of the peanut butter mixture and roll them into small balls, then gently flatten them into disks about 1 inch smaller than the diameter of your cupcake liners. Place one peanut butter disk into each chocolate cup, pressing down gently. Pour another light layer (about 1-2 teaspoons) of melted chocolate over the peanut butter disks, just enough to seal the filling. Return to the fridge for another 15-20 minutes to set.
5. The Marshmallow Topping
Once the cups are firm, remove them from the fridge. Spoon a generous dollop of marshmallow fluff on top of each cup, creating a nice dome. Now for the fun part! You can either use a kitchen torch to gently toast the marshmallow tops until golden brown, or place the muffin tin under a broiler for about 30 seconds to 1 minute, watching constantly to prevent burning. The broiler method is quick, but easy to overdo, so keep a very close eye! Let them cool slightly before serving for the marshmallow to set a bit more.
Pro Tips for S’mores Peanut Butter Cup Success
- Temperature Control: Avoiding Seizing Chocolate: Always melt chocolate gently. Overheating chocolate will cause it to seize and become grainy. If using a microwave, always use 50% power and stir frequently. If using a double boiler, ensure the water does not touch the bottom of the bowl containing the chocolate, and avoid any steam or water droplets getting into the chocolate.
- Peanut Butter Consistency: Tips for a Smooth Fill: Make sure your butter for the peanut butter filling is softened, not melted. This helps create a smooth, rollable dough. If your peanut butter mixture is too crumbly, add a tiny bit more melted butter; if too sticky, add a touch more powdered sugar.
- Toasting Marshmallows: Broiler vs. Torch Method: A kitchen torch offers the most control for toasting marshmallows evenly and beautifully. If using a broiler, place the rack on the highest setting, and keep the oven door ajar so you can watch closely. Marshmallows can go from perfectly golden to burnt in seconds! Rotate the pan if needed to ensure even toasting.
- Chilling Time: The Secret to Clean Cups: Don’t rush the chilling! Adequate chilling time between layers and for the final set is crucial for the cups to firm up properly, allowing for easy removal from the liners and a clean, defined appearance.
What to Serve With Your S’mores Peanut Butter Cups
Coffee and Hot Chocolate Pairings
These S’mores Peanut Butter Cups are incredibly rich, making them perfect companions for a warm beverage. A strong, dark roast coffee will balance the sweetness beautifully, cutting through the richness with its bold flavors. For a truly indulgent treat, pair them with a creamy hot chocolate, perhaps even one spiked with a hint of vanilla or peppermint. The cocoa notes will complement the chocolate and marshmallow effortlessly.
Ice Cream & Dessert Board Additions
Consider serving these cups alongside a scoop of vanilla bean ice cream or a scoop of coffee-flavored ice cream for an extra layer of decadence. They also make a show-stopping addition to any dessert board. Arrange them with fresh berries, other small cookies, and perhaps some candied nuts for a visually stunning and delicious spread that caters to all tastes.
Storing and Reheating Your Sweet Treats
Fridge vs. Freezer Storage Best Practices
These S’mores Peanut Butter Cups are best stored in an airtight container in the refrigerator for up to a week. The chill helps them maintain their shape and firmness. If you want to make them further in advance or keep them for longer, they freeze exceptionally well. Place them in a single layer on a baking sheet to freeze solid, then transfer them to an airtight freezer-safe container or bag for up to 2-3 months. Separating layers with parchment paper can prevent them from sticking together.
Bringing Them to Room Temp (or Enjoying Them Cold)
While delicious eaten straight from the fridge (the chocolate will have a satisfying snap!), many prefer them at a slightly softer, room-temperature consistency. If you’ve refrigerated them, let them sit out for 15-20 minutes before serving. If frozen, thaw them in the refrigerator overnight or at room temperature for an hour or so. You can give the marshmallow topping a quick re-toast with a kitchen torch if you want that fresh gooeyness, but it’s not essential.
S’mores Peanut Butter Cups: Your Questions Answered
Can I use different types of chocolate?
How do I prevent the graham cracker layer from getting soggy?
Can these be made ahead of time?
Is there a gluten-free option for graham crackers?
S’mores Peanut Butter Cups
- Total Time: 35 minutes
- Yield: 12 cups
Description
These S’mores Peanut Butter Cups are an irresistible blend of classic s’mores and creamy peanut butter cups. Layers of rich chocolate, salty-sweet peanut butter, crunchy graham cracker, and toasted marshmallow create an unforgettable treat.
Ingredients
- 1¾ cups (about 10 oz) high-quality chocolate melting wafers or chopped chocolate
- 2 tbsp unsalted butter, divided
- 1 tsp vegetable shortening (optional, for chocolate)
- 1 cup creamy peanut butter (Jif, Skippy recommended)
- ½ cup powdered sugar
- ½ cup graham cracker crumbs
- 1 cup marshmallow fluff (or marshmallow creme)
Instructions
- Line a 12-cup standard muffin tin with paper or foil cupcake liners.
- Melt 1.5 cups of chocolate wafers with 1 tbsp butter and optional shortening using a double boiler or 50% power in the microwave, stirring until smooth.
- Spoon 1-2 tbsp melted chocolate into each liner, spreading up the sides. Chill for 10-15 minutes until set.
- In a mixing bowl, combine peanut butter, powdered sugar, graham cracker crumbs, and remaining 1 tbsp softened butter. Mix until a firm, pliable dough forms.
- Roll peanut butter mixture into 12 disks and place one into each chilled chocolate cup, pressing gently.
- Melt the remaining ¼ cup chocolate wafers. Drizzle 1-2 tsp over each peanut butter disk to seal. Chill for 15-20 minutes until firm.
- Remove cups from the fridge. Top each with a generous dollop of marshmallow fluff.
- Using a kitchen torch or broiler (watching carefully!), toast the marshmallow tops until golden brown.
- Let cool for a few minutes before serving, or chill until ready to enjoy.
- Prep Time: 30 mins
- Cook Time: 5 mins