
")
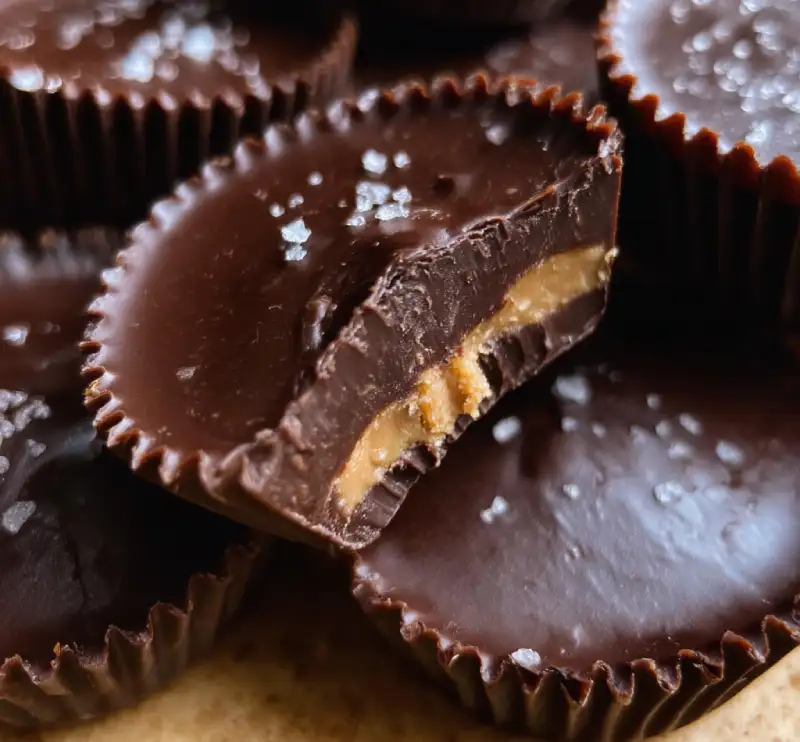
Dark chocolate Reese’s. Just the words conjure up images of a rich, deeply satisfying treat that perfectly balances salty peanut butter with luscious, bittersweet chocolate. Imagine biting into a perfectly formed cup, the dark chocolate shell snapping delicately, giving way to a velvety smooth, melt-in-your-mouth peanut butter filling. It’s a symphony of textures and flavors that’s intensely gratifying and utterly irresistible. This isn’t just a recipe; it’s an experience – a journey to crafting the ultimate homemade version of everyone’s favorite candy, only better. And trust me, once you taste these homemade beauties, there’s no going back to the store-bought kind. For more easy recipes that deliver on taste and texture, see more easy recipes and dive into a world of delicious possibilities right in your own kitchen.
Table of Contents
- The Ultimate Dark Chocolate Reese’s: A Homemade Treat
- How This Recipe Works: Achieving Perfect Texture and Flavor
- Ingredients and Smart Substitutions
- How to Make Dark Chocolate Reese’s
- Expert Tips for Success
- What to Serve With Your Dark Chocolate Reese’s
- Storing and Reheating Your Homemade Treats
- Dark Chocolate Reese’s FAQ
The Ultimate Dark Chocolate Reese’s: A Homemade Treat
There’s something inherently magical about homemade treats, and these dark chocolate Reese’s are no exception. While the classic store-bought cups hold a special place in our hearts, crafting them at home allows for an unparalleled level of quality and customization. You control the ingredients, ensuring pure, rich flavors without any artificial additives. The difference is truly remarkable – a more intense chocolate experience, a creamier, more authentic peanut butter filling, and a freshness that simply can’t be replicated. My journey to perfecting this recipe began years ago, driven by a yearning for that perfect balance of bittersweet chocolate and salty peanut. After countless experiments and adjustments, I finally landed on a method that consistently delivers the ideal texture and flavor, elevating the humble peanut butter cup to gourmet status. Get ready to impress yourself and everyone you share these with!
How This Recipe Works: Achieving Perfect Texture and Flavor
- Balanced Sweetness and Bitterness: By using quality dark chocolate (60-75% cacao), we achieve a sophisticated bitterness that perfectly counteracts the sweetness of the peanut butter filling, creating a harmonious flavor profile that’s never cloying.
- Irresistibly Creamy Peanut Butter Filling: The combination of creamy peanut butter, powdered sugar, and a touch of butter ensures a super smooth, decadent filling that practically melts in your mouth, avoiding any dry or crumbly textures.
- Snappy Dark Chocolate Shell: Proper melting and chilling techniques result in a firm, glossy dark chocolate shell that creates a satisfying snap with every bite, characteristic of a high-quality chocolate confection.
- Effortless No-Bake Simplicity: This recipe is a dream for bakers and non-bakers alike! With no oven required, it relies on simple melting, mixing, and chilling, making it accessible and enjoyable to create.
Ingredients and Smart Substitutions
Here is what you need and why:
Quality Dark Chocolate (60-75% cacao): This is the star of our dark chocolate Reese’s! Opt for a good quality bar or baking chocolate. The higher cacao percentage provides that delightful bittersweet contrast to the peanut butter. Avoid chocolate chips if possible, as they often contain stabilizers that prevent smooth melting. My go-to is often Ghirardelli or Guittard baking bars.
Creamy Peanut Butter (natural vs. processed): For the best texture, I highly recommend using a smooth, creamy, processed peanut butter like Jif or Skippy. Natural peanut butter, while healthier, often separates and can make the filling too oily or crumbly. If you insist on natural, make sure it’s well stirred and drain off any excess oil.
Powdered Sugar: Also known as confectioners’ sugar, this ingredient is crucial for the creamy, non-gritty texture of the peanut butter filling. Granulated sugar would leave the filling grainy. There’s no good substitute for this if you want that classic smooth texture.
Unsalted Butter (softened): A small amount of butter adds richness and helps bind the peanut butter filling together, contributing to its luscious mouthfeel. Make sure it’s softened to room temperature for easy incorporation. You can use salted butter, but then omit the pinch of sea salt.
Optional: Pure Vanilla Extract: Just a dash of vanilla enhances all the other flavors, adding a subtle warmth and aroma to the peanut butter filling. Use a good quality pure vanilla for the best results.
Optional: A pinch of fine sea salt: If your peanut butter isn’t very salty, a tiny pinch of sea salt in the filling helps to cut through the sweetness and really makes the peanut flavor pop, a signature of authentic peanut butter cups.
How to Make Dark Chocolate Reese’s
Follow these step-by-step photos:
1. Prepare Your Molds
Line a mini cupcake pan with mini paper liners. This recipe typically yields around 18-24 mini cups, so have enough liners ready. These liners make the finished dark chocolate Reese’s incredibly easy to remove and handle.
2. Melt the Dark Chocolate
Chop your dark chocolate into small, even pieces. This helps it melt more evenly. Create a double boiler by setting a heatproof bowl over a saucepan of simmering water, ensuring the bottom of the bowl doesn’t touch the water. Add about two-thirds of your chopped chocolate to the bowl. Stir constantly until smooth and fully melted. Remove from heat and stir in the remaining one-third of chopped chocolate until completely smooth. This tempering-like technique helps create a glossy, snappable shell. Ensure the chocolate doesn’t get too hot; ideal melting temperature for dark chocolate is around 115-120°F (46-49°C). Learn more about melting chocolate properly here.
3. Create the Peanut Butter Filling
In a medium bowl, combine the creamy peanut butter, powdered sugar, softened butter, and optional vanilla extract and sea salt. Mix with a spoon or electric mixer on low speed until thoroughly combined and smooth. The mixture should be thick, pliable, and easy to roll. If it’s too sticky, add a tiny bit more powdered sugar. If too dry, add a touch more melted butter or peanut butter.
4. Layering: Chocolate Base, Peanut Butter, and Chocolate Top
Spoon approximately 1 teaspoon of melted dark chocolate into the bottom of each mini cupcake liner. Gently tap the pan on the counter a few times to spread the chocolate evenly and release any air bubbles. Then, take small pieces of the peanut butter mixture (about 1 teaspoon), roll them into a ball, and gently flatten them into a disk that fits inside the chocolate base. Place the peanut butter disk on top of the chocolate. Finally, spoon about 1-2 teaspoons of the remaining melted chocolate over the peanut butter layer, spreading gently to cover it completely. Lightly tap the pan again to settle the chocolate.
5. Chilling for Setting
Once all your cups are assembled, transfer the mini cupcake pan to the refrigerator. Chill for at least 30-60 minutes, or until the dark chocolate Reese’s are completely firm and the chocolate has set. This ensures a clean release from the liners and a firm, snappy texture to the chocolate shell.
Expert Tips for Success
- Don’t overheat your chocolate: Overheated chocolate will become thick, grainy, and difficult to work with. Use a double boiler and remove it from the heat as soon as it’s mostly melted, allowing residual heat to finish the job.
- Achieve smooth peanut butter filling: Ensure your butter is truly softened to room temperature. This will help it cream effortlessly with the peanut butter and powdered sugar, preventing a lumpy or crumbly filling.
- Thin chocolate layers are key: You want enough chocolate to form a sturdy shell, but not so much that it overwhelms the peanut butter. Aim for thin, even layers on the bottom and top for the best balance.
- Patience during chilling: Rushing the chilling process means your peanut butter cups might not set properly, making them difficult to handle and prone to melting quickly. Give them ample time in the fridge!
- Use mini cupcake liners for easy removal: While you can grease a mini muffin tin, liners make for quick, mess-free removal and are perfect for serving and gifting your beautiful dark chocolate Reese’s.
What to Serve With Your Dark Chocolate Reese’s
These homemade dark chocolate Reese’s are truly a treat on their own, but pairing them can elevate the experience even further. Imagine one alongside a steaming cup of freshly brewed coffee or a rich, dark espresso – the slight bitterness of the coffee perfectly complements the chocolate. For a classic pairing, a tall, cold glass of milk is always a winner, especially since it brings back that nostalgic, childhood comfort. And for an extra decadent dessert, try crumbling a few over a scoop of vanilla bean ice cream; the contrast of cold ice cream and the rich chocolate-peanut butter will be absolutely heavenly.
Storing and Reheating Your Homemade Treats
To keep your homemade dark chocolate Reese’s at their best, store them in an airtight container in the refrigerator. They will last beautifully for up to 2-3 weeks. The cold helps maintain the chocolate’s snap and prevents the peanut butter from becoming too soft. For longer storage, you can freeze them for up to 2-3 months. Place them in a single layer on a baking sheet to freeze solid, then transfer them to a freezer-safe airtight container or bag. When you’re ready to enjoy them, it’s best to bring them to room temperature for about 15-20 minutes before serving. This allows the chocolate to soften just slightly and the peanut butter filling to become wonderfully creamy again, enhancing their texture and flavor.
Dark Chocolate Reese’s FAQ
Can I use milk chocolate instead?
How do I prevent the chocolate from seizing?
What if my peanut butter filling is too crumbly?
How long do these last?
Homemade Dark Chocolate Reese’s
- Total Time: 20 minutes
- Yield: 24 mini cups
Description
Craft truly irresistible dark chocolate peanut butter cups at home with this easy no-bake recipe. Enjoy the perfect balance of bittersweet chocolate and creamy, salty peanut butter.
Ingredients
- 12 oz (340g) Quality Dark Chocolate (60-75% cacao), chopped
- 1 cup (250g) Creamy Peanut Butter (processed type recommended)
- 1 cup (120g) Powdered Sugar
- 4 tbsp (56g) Unsalted Butter, softened
- 1 tsp Pure Vanilla Extract (optional)
- Pinch of fine sea salt (optional)
Instructions
- Prepare Liners: Line a mini cupcake pan with 24 mini paper liners.
- Melt Chocolate: Melt 2/3 of the chopped dark chocolate using a double boiler method until smooth. Remove from heat, stir in remaining chocolate until fully melted and glossy.
- Make Filling: In a bowl, combine peanut butter, powdered sugar, softened butter, and optional vanilla and sea salt. Mix until smooth and pliable.
- Layer Cups: Spoon 1 tsp melted chocolate into each liner. Tap pan gently. Flatten 1 tsp of peanut butter filling into a disk and place on chocolate. Top with 1-2 tsp more melted chocolate.
- Chill to Set: Refrigerate for 30-60 minutes, or until firm. Bring to room temperature before serving for best texture.
- Prep Time: 20 mins
- Cook Time: 0 mins