
")
Ever craved that ultimate crunch, followed by a burst of savory, perfectly seasoned chicken, all wrapped in a golden tortilla? Folks, you’ve landed in the right spot! Today, we’re diving into the absolute magic of homemade Crispy Chicken Taquitos. Forget those soggy, bland frozen versions; we’re talking about a flavor explosion that’s surprisingly easy to achieve right in your own kitchen. There’s something incredibly satisfying about biting into a perfectly crisp taquito, and trust me, your family (and your taste buds!) will thank you. If you’re looking for more delicious dinner ideas, See more good recipes here!
Table of Contents
Make Crispy Chicken Taquitos at Home
Why bake these taquitos now? Because life is too short for boring meals, and these Crispy Chicken Taquitos are a game-changer! They bridge the gap between delicious homemade comfort food and quick, satisfying weeknight dinners. They’re perfect for a casual family meal, impressive enough for guests, and an absolute hit for game day. My journey to the perfect crispy taquito involved a lot of trial and error (and a few less-than-crispy attempts!). I experimented with frying, air frying, and baking, and I’ve finally landed on a baking method that guarantees that glorious crunch without the mess and extra oil of frying. It’s a method that truly delivers on its promise of perfectly Crispy Chicken Taquitos every time.
Why This Crispy Chicken Taquito Recipe Works
- Golden, crunchy exterior, every time: My secret baking technique ensures a consistently crispy shell without deep-frying.
- Juicy, seasoned chicken filling: We’re talking tender, flavorful chicken that’s anything but dry or bland.
- Minimal prep, maximum flavor: This recipe streamlines the process, so you get incredible taste without spending hours in the kitchen.
- Perfect for weeknights or gatherings: Quick enough for a busy evening, but easily scaleable for a crowd.
Ingredients & Smart Substitutions
Here is what you need and why:
Chicken: For convenience, I often use pre-cooked, shredded chicken (rotisserie chicken is amazing here!). If cooking from scratch, boneless, skinless chicken breasts or thighs work beautifully. Boil or pan-fry them until cooked, then shred using two forks or a stand mixer with the paddle attachment for super fast shredding. Dark meat yields a juicier filling, but white meat is leaner.
Tortillas: Corn tortillas are traditional for taquitos and deliver the best crispiness and authentic flavor. They can be prone to cracking, so we’ll have a trick for that! While flour tortillas can be used, they generally result in a chewier, less shatteringly crisp texture. For an incredibly comprehensive guide on all things tortillas, check out this fabulous resource from King Arthur Baking.
Cheese: I love using a blend like Monterey Jack, cheddar, or a Mexican blend. Their melting properties are fantastic, creating that gooey, delicious interior. Feel free to experiment with pepper jack for a little kick!
Seasonings: Chili powder, cumin, smoked paprika, garlic powder, onion powder, and a dash of cayenne pepper are my go-tos. These build layers of rich, complex, and slightly smoky flavor. Adjust to your spice preference!
Oil: A light coating of olive oil or avocado oil is crucial for achieving that golden, crispy exterior in the oven. It helps conduct heat and creates a beautiful browning effect.
How to Make These Crispy Chicken Taquitos
Follow these step-by-step photos:
1. Make the Chicken Filling
In a large bowl, combine your shredded cooked chicken with all the seasonings (chili powder, cumin, smoked paprika, garlic powder, onion powder, salt, and pepper). Mix well to ensure the chicken is evenly coated. Next, stir in about half of the shredded cheese. The cheese will melt during baking, helping to bind the filling together and add incredible flavor.
2. Prep Tortillas for Rolling
This is a critical step for preventing cracks! Lightly dampen 6-8 corn tortillas at a time. The easiest way is to wrap them in a damp paper towel and microwave for about 20-30 seconds, or quickly dip them in warm water. They should be pliable, not soggy. Keep remaining tortillas warm by placing them back into the damp towel or a tortilla warmer while you roll.
3. Rolling Techniques for Tight Taquitos
Take one warm, flexible tortilla. Place about 1-2 tablespoons of the chicken and cheese filling in a line just off-center, leaving about a half-inch margin on each side. Don’t overfill! Too much filling makes them hard to roll tightly and prone to bursting. Starting from the edge closest to you, roll the tortilla up as tightly as possible. A tight roll is key to keeping the filling secure and achieving maximum crispiness.
4. Baking for Ultimate Crispiness
Preheat your oven to 400°F (200°C). Lightly brush each rolled taquito with olive oil – this is your secret weapon for that beautiful golden-brown crisp! Place the taquitos seam-side down on a baking sheet lined with parchment paper. Ensure they are in a single layer and not touching, allowing air to circulate around them. Bake for 20-25 minutes, flipping halfway through, until they are gloriously golden brown and crispy.
Expert Tips for Success
- Don’t overfill: A common mistake! Stick to 1 to 2 tablespoons of filling per tortilla to prevent bursting and ensure a tight roll.
- Brush with oil for extra crisp: Don’t skip the oil! It’s essential for achieving that restaurant-quality golden-brown crust in the oven.
- Bake in a single layer: Crowding the baking sheet steams the taquitos instead of baking them, preventing crispiness. Use multiple sheets if necessary.
- Achieve even browning: Flipping the taquitos halfway through the baking process ensures both sides get beautifully crispy and golden.
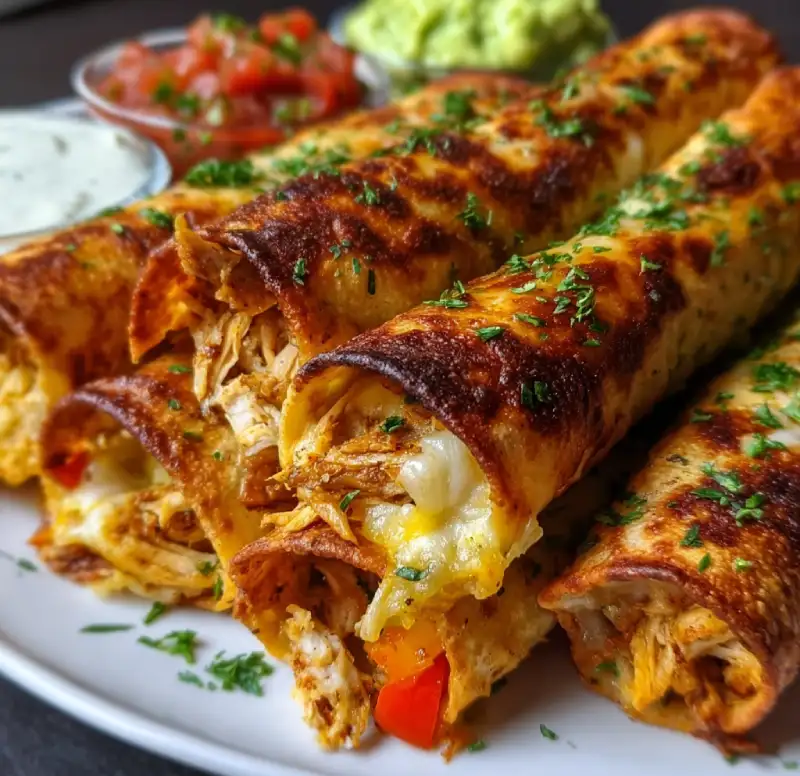
What to Serve With Crispy Chicken Taquitos
- Classic dips: Guacamole, salsa (verde or rojo!), sour cream, or a creamy avocado ranch dressing are absolute musts.
- Fresh sides: A simple fresh pico de gallo, a vibrant corn and black bean salad, or a refreshing cucumber-lime salad complement the richness of the taquitos beautifully.
- Hearty accompaniments: If you’re making it a bigger meal, consider a side of Mexican rice or refried beans.
Storing & Reheating Your Taquitos
Leftover Crispy Chicken Taquitos can be stored in an airtight container in the refrigerator for up to 3-4 days. For longer storage, you can freeze them! Arrange cooled taquitos in a single layer on a baking sheet and freeze until solid, then transfer to a freezer-safe bag or container. They’ll keep for up to 2-3 months. To reheat, place them on a baking sheet and warm them in a preheated oven at 375°F (190°C) for about 10-15 minutes (longer if frozen), or until heated through and crispy again. The objective is always to restore that glorious crunch!
Frequently Asked Questions
Can I use rotisserie chicken?
What if my tortillas break?
Can I air fry these taquitos?
How do I make them spicy?
Crispy Baked Chicken Taquitos
- Total Time: 45 minutes
- Yield: 18-24 taquitos
Description
Achieve ultimate crispiness with these oven-baked chicken taquitos. Filled with a savory, seasoned chicken and cheese mixture, they’re perfect for any occasion.
Ingredients
- 2 cups cooked chicken, shredded
- 1 teaspoon chili powder
- 1/2 teaspoon ground cumin
- 1/2 teaspoon smoked paprika
- 1/4 teaspoon garlic powder
- 1/4 teaspoon onion powder
- Salt and black pepper to taste
- 1 cup shredded Monterey Jack or Mexican blend cheese, divided
- 18–24 corn tortillas
- 3 tablespoons olive oil, divided
Instructions
- Make the Chicken Filling: In a large bowl, combine shredded chicken, chili powder, cumin, smoked paprika, garlic powder, onion powder, salt, and pepper. Mix well. Stir in 1/2 cup of shredded cheese.
- Prepare Tortillas: Wrap 6-8 corn tortillas in a damp paper towel and microwave for 20-30 seconds, or quickly dip in warm water, until pliable. Keep unused tortillas warm.
- Roll Taquitos: Place 1-2 tablespoons of filling in a line just off the center of a warm tortilla. Roll the tortilla up tightly, starting from the edge closest to you.
- Arrange and Bake: Preheat oven to 400°F (200°C). Lightly brush each rolled taquito with olive oil and place seam-side down on a parchment-lined baking sheet.
- Bake for Crispiness: Bake for 20-25 minutes, flipping halfway through, until golden brown and crispy. Serve immediately with your favorite dips.
- Prep Time: 20 mins
- Cook Time: 25 mins