
")
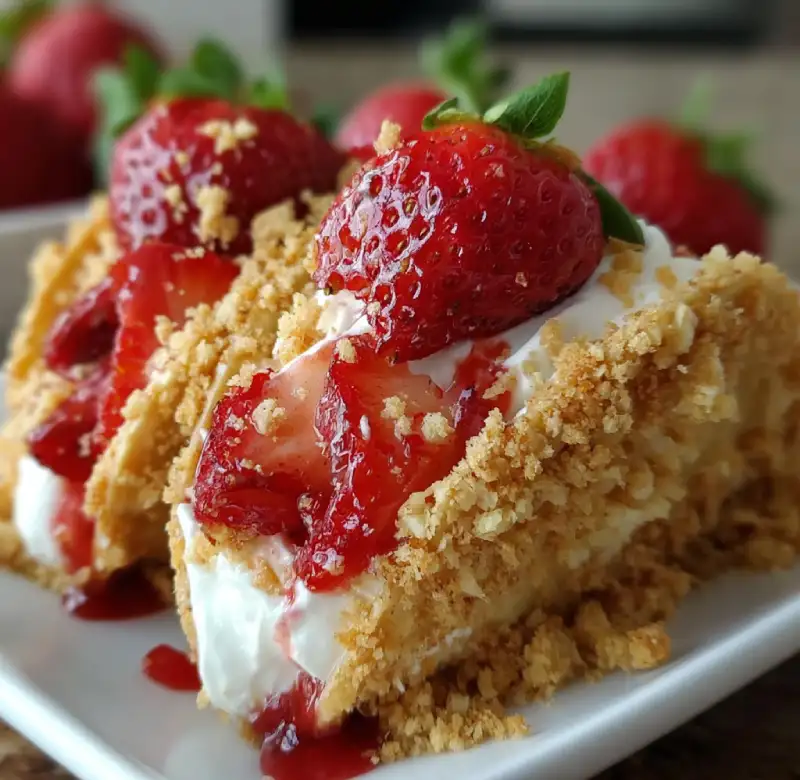
Table of Contents
- Why This Irresistible Strawberry Crunch Cheesecake Taco Recipe Works
- Ingredients and Smart Substitutions for Your Strawberry Crunch Cheesecake Tacos
- Step-by-Step Instructions: Crafting Your Strawberry Crunch Cheesecake Tacos
- Expert Tips for Success with Strawberry Crunch Cheesecake Tacos
- What to Serve With Strawberry Crunch Cheesecake Tacos
- Storing and Reheating Your Strawberry Crunch Cheesecake Tacos
- Frequently Asked Questions About Strawberry Crunch Cheesecake Tacos
Oh, prepare your taste buds for an adventure! Imagine the creamy, decadent richness of cheesecake, nestled inside a delightfully crispy, sweet strawberry-infused shell, delivering an explosion of texture and flavor in every single bite. That’s exactly what you get with these irresistible Strawberry Crunch Cheesecake Tacos. They’re a playful, portable, and utterly delicious twist on dessert that’s guaranteed to be a showstopper at any gathering. The contrast between the crunchy exterior and the smooth, tangy filling is truly a match made in dessert heaven. If you’re looking for unique and easy-to-follow recipes that deliver big on flavor, you’ve come to the right place. See more easy recipes and let your baking journey begin!
Why This Irresistible Strawberry Crunch Cheesecake Taco Recipe Works
- Unbeatable Texture Contrast: We’ve perfected the balance between a super crispy, sweet strawberry crunch shell and a lusciously smooth, creamy cheesecake filling that melts in your mouth.
- Achievable Elegance: This recipe delivers a sophisticated dessert experience with surprisingly simple steps, making it perfect for both novice and experienced bakers.
- Flavor Harmony: The natural tang of the cheesecake filling beautifully cuts through the sweetness of the strawberry crunch, creating a perfectly balanced profile that keeps you coming back for more.
- Customizable Fun: While incredible as is, this recipe is a fantastic canvas for your creativity, allowing for easy substitutions and personal touches.
Ingredients and Smart Substitutions for Your Strawberry Crunch Cheesecake Tacos
Here is what you need and why:
Cream Cheese (Full-Fat for Creaminess): This is the heart of your cheesecake filling! Using full-fat cream cheese is absolutely essential for achieving that signature rich, dense, and ultra-creamy texture. Lower-fat versions often result in a watery or less luxurious filling, so don’t skimp here!
Powdered Sugar (Smoothness, No Graininess): Unlike granulated sugar, powdered sugar (confectioners’ sugar) dissolves effortlessly into the cream cheese, ensuring your filling is incredibly smooth and velvety, without any unwanted grainy texture. It’s key for that luxurious mouthfeel.
Heavy Cream (Whip for Stability): When whipped, heavy cream transforms into a light, airy, and stable cloud that adds volume and lightness to your cheesecake filling. It helps stabilize the mixture and provides an ethereal quality that balances the richness of the cream cheese. Make sure it’s very cold for optimal whipping!
Vanilla Extract (Flavor Enhancer): A pure vanilla extract is not just a flavor; it’s a foundation. It enhances and deepens the overall sweetness and creaminess of the cheesecake filling, providing a warm, aromatic backdrop. Don’t skip a good quality vanilla for the best results!
Golden Oreos (Shell Base): These iconic cookies are the secret to our incredible taco shells! Their buttery vanilla flavor and crisp texture provide the perfect base for the strawberry crunch. If you can’t find Golden Oreos, vanilla wafers or shortbread cookies make excellent substitutes, offering a similar sweetness and crunch. Just ensure they’re finely crushed.
Freeze-Dried Strawberries (Natural Color/Flavor): For an intense, vibrant strawberry punch and beautiful natural color without adding excess moisture, freeze-dried strawberries are a must. They pulverize easily and blend seamlessly into your crunch. A less ideal, but still viable, substitute could be strawberry Jell-O powder mixed with a little less butter, though this will result in a more artificial flavor and color.
Melted Butter (Binder for Crunch): Butter is the magical binder that brings your Golden Oreo and freeze-dried strawberry crumbles together to form a cohesive, yet still crunchy, texture. It imparts a rich flavor and helps the crunch stick to the white chocolate coating.
White Chocolate (Coating for Shell): This creates the sturdy, yet delicious, shell that holds your cheesecake filling. When melted and cooled, it forms a protective barrier for the cookie shell and provides an extra layer of sweetness. Use a good quality white chocolate baking bar or chips for the best melting and setting properties. For high-quality chocolate, I love Guittard or Valrhona, but even Ghirardelli chips work great. King Arthur Baking has some excellent resources on working with chocolate!
Step-by-Step Instructions: Crafting Your Strawberry Crunch Cheesecake Tacos
Follow these step-by-step photos:
1. Prepare the Strawberry Crunch Topping
First, let’s create that signature strawberry crunch! In a food processor, finely crush your Golden Oreos until they resemble coarse crumbs. Then, add the freeze-dried strawberries and pulse until combined and the strawberries are also finely ground. Melt your butter and pour it over the crumb mixture, stirring until everything is evenly moistened. Spread this delicious crumb mixture onto a baking sheet lined with parchment paper and chill in the refrigerator for at least 15-20 minutes. This helps the butter set and keeps the crunch nice and crisp.
2. Make the Cheesecake Filling
In a large mixing bowl, ensure your full-fat cream cheese is at room temperature – this is key for a lump-free filling! Beat the softened cream cheese with an electric mixer on medium speed until it’s completely smooth and creamy. Gradually add the powdered sugar, mixing until just combined and smooth. In a separate, very cold bowl, whip the heavy cream until stiff peaks form. Gently fold the whipped cream into the cream cheese mixture along with the vanilla extract until just incorporated. Be careful not to overmix, as this can deflate the mixture. You want a light, yet rich and fluffy filling!
3. Form the Taco Shells
Melt your white chocolate gently, either in a microwave in 30-second intervals (stirring well after each) or over a double boiler. Once smooth, take a handful of your chilled strawberry crunch and press it into a thin, even layer within the well of a taco mold or a tortilla warmer. Alternatively, you can shape it over tented aluminum foil to create the taco shape. You want the shell to be substantial enough to hold the filling but not overly thick. Once shaped, dip the outer side of each shell into the melted white chocolate, ensuring it’s fully coated. Let any excess chocolate drip off, then place them back into the mold or over the foil to set in the refrigerator for at least 30 minutes, or until firm.
4. Assemble the Tacos
Once your white chocolate-coated taco shells are firm and cold, it’s assembly time! Carefully remove the shells from their molds. Using a piping bag (with a star tip for a fancy look, or just a snipped corner for ease) or a spoon, generously fill each taco shell with your creamy cheesecake filling. Don’t be shy! Finish by sprinkling extra strawberry crunch topping over the filling and on the edges of the taco shells for maximum visual appeal and flavor. Chill the assembled tacos for at least another 30 minutes to allow the filling to set thoroughly and the flavors to meld beautifully. This step is crucial for stability and taste!
Expert Tips for Success with Strawberry Crunch Cheesecake Tacos
- Cream Cheese at Room Temperature: This cannot be stressed enough! Cold cream cheese will inevitably lead to a lumpy filling. Take it out of the fridge at least an hour before you plan to mix.
- Chill Time is Crucial: Patience is your friend here! Chilling both the crunch mixture and the assembled tacos ensures everything sets properly, giving you that perfect crispy shell and firm, yet creamy, filling. Don’t rush it!
- Don’t Overmix Cheesecake Filling: Once the powdered sugar is incorporated, mix the cream cheese and whipped cream gently. Overmixing can incorporate too much air, leading to a less dense and potentially unstable filling.
- Shaping Taco Shells: If you don’t have dedicated taco molds, a tortilla warmer or even simply draping a piece of parchment-lined aluminum foil over an oven rack can wonderfully create that signature taco curve. Get creative with what you have!
- Quality Ingredients Matter: Especially for the white chocolate and vanilla extract. Better quality ingredients will yield a significantly better flavor profile in your final product.
What to Serve With Strawberry Crunch Cheesecake Tacos
While these irresistible Strawberry Crunch Cheesecake Tacos are a stand-alone dessert sensation, a few accompaniments can truly elevate the experience.
- Fresh Berries: A scattering of fresh sliced strawberries, blueberries, or raspberries alongside provides a vibrant burst of natural fruitiness and a lovely color contrast.
- Whipped Cream: A dollop of freshly made whipped cream, perhaps infused with a hint of vanilla or a touch of a complementary liqueur, adds an extra layer of cloud-like decadence.
- Mint Sprigs: A few delicate mint sprigs not only add a pop of green and a sophisticated touch for presentation but also provide a refreshing aromatic counterpoint to the sweetness.
- Iced Coffee or Light Tea: For a perfect pairing, serve them with a cold brew, an iced latte, or a light berry-infused iced tea. The bitterness or refreshing quality can balance the sweetness beautifully.
Storing and Reheating Your Strawberry Crunch Cheesecake Tacos
Keeping your irresistible Strawberry Crunch Cheesecake Tacos fresh for as long as possible is key to enjoying their full deliciousness!
- Refrigeration: The best way to store these tacos is in an airtight container in the refrigerator. They will remain wonderfully fresh for up to 3 days. Be aware that over time, the ‘crunch’ in the shell might soften slightly due to the moisture from the cheesecake filling. For optimal crunch, enjoy them within 24 hours.
- Freezing: Unfortunately, freezing is not recommended for optimal texture. The dairy in the cheesecake filling can separate and become grainy once thawed, and the crispy taco shell will likely become soggy and lose its delightful crunch. These are definitely best enjoyed fresh!
Frequently Asked Questions About Strawberry Crunch Cheesecake Tacos
Can I make these ahead of time?
How do I prevent the shells from breaking?
What if I don’t have taco molds?
Can I use other types of cookies for the shell?
Why did my cheesecake filling turn out runny?
Irresistible Strawberry Crunch Cheesecake Tacos
- Total Time: 30 minutes
- Yield: 12 tacos
Description
These delightful tacos combine a creamy, tangy cheesecake filling with a crispy, sweet strawberry-infused shell for an explosion of flavor and texture. Perfect as a unique and delicious dessert for any occasion.
Ingredients
- 16 oz (2 blocks) full-fat cream cheese, softened
- 1 cup powdered sugar
- 1 cup heavy cream, very cold
- 1 tsp vanilla extract
- 1 (14.3 oz) package Golden Oreos, finely crushed
- 1 cup freeze-dried strawberries, finely crushed
- 1/2 cup unsalted butter, melted
- 12 oz good quality white chocolate, melted
Instructions
- Prepare the Strawberry Crunch Topping: In a food processor, combine crushed Golden Oreos and freeze-dried strawberries. Pulse until finely ground. Mix in melted butter until moistened. Spread on a parchment-lined baking sheet and chill for 15-20 minutes.
- Make the Cheesecake Filling: Beat softened cream cheese until smooth. Gradually add powdered sugar, mixing until smooth. In a separate bowl, whip cold heavy cream to stiff peaks. Gently fold whipped cream and vanilla extract into the cream cheese mixture until just combined.
- Form the Taco Shells: Melt white chocolate. Press a portion of the chilled strawberry crunch into taco molds (or shape over tented foil) to form a shell. Dip the outer side of each shell into melted white chocolate, letting excess drip. Place back into molds/foil and chill for at least 30 minutes until firm.
- Assemble the Tacos: Carefully remove shells from molds. Fill each shell with cheesecake filling using a piping bag or spoon. Sprinkle generously with extra strawberry crunch topping. Chill for at least 30 minutes before serving to allow filling to set.
- Prep Time: 30 mins
- Cook Time: 0 mins