
")
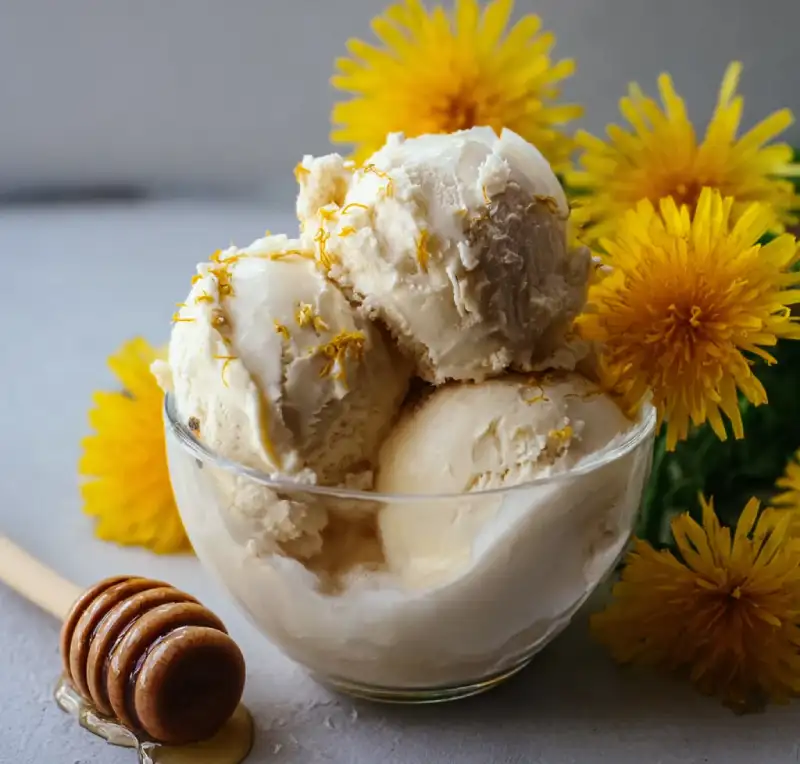
Table of Contents
- Intro: My Foraging Adventure & This Unique Ice Cream
- How This Recipe Works: The Science of Creamy Dandelion Goodness
- Ingredients and Smart Substitutions: Why Each Component Matters
- Step-by-Step Instructions: Your Visual Guide to Dandelion Ice Cream
- Expert Tips for Success: Achieve Perfect Dandelion Ice Cream Every Time
- What to Serve With Dandelion & Honey Ice Cream
- Storing Dandelion & Honey Ice Cream: Keep it Fresh
- Dandelion & Honey Ice Cream FAQ: Your Questions Answered
Intro: My Foraging Adventure & This Unique Ice Cream
Imagine a scoop of ice cream that tastes like a warm spring day, a delicate balance of floral sweetness with a hint of nature’s wild side. That’s exactly what you’ll find in my Dandelion & Honey Ice Cream! My journey to creating this unique dessert started with a simple walk through a sun-drenched field. I’ve always been fascinated by edible flowers, and dandelions, often dismissed as weeds, held a particular intrigue. Could I transform these ubiquitous yellow blooms into something truly extraordinary?
After much experimentation, I discovered that dandelions, when handled correctly, infuse a beautifully subtle, honey-like flavor into a creamy base that is absolutely divine. This recipe isn’t just about making ice cream; it’s about embracing ingredients found right outside our doors and turning them into unexpected culinary delights. Prepare to be surprised and delighted by the silky smooth texture and the ethereal, earthy-sweet notes of this homemade treat. It’s a revelation, and you won’t believe you’re eating dandelions! For more easy recipes that turn the ordinary into extraordinary, see more easy recipes.
How This Recipe Works: The Science of Creamy Dandelion Goodness
Creating this Dandelion & Honey Ice Cream is more than just mixing ingredients; it’s about understanding how each component contributes to its magic.
- Floral Infusion Mastery: We carefully extract the delicate dandelion essence, ensuring a pure, non-bitter floral note that truly shines. This isn’t just dandelions; it’s the soul of spring in every bite.
- Honey’s Dual Role: Beyond just sweetness, honey acts as a natural emulsifier, contributing to the ice cream’s incredible creaminess and helping prevent crystallization, giving it that perfect scoopable texture.
- Balanced Bitterness: Through precise harvesting and preparation, we eliminate the dandelion’s natural bitterness, leaving only its pleasant, unique flavor profile to complement the sweetness of the honey.
- Effortless Richness: Whether you opt for a no-churn method or an ice cream maker, the carefully crafted base guarantees a luxurious, velvety texture that rivals any gourmet ice cream.
Ingredients and Smart Substitutions: Why Each Component Matters
Here is what you need and why:
Fresh dandelion petals: These are the star of our show! It’s crucial to source them from an unsprayed area, far from roadsides. The key is to separate the yellow petals from the green base (the ‘calyx’) immediately upon harvesting. The green parts contain latex that can impart a bitter flavor. Aim for tightly packed cups of petals for the best infusion.
Heavy cream and whole milk: This combination provides the perfect fat content for richness and a smooth, luxurious mouthfeel. Heavy cream alone can be too rich, while too much milk might lead to an icier texture. For a dairy-free alternative, you can substitute full-fat coconut cream and a plant-based milk (like oat or cashew milk), ensuring they have a good fat content to maintain creaminess.
Honey: This isn’t just a sweetener; it’s a flavor enhancer and texture improver. Local honey will offer a unique terroir, while a wildflower honey might bring more complex floral notes. Honey helps lower the freezing point, contributing to a softer, more scoopable ice cream. For a different flavor profile, you could experiment with maple syrup, but be aware it will change the overall taste and potentially the texture slightly.
Egg yolks (for custard base): If you opt for a traditional custard base, egg yolks are essential emulsifiers. They create an incredibly smooth, rich ice cream by binding water and fat, preventing ice crystals. Tempering them correctly is vital to avoid scrambled eggs! For an egg-free version, consider using cornstarch or arrowroot powder as a thickener in a hot-infused base, though the texture will be slightly different.
Granulated sugar: While honey provides sweetness, a touch of granulated sugar ensures the right balance and helps with the overall texture. The combination prevents the ice cream from becoming overly sweet or too firm. Adjust to your preference, keeping in mind honey is sweeter than sugar. Learn more about baking with honey here!
Vanilla extract: A classic flavor enhancer, vanilla brings warmth and depth to the floral and honey notes. Use a good quality pure vanilla extract for the best results. Vanilla bean paste can also be an excellent substitute for a more pronounced vanilla flavor.
Pinch of salt: Often overlooked, a tiny pinch of salt elevates all the other flavors, making the honey and dandelion notes pop. It balances the sweetness beautifully.
Potential substitutions: As mentioned, for dairy-free, use full-fat coconut cream and plant milk. For alternative sweeteners, consult guides on how they affect ice cream texture, as they can sometimes lead to icier results.
Step-by-Step Instructions: Your Visual Guide to Dandelion Ice Cream
Follow these step-by-step photos:
1. Gather and Prepare Your Petals
Head to your unsprayed garden or a natural area away from roads. Pick dandelions that are fully open and vibrant. Immediately upon bringing them inside, carefully pluck only the yellow petals from the green base. This step is crucial to avoid bitterness. You should aim for about 1 cup of tightly packed yellow petals.
2. Infuse the Cream Base with Dandelion Flavor
In a saucepan, combine the heavy cream, milk, and your prepared dandelion petals. Heat this mixture gently over medium-low heat until it just begins to simmer around the edges – do not boil. Remove from heat, cover, and let it steep for at least 1-2 hours, or even better, refrigerate overnight for a stronger infusion. Strain the petals out, pressing lightly to extract all liquid, and discard the petals.
3. Make the Custard Base (Traditional Method)
In a separate bowl, whisk together the egg yolks, sugar, and salt until pale and slightly thickened. Reheat the dandelion-infused cream mixture over medium-low heat. Slowly drizzle about half a cup of the warm cream into the egg yolk mixture, whisking constantly to temper the eggs. Pour the tempered egg mixture back into the saucepan with the remaining cream. Stir constantly over medium-low heat until the custard thickens enough to coat the back of a spoon (about 175°F/80°C). Do not let it boil.
4. Chill Thoroughly
Stir in the honey and vanilla extract into your custard base. Pour the mixture through a fine-mesh sieve into a clean bowl set over an ice bath. Stir occasionally until completely cool, then cover and refrigerate for at least 4 hours, or preferably overnight. A well-chilled base makes for the creamiest ice cream.
5. Churn and Freeze
Once your base is thoroughly chilled, pour it into your ice cream maker and churn according to the manufacturer’s instructions. This usually takes about 20-30 minutes, until it reaches the consistency of soft-serve. Transfer the churned ice cream to an airtight container and freeze for at least 4-6 hours to full harden before serving. If you’re doing a no-churn version, fold the chilled infused cream base (sweetened with honey and vanilla) with whipped heavy cream until just combined, then freeze.
Expert Tips for Success: Achieve Perfect Dandelion Ice Cream Every Time
- Harvesting Dandelions: Always pick dandelions in the morning after the dew has dried and the flowers are fully open. Choose flowers from areas that are pesticide-free and away from roadsides to ensure purity and safety.
- Avoiding Bitterness is Key: The green part of the dandelion contains a milky sap that is bitter. Meticulously remove every single green bit from the yellow petals. Even a little green can impart an unwanted bitter taste.
- Don’t Rush the Infusion: For the most pronounced dandelion flavor, a longer steeping time for your petals in the warm milk and cream base is beneficial. Overnight chilling in the refrigerator for the infusion works wonders.
- Thoroughly Chill the Base: This is non-negotiable for creamy ice cream! An adequately chilled base (4 hours to overnight) will churn into a smoother, less icy final product. Warm bases lead to larger ice crystals.
- Adjust Sweetness Carefully: Taste your base mixture before churning. Dandelions can vary slightly in their subtle flavor, and your preferred honey might be sweeter or less sweet. Adjust the granulated sugar incrementally if needed.
What to Serve With Dandelion & Honey Ice Cream
This unique Dandelion & Honey Ice Cream is versatile! Its delicate flavor pairs beautifully with:
- Complementary Desserts: A light lemon almond cake, a simple shortbread cookie, or even a fresh berry tart will highlight its subtle floral notes without overpowering them.
- Syrups and Sauces: A simple drizzle of warm honey, a fresh berry compote (raspberry or blueberry works wonderfully), or a swirl of apricot preserves can add another layer of sweetness and complexity.
- Drinks: Serve alongside a fragrant herbal tea (like chamomile or mint), a delicate sparkling wine, or even a glass of chilled elderflower cordial for a truly botanical experience.
Storing Dandelion & Honey Ice Cream: Keep it Fresh
To enjoy your homemade Dandelion & Honey Ice Cream at its best, proper storage is essential.
- Proper Storage Containers: Transfer the churned ice cream into a shallow, airtight container. This minimizes exposure to air and helps prevent ice crystals. Stainless steel or glass containers with tight-fitting lids are excellent choices.
- Preventing Ice Crystals: Press a piece of parchment paper or plastic wrap directly onto the surface of the ice cream before securing the lid. This creates a barrier against freezer burn and ice crystal formation.
- Shelf Life: Homemade ice cream, unlike commercial varieties, doesn’t contain stabilizers. For the best flavor and texture, aim to consume your Dandelion & Honey Ice Cream within 1-2 weeks. After that, the texture may start to degrade slightly, though it will still be safe to eat for up to a month.
Dandelion & Honey Ice Cream FAQ: Your Questions Answered
Is it safe to eat dandelions?
Can I make this recipe vegan?
Do I need an ice cream maker?
How to fix bitter ice cream?
Dandelion & Honey Ice Cream
- Total Time: 45 minutes
- Yield: 1 Quart
Description
Indulge in a unique homemade ice cream blending the subtle floral notes of dandelions with the sweet richness of honey. This recipe creates a surprisingly delicious and creamy dessert, turning garden ‘weeds’ into a gourmet treat.
Ingredients
- 1 cup fresh dandelion petals (yellow parts only, tightly packed)
- 1 ½ cups heavy cream
- 1 cup whole milk
- ¼ teaspoon salt
- 3 large egg yolks
- ½ cup granulated sugar
- ½ cup honey (local or wildflower)
- 1 teaspoon pure vanilla extract
Instructions
- Carefully pull only the yellow petals from the green base of fresh dandelions. Discard all green parts to avoid bitterness.
- In a medium saucepan, combine the heavy cream, whole milk, and dandelion petals. Heat over medium-low heat until steam rises and small bubbles form around the edges; do not boil. Remove from heat, cover, and let steep for at least 1 hour, or refrigerate overnight for a stronger flavor.
- Strain the cream mixture through a fine-mesh sieve, pressing lightly on the petals to extract all liquid. Discard the petals. Return the infused cream to the saucepan and add the salt.
- In a separate bowl, whisk together the egg yolks and granulated sugar until pale yellow.
- Reheat the infused cream over medium-low heat until warm. Slowly ladle about ½ cup of the warm cream into the egg yolk mixture, whisking constantly to temper the yolks. Pour the tempered yolk mixture back into the saucepan with the remaining cream.
- Cook over medium-low heat, stirring constantly with a rubber spatula, until the custard thickens to coat the back of a spoon (about 175°F/80°C). Do not let it boil.
- Remove from heat and stir in the honey and vanilla extract.
- Pour the custard through a fine-mesh sieve into a clean bowl set over an ice bath. Stir occasionally until completely cool. Cover and refrigerate for at least 4 hours, or preferably overnight, to ensure it is thoroughly chilled.
- Pour the chilled custard into your ice cream maker and churn according to the manufacturer’s instructions until it reaches the consistency of soft-serve.
- Transfer the churned ice cream to an airtight freezer-safe container. Press a piece of parchment paper or plastic wrap directly onto the surface of the ice cream before sealing with a lid. Freeze for at least 4-6 hours, or until firm, before serving.
- Prep Time: 30 mins (plus steeping)
- Cook Time: 15 mins