
")
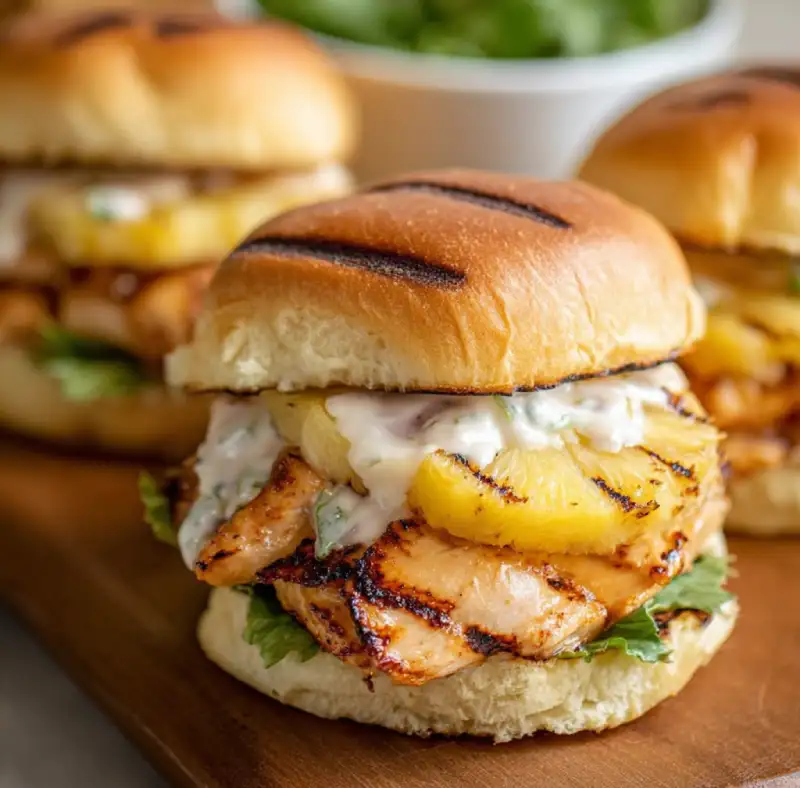
Table of Contents
- Intro: Your New Favorite Weeknight Meal
- How This Recipe Works: Flavor & Texture Unpacked
- Ingredients and Substitutions: The Why Behind Each Choice
- Step-by-Step Instructions: Your Visual Guide to Perfection
- Expert Tips for Success: Elevate Your Sandwich Game
- What to Serve With Your Hawaiian Chicken Sandwiches
- Storing and Reheating Grilled Hawaiian Chicken Sandwiches
- FAQs About Grilled Hawaiian Chicken Sandwiches
Intro: Your New Favorite Weeknight Meal
Imagine biting into a sandwich that immediately transports you to a sun-drenched beach, the flavors doing a joyful hula on your taste buds. That’s exactly what you get with these Grilled Hawaiian Chicken Sandwiches. Each bite offers an incredible medley of juicy, tender chicken, perfectly charred pineapple, sweet and savory teriyaki goodness, and melty cheese, all nestled in a toasted bun. The combination of textures—the slight chew of the chicken, the crispness of the pineapple, and the soft resilience of the bun—is nothing short of spectacular. This isn’t just a meal; it’s an experience, a mini-vacation for your palate. If you’re looking for more easy recipes that deliver big on flavor, be sure to See more easy recipes right here on our site!
I still remember the first time I truly perfected this recipe. It was a scorching summer evening, and I was determined to create something that felt both indulgent and incredibly fresh for a backyard gathering. After a few tweaks to the marinade and grilling technique, that first bite was pure magic. The reaction from friends confirmed it: this wasn’t just a good sandwich; it was a game-changer. And now, I’m thrilled to share my tried-and-true method with you, so you can create your own magical meal moments.
How This Recipe Works: Flavor & Texture Unpacked
- Juicy, tender chicken every time: Our special marinade penetrates deep, ensuring every piece of chicken is infused with flavor and stays incredibly moist, even when grilled to perfection.
- The perfect balance of sweet and savory: The teriyaki provides that rich, umami depth, while the pineapple juice and grilled pineapple bring a natural sweetness and tang, creating a harmonious flavor profile that’s truly irresistible.
- Crisp pineapple and toasted buns: Grilling the pineapple caramelizes its sugars, giving it a delightful char and intensifying its sweetness. And don’t underestimate the power of a perfectly toasted bun – it adds essential texture and holds everything together beautifully.
- Quick Prep, Big Flavor: Despite tasting incredibly gourmet, this recipe is designed for ease, with most of the work being passive marinating time and quick grilling.
Ingredients and Substitutions: The Why Behind Each Choice
Here is what you need and why:
Chicken – Thighs vs. Breasts: For ultimate juiciness and flavor, I nearly always recommend boneless, skinless chicken thighs. They stand up well to grilling and are incredibly forgiving. If you prefer chicken breasts, opt for thinner cutlets or pound them to an even thickness (about 1/2-inch) to ensure even cooking and prevent drying out. Both are delicious, but thighs are truly superior here.
Marinade Essentials – Teriyaki, Pineapple Juice, Ginger, Garlic: This is where the magic happens! A good quality teriyaki sauce (I like one with lower sodium) forms the base. Pineapple juice not only helps tenderize the chicken but also amplifies that tropical flavor. Fresh grated ginger and minced garlic add essential aromatic depth. For a quick shortcut, you can use pre-minced ginger and garlic, or even a good quality teriyaki marinade that already incorporates these flavors. Just ensure your teriyaki isn’t overly sugary or salty; balance is key!
Grilled Pineapple – Fresh vs. Canned: Fresh pineapple, cut into 1/2-inch thick rings, is my top choice. When grilled, it caramelizes beautifully, developing a smoky sweetness that’s unmatched. If fresh isn’t available or convenient, canned pineapple rings (packed in juice, not syrup) can be used. Just pat them very dry before grilling to get a nice char.
Cheese – Provolone, Muenster, or Monterey Jack: We want a good melter here! Provolone offers a mild, slightly nutty flavor and melts wonderfully. Muenster is another fantastic option, known for its smooth texture and creamy melt. Monterey Jack is classic for its mild flavor and excellent melting properties. Avoid anything too strong that would overpower the delicate Hawaiian flavors.
Buns – Brioche, Kaiser, or Hawaiian Rolls: The bun is the vehicle! Brioche buns are fantastic for their rich, buttery flavor and soft texture. Kaiser rolls offer a bit more chew and substance if you prefer a heartier sandwich. And, of course, authentic Hawaiian sweet rolls (King’s Hawaiian are a popular choice, see this Food Network recipe for a homemade version) are perfect for reinforcing the theme with their delightful sweetness. Whatever you choose, toasting is absolutely non-negotiable for texture and flavor!
Optional Toppings – Red Onion, Lettuce, Mayo: These are your personalized touches. Thinly sliced red onion adds a sharp, fresh bite. Crisp lettuce (like butter lettuce or romaine) provides a cool contrast. A simple smear of mayonnaise on the bun adds creaminess. Feel free to get creative here!
Step-by-Step Instructions: Your Visual Guide to Perfection
Follow these step-by-step instructions for the best Grilled Hawaiian Chicken Sandwiches:
1. Marinating the chicken: Don’t skip this!
Place chicken thighs or breasts in a shallow dish or a zip-top bag. In a bowl, whisk together the teriyaki sauce, pineapple juice, grated ginger, and minced garlic. Pour the marinade over the chicken, making sure it’s fully coated. Seal the bag or cover the dish and refrigerate for at least 30 minutes, or ideally 2-4 hours. You can even marinate it overnight for maximum flavor!
2. Grilling the chicken: Achieving those perfect marks
Preheat your grill to medium-high heat (about 400-450°F or 200-230°C). Lightly oil the grates. Remove the chicken from the marinade, letting any excess drip off (do not wipe off all the marinade). Place the chicken on the hot grill. Cook chicken breasts for 4-6 minutes per side, and chicken thighs for 5-7 minutes per side, or until internal temperature reaches 165°F (74°C) with an instant-read thermometer. Look for beautiful grill marks and a nicely charred exterior. Transfer the cooked chicken to a clean plate and tent loosely with foil to rest for 5-10 minutes. This is crucial for juiciness!
3. Grilling the pineapple: Sweet and smoky char
While the chicken rests (or immediately after removing it), place the pineapple rings directly on the grill grates. Grill for 2-3 minutes per side, until they develop nice caramelization and visible grill marks. The sugars will intensify, and the pineapple will become delightfully sweet and slightly smoky.
4. Toasting the buns: The final touch
Slice your buns in half. Lightly butter the cut sides (or brush with a little olive oil). Place them cut-side down on the grill for 1-2 minutes, or until lightly golden brown and toasted. Watch carefully, as they can burn quickly!
5. Assembling your sandwiches: Layering for success
On the bottom toasted bun, spread a thin layer of mayonnaise if desired. Place a piece of grilled chicken on top. Then, add a slice of cheese. Top the cheese with one or two grilled pineapple rings. Add any optional toppings like red onion or lettuce. Finally, crown it with the top bun and serve immediately!
Expert Tips for Success: Elevate Your Sandwich Game
- Don’t overcrowd the grill: Give each piece of chicken and pineapple enough space on the grates. Overcrowding lowers the grill temperature and leads to steaming rather than searing, preventing those beautiful grill marks.
- Pat chicken dry before grilling: While you want the marinade on the chicken, gently patting off excess liquid (not too much!) helps achieve a better sear and prevents the chicken from sticking.
- Rest the chicken for juiciness: After grilling, always allow the chicken to rest for 5-10 minutes under foil. This allows the juices to redistribute throughout the meat, keeping it incredibly tender and moist.
- Prevent cheese from sliding off: Place the cheese on the hot chicken immediately after it comes off the grill. The residual heat will melt it perfectly. If adding to the sandwich on a plate, the cheese will melt just from the heat of the chicken and pineapple.
- Clean your grill grates: Start with clean, oiled grates to prevent sticking and ensure even cooking. This also helps in achieving those desirable grill marks.
What to Serve With Your Hawaiian Chicken Sandwiches
These Grilled Hawaiian Chicken Sandwiches are hearty enough to be a meal on their own, but they pair beautifully with a variety of sides:
- Classic potato or pasta salad: A creamy, cool side provides a lovely contrast to the warm sandwich.
- Simple green salad: A light, crisp salad with a vinaigrette dressing offers a refreshing balance.
- Coleslaw: The crunch and tanginess of coleslaw are a fantastic complement.
- Sweet potato fries: For an extra touch of sweetness and a satisfying crunch, sweet potato fries are an excellent choice.
Storing and Reheating Grilled Hawaiian Chicken Sandwiches
To best preserve the quality and flavor of your Grilled Hawaiian Chicken Sandwiches, it’s best to store and reheat components separately and assemble fresh:
- Separating ingredients for best storage: Store any leftover cooked chicken, grilled pineapple, cheese, and buns in separate airtight containers in the refrigerator for up to 3 days. This prevents the buns from getting soggy and maintains the texture of each component.
- Reheating chicken for optimal texture: To reheat the chicken, you can gently warm it in a skillet over medium-low heat with a splash of water or broth, or in the microwave (being careful not to overcook and dry it out).
- Assembling fresh if possible: For the best experience, re-toast buns and warm the chicken and pineapple, then assemble your sandwich fresh. This ensures crisp buns and warm, melty cheese every time, giving you that ‘just made’ taste.
Frequently Asked Questions
Can I bake or pan-fry the chicken?
Can I make this ahead of time?
What if I don’t have a grill?
Is this recipe kid-friendly?
Grilled Hawaiian Chicken Sandwiches
- Total Time: 35 minutes
- Yield: 4 servings
Description
Create the best grilled Hawaiian chicken sandwiches with this easy-to-follow, step-by-step recipe for amazing flavor. This dish combines juicy, marinated chicken with sweet grilled pineapple and melty cheese for a tropical delight.
Ingredients
- 4 boneless, skinless chicken thighs (or 2 chicken breasts, pounded thin)
- 1/2 cup teriyaki sauce
- 1/4 cup pineapple juice
- 1 tablespoon fresh grated ginger
- 2 cloves garlic, minced
- 4 pineapple rings, 1/2-inch thick (fresh or canned, patted dry)
- 4 slices Provolone, Muenster, or Monterey Jack cheese
- 4 brioche, Kaiser, or Hawaiian sweet buns
- Optional: Mayonnaise, red onion (thinly sliced), lettuce leaves
- Olive oil or butter, for buns and grates
Instructions
- 1. Marinate the Chicken: In a shallow dish or zip-top bag, combine chicken, teriyaki sauce, pineapple juice, ginger, and garlic. Marinate for at least 30 minutes, up to 4 hours in the refrigerator.
- 2. Grill the Chicken: Preheat grill to medium-high (400-450°F). Lightly oil grates. Remove chicken from marinade, letting excess drip off. Grill chicken thighs 5-7 minutes per side, or breasts 4-6 minutes per side, until internal temperature reaches 165°F (74°C). Transfer to a plate, tent with foil, and rest for 5-10 minutes.
- 3. Grill the Pineapple: Place pineapple rings on the hot grill. Grill for 2-3 minutes per side until caramelized with grill marks.
- 4. Toast the Buns: Slice buns in half. Lightly butter or oil cut sides. Place cut-side down on the grill for 1-2 minutes until lightly golden brown.
- 5. Assemble Sandwiches: Spread mayonnaise on bottom bun if desired. Layer with grilled chicken, cheese, grilled pineapple, and any optional toppings. Top with the other half of the bun and serve immediately.
- Prep Time: 15 mins
- Cook Time: 20 mins