
")
Cheesy Loaded Hashbrown Bites: Delicious Recipe
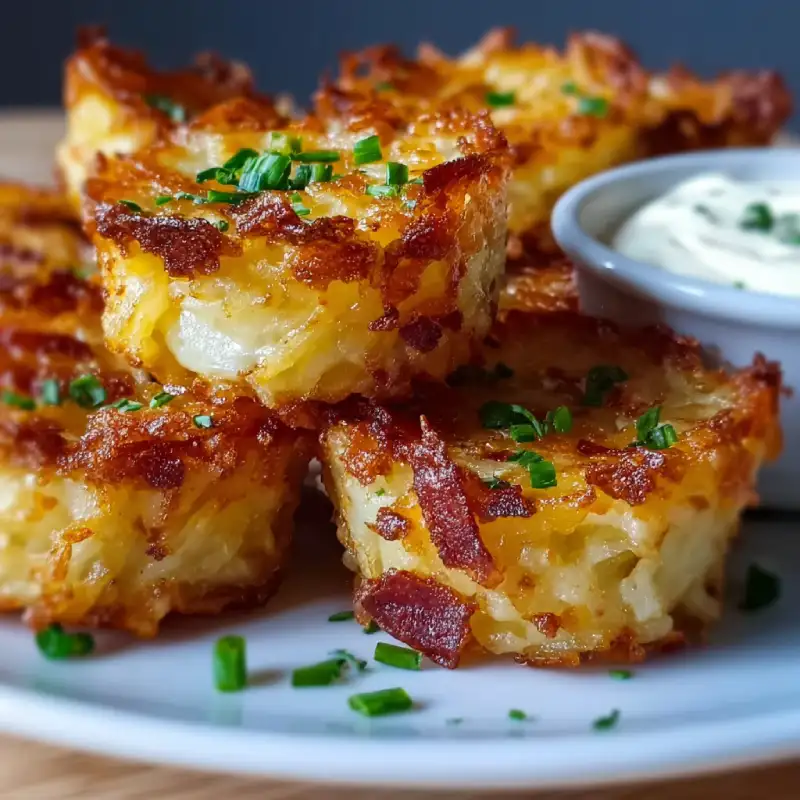
Imagine a bite-sized explosion of crispy potato, savory bacon, sharp cheddar, and fresh scallions, all held together in a perfectly golden package. That’s exactly what you get with these cheesy Loaded Hashbrown Bites! They are the ultimate crowd-pleaser, delivering an irresistible combination of textures—a gloriously crispy exterior that gives way to a tender, cheesy interior with every mouthful. This recipe isn’t just delicious; it’s designed for maximum impact with minimal fuss, making it your new go-to for everything from a leisurely brunch to a quick, satisfying snack. For more culinary inspiration, See more easy recipes.
Table of Contents
- Introduction: Your Go-To Cheesy Loaded Hashbrown Bites Recipe
- How This Recipe Works: Crispy, Cheesy, and Flavorful
- Ingredients and Substitutions: Building Your Perfect Bites
- Step-by-Step Instructions: Creating Your Cheesy Loaded Hashbrown Bites
- Expert Tips for Success: Achieve Perfect Bites Every Time
- What to Serve With Your Cheesy Loaded Hashbrown Bites
- Storing and Reheating Your Hashbrown Bites
- Frequently Asked Questions About Cheesy Loaded Hashbrown Bites
Introduction: Your Go-To Cheesy Loaded Hashbrown Bites Recipe
When it comes to versatile, crowd-pleasing fare, few dishes hit the mark quite like these cheesy Loaded Hashbrown Bites. They offer that delightful crunch, followed by a warm, fluffy, and utterly cheesy center—a textural symphony that makes them irresistible. I’ve refined this recipe over countless brunches and weeknight cravings, transforming simple ingredients into something truly spectacular. From impressing guests at a family gathering to serving up a quick, comforting snack after a long day, these bites never disappoint. They’re quick enough for a spontaneous craving and impressive enough for an occasion.
Quick, Easy, and Delicious: Why This Recipe Works
This recipe is my secret weapon because it’s incredibly straightforward, relying on readily available ingredients, and doesn’t require any advanced culinary skills. The magic lies in the simple preparation that yields complex flavors and textures. It’s the kind of recipe you’ll commit to memory and reach for again and again.
My Experience: From Family Brunch to Weekday Snack
I distinctly remember the first time I served these at a family brunch. They vanished in minutes! Since then, they’ve become a staple. They’re perfect for dipping into ketchup or hot sauce, and just as fantastic on their own. They’ve even saved me on those busy weekdays when I need something satisfying but don’t have much time.
How This Recipe Works: Crispy, Cheesy, and Flavorful
- Optimal Texture Balance: We achieve an incredibly crispy exterior on these cheesy Loaded Hashbrown Bites by properly draining the hashbrowns, ensuring no excess moisture interferes with the browning process.
- Effortless Flavor Integration: All the savory fillings, from crispy bacon to sharp cheddar, are mixed directly into the hashbrown base, guaranteeing a burst of flavor in every single bite without complex layering.
- Minimal Cleanup: This one-bowl (or two-bowl!) recipe minimizes dishes, making preparation and post-meal tidy-up a breeze.
- Customizable Goodness: While fantastic as is, these bites are incredibly adaptable, allowing for easy substitutions or additions based on what you have on hand or what you’re craving.
Perfectly Crispy Exterior, Tender Interior
The secret to that coveted crunch is all in the preparation of your hashbrowns. Removing excess moisture is paramount, allowing them to crisp up beautifully in the oven while maintaining a soft, tender interior. No one likes a soggy hashbrown, and this recipe guarantees perfection.
Loaded with Savory Fillings
These aren’t just plain hashbrowns; they’re *loaded*. Crispy bacon, pungent scallions, and liberal amounts of melty cheese are incorporated throughout, ensuring that every bite is packed with savory goodness. It’s a flavor party!
Effortless Preparation for Maximum Flavor
Despite their impressive outcome, these hashbrown bites are surprisingly easy to make. A simple mix, form, and bake process is all it takes to achieve these delectable morsels, proving that incredible flavor doesn’t have to mean complicated cooking.
Ingredients and Substitutions: Building Your Perfect Bites
Here is what you need and why:
Hashbrowns (Frozen Shredded): While fresh potatoes can work, frozen shredded hashbrowns are a true time-saver and provide consistent results. The key is to thaw and deeply drain them to remove as much moisture as possible. This ensures crispiness. If using fresh, grate them and then rinse and squeeze them bone dry in a clean kitchen towel.
Cheese Selection (Sharp Cheddar & Monterey Jack): I love the combination of sharp cheddar for its robust flavor and Monterey Jack for its exceptional meltiness. You can experiment with other good melting cheeses like gruyere, colby, or even a spicy pepper jack for a kick.
Bacon (Cooked & Crumbled): This adds an incredible depth of smoky, salty flavor and a textural contrast. For best results, cook your bacon until extra crispy before crumbling. Turley bacon can be used as a leaner alternative, or for a vegetarian option, omit it entirely or use a plant-based bacon substitute. For a different savory note, try cooked and crumbled sausage!
Scallions (Green Onions): These provide a fresh, mild onion flavor and a pop of color. The green parts are usually preferred for their milder taste. Chives or finely diced red onion can be good substitutes, though red onion will have a stronger bite.
Eggs (Large): Eggs act as a crucial binding agent, holding all the ingredients together so your bites don’t fall apart during baking. There isn’t an easy direct substitute here if you want cohesive bites.
All-Purpose Flour: Just a touch of flour helps absorb any residual moisture and further aids in binding, contributing to a crisper exterior. For a gluten-free version, a measure-for-measure gluten-free flour blend should work.
Salt and Freshly Ground Black Pepper: Essential for seasoning! Don’t skimp, as potatoes love salt. Taste and adjust as needed.
Step-by-Step Instructions: Creating Your Cheesy Loaded Hashbrown Bites
Follow these simple steps to create perfect cheesy Loaded Hashbrown Bites:
1. Prep Your Hashbrowns for Optimal Crispiness
If using frozen hashbrowns, ensure they are fully thawed. Place the thawed hashbrowns in a clean kitchen towel or several layers of paper towels. Squeeze out as much moisture as humanly possible! This is the most critical step for achieving truly crispy bites. You’ll be surprised how much water comes out. Preheat your oven to 400°F (200°C) and lightly grease a muffin tin with cooking spray, or line with paper liners for easier removal.
2. Combine All Ingredients: The Flavor Fusion
In a large mixing bowl, combine the thoroughly drained hashbrowns, cooked and crumbled bacon, shredded cheeses, chopped scallions, eggs, all-purpose flour, and salt and pepper. Use your hands (or a sturdy spoon) to mix everything together until it’s well combined. Ensure the ingredients are evenly distributed, so each bite is packed with all the good stuff.
3. Forming Your Bites: Uniformity for Even Cooking
Using a tablespoon or a small cookie scoop, scoop the hashbrown mixture into the prepared muffin tin cavities. Press the mixture down firmly into each cavity. This helps create compact, uniform bites that will cook evenly and hold their shape. Fill the cavities until they are slightly mounded on top.
4. Baking to Golden Perfection
Bake the hashbrown bites in the preheated oven for 20-25 minutes, or until they are golden brown and crispy around the edges. The exact baking time may vary based on your oven and the size of your bites. Once baked, let them cool in the muffin tin for 5 minutes before carefully removing them. This allows them to firm up, making them easier to handle. Serve warm.
5. For Extra Crispy Bites (Optional Step)
After the initial bake, if you desire an even crispier texture for your cheesy Loaded Hashbrown Bites, you can carefully remove them from the muffin tin and place them directly onto a baking sheet. Return them to the oven for another 5-10 minutes, or until they reach your desired level of crispness. Keep a close eye on them to prevent burning.
Expert Tips for Success: Achieve Perfect Bites Every Time
- Don’t Skip Draining Your Hashbrowns: This is the golden rule! Any excess moisture will prevent your hashbrowns from crisping up and can lead to soggy bites. Squeeze them as dry as possible.
- Season Generously for Best Flavor: Potatoes require a good amount of salt. Don’t be afraid to season the mixture well before baking. You can always adjust to your taste.
- Avoid Overcrowding the Baking Sheet: If you’re using more than one muffin tin or baking on a sheet, give the bites some space. Overcrowding can lead to steaming instead of baking, which inhibits crispiness.
- Experiment with Add-ins: While bacon and scallions are classics, feel free to get creative! Finely diced bell peppers, sautéed onions, jalapeños, or even a pinch of paprika can add new dimensions of flavor. For a vegetarian option, consider sun-dried tomatoes or spinach.
- Press Firmly into Muffin Tins: This helps the mixture bind together and ensures the bites hold their shape beautifully. A compact bite means a robust bite.
What to Serve With Your Cheesy Loaded Hashbrown Bites
Breakfast & Brunch Pairings
These cheesy Loaded Hashbrown Bites are a natural fit for breakfast or brunch. Serve them alongside scrambled eggs, a fresh fruit salad, or even a side of sausage links. Don’t forget the hot coffee or mimosas! They also pair wonderfully with a dollop of sour cream or a sprinkle of extra fresh chives.
Snack & Appetizer Companions
For a fantastic appetizer, arrange the bites on a platter with various dipping sauces. Ketchup, sriracha mayo, ranch dressing, or a spicy homemade aioli all work beautifully. They are also great as part of a snack board with other finger foods like mini quiches or vegetable sticks.
Dinner Side Dish Ideas
These versatile bites can easily elevate a dinner plate. They make an excellent substitute for traditional baked potatoes or mashed potatoes. Serve them alongside grilled chicken, roasted pork tenderloin, or a juicy steak for a comforting and flavorful side. For a complete meal, pair them with a simple green salad.
Storing and Reheating Your Hashbrown Bites
Proper Storage for Freshness
Once cooled completely, store your cheesy Loaded Hashbrown Bites in an airtight container in the refrigerator for up to 3-4 days. Proper cooling before storage is key to prevent condensation and sogginess.
Best Reheating Methods for Crispiness
To bring back their glorious crispness, reheating in an oven or air fryer is best. Preheat your oven to 350°F (175°C) and bake for 10-15 minutes, or until heated through and crispy. In an air fryer, cook at 350°F (175°C) for 5-8 minutes, shaking the basket halfway through. Microwaving is an option for speed, but they won’t be as crispy.
For an excellent resource on food safety and storage, check out the FoodSafety.gov Refrigerator & Freezer Storage Chart.
Frequently Asked Questions About Cheesy Loaded Hashbrown Bites
Can I make these ahead of time?
Absolutely! You can prepare the hashbrown mixture up to 24 hours in advance and store it covered in the refrigerator. When you’re ready to bake, simply scoop into your muffin tin and proceed with the baking instructions. This makes them perfect for entertaining!
Can I air fry these hashbrown bites?
Yes, you can! Air frying is a fantastic method for achieving extra crispy hashbrown bites. Preheat your air fryer to 375°F (190°C). Place the formed bites in a single layer in the air fryer basket, ensuring not to overcrowd. Air fry for 12-18 minutes, flipping halfway through, until golden brown and crispy.
What other vegetables can I add?
The possibilities are endless! Finely diced onions (sautéed first if you want them softer), bell peppers, spinach (squeezed dry if fresh or thawed), or even corn kernels would be delicious. Just make sure any vegetable additions are finely chopped and don’t add too much moisture.
Are these freezer-friendly?
They are! After baking and allowing them to cool completely, place the cheesy Loaded Hashbrown Bites on a baking sheet and freeze for about an hour until solid. Then transfer them to a freezer-safe bag or container and freeze for up to 2-3 months. To reheat, bake from frozen at 375°F (190°C) for 20-30 minutes, or until heated through and crispy.
Cheesy Loaded Hashbrown Bites
- Total Time: 40 minutes
- Yield: 18-24 bites (depending on size)
Description
These irresistibly crispy on the outside, tender on the inside hashbrown bites are packed with savory bacon, sharp cheddar, and fresh scallions. Perfect as a quick snack, brunch staple, or versatile side dish for any meal.
Ingredients
- 30 oz (approx. 850g) frozen shredded hashbrowns, thawed
- 8 oz sharp cheddar cheese, shredded
- 4 oz Monterey Jack cheese, shredded
- 8 slices bacon, cooked crispy and crumbled
- 4 large scallions, thinly sliced (green and white parts)
- 2 large eggs, lightly beaten
- 2 tbsp all-purpose flour
- 1 tsp salt
- ½ tsp freshly ground black pepper
- Cooking spray or oil for greasing
Instructions
- 1. Prep Hashbrowns: Thaw frozen hashbrowns completely. Place them in a clean kitchen towel and squeeze out as much moisture as aggressively as possible. Preheat oven to 400°F (200°C). Lightly grease a 12-cup muffin tin (or two, if making a larger batch).
- 2. Combine Ingredients: In a large mixing bowl, combine the thoroughly drained hashbrowns, shredded cheeses, crumbled bacon, sliced scallions, beaten eggs, flour, salt, and pepper. Mix until all ingredients are well incorporated.
- 3. Form Bites: Using a tablespoon or small cookie scoop, fill each muffin tin cavity with the hashbrown mixture. Press down firmly to make compact bites.
- 4. Bake: Bake for 20-25 minutes, or until the bites are golden brown and crispy around the edges. Let cool in the muffin tin for 5 minutes before removing carefully. Serve warm.
- 5. Optional Extra Crisp: For even crisper bites, remove from muffin tin after initial bake and place directly on a baking sheet. Bake for an additional 5-10 minutes, watching carefully.
- Prep Time: 15 mins
- Cook Time: 25 mins