


Table of Contents
- Why These Easy Protein Powder Pancakes Are Your New Go-To
- How This Recipe Works: Beyond Just Protein
- Ingredients & Substitutions: Understanding Each Component
- Step-by-Step Instructions: Your Visual Pancake Guide
- Expert Tips for Success: Fluffy Pancakes Every Time
- What to Serve With Your Easy Protein Powder Pancakes
- Storing & Reheating Your Protein Pancakes
- Easy Protein Powder Pancakes FAQ
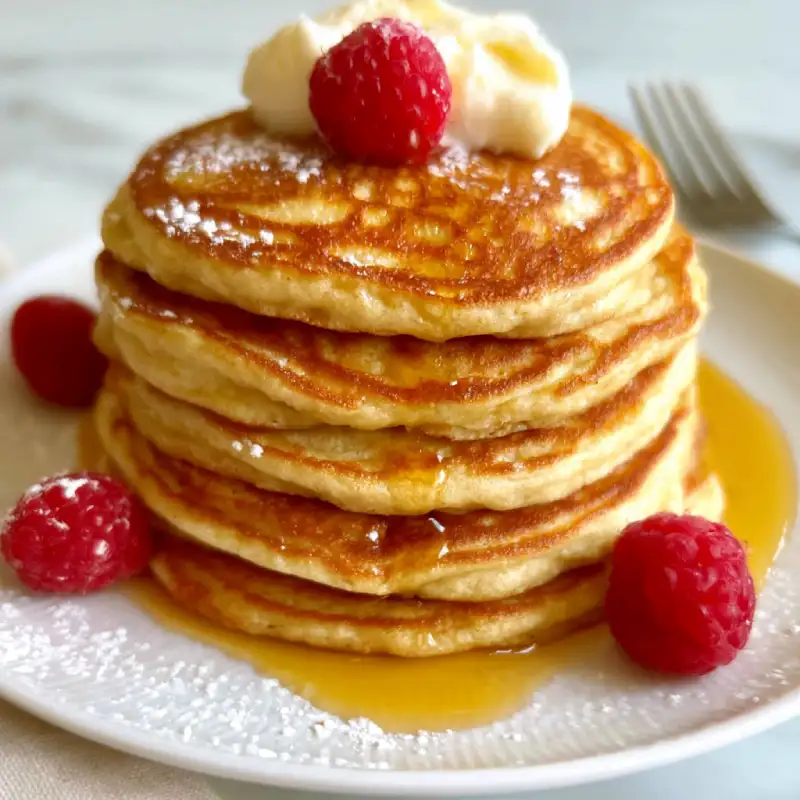
Imagine waking up to the aroma of freshly cooked pancakes, but with the added bonus of a significant protein boost that keeps you full and energized throughout your morning. These easy protein powder pancakes aren’t just a simple breakfast; they’re a revelation in texture and taste! Forget dry, rubbery, or bland protein pancakes you might have encountered in the past. My recipe delivers an unbelievably fluffy, tender stack with a golden-brown crust and a delightful melt-in-your-mouth interior. Each bite is subtly sweet, perfectly balanced, and utterly satisfying. They taste so good, you might even forget they’re packed with protein! If you’re looking for more delicious and straightforward recipes to elevate your daily meals, see more good recipes here.
Why These Easy Protein Powder Pancakes Are Your New Go-To
A Personal Journey to Protein-Packed Breakfasts
For years, my quest for a truly satisfying, high-protein breakfast that didn’t involve eggs or a bland shake felt endless. I tried countless protein pancake recipes, often ending up with hockey pucks or overly dense, chewy discs. It was a frustrating journey of trial and error, but it led me to perfect this recipe for easy protein powder pancakes. This isn’t just another recipe; it’s the culmination of extensive testing, tweaking, and a passionate pursuit of the perfect fluffy, protein-packed start to the day. It’s designed to be simple enough for a busy weekday morning yet delicious enough for a leisurely weekend brunch. Trust me, once you try these, there’s no going back!
How This Recipe Works: Beyond Just Protein
Fluffy, Not Rubber-y: The Right Ratio
The secret to avoiding rubbery protein pancakes lies in striking the perfect balance between liquid, dry ingredients, and, crucially, the type and amount of protein powder. We’re using a combination of all-purpose flour (or a suitable alternative) with just enough protein powder to boost nutrition without compromising the delicate structure. The leavening agents, baking powder and baking soda, work synergistically to create those beautiful bubbles that result in an airy texture. A touch of fat ensures moisture and tenderness, preventing that all-too-common dry mouthfeel often associated with protein-heavy baked goods.
Naturally Sweetened for Real Flavor
While some protein pancake recipes rely heavily on artificial sweeteners or too much added sugar, my approach focuses on natural, nuanced sweetness. A hint of pure maple syrup or honey, combined with vanilla extract, brings out the natural flavors of the ingredients. This creates a pancake that feels wholesome and satisfying without being overly sweet, allowing you to truly enjoy the delicate flavor profile. It’s about enhancing, not masking, the deliciousness.
Ingredients & Substitutions: Understanding Each Component
Here is what you need and why:
Protein Powder: Type Matters: For the best results in these easy protein powder pancakes, I highly recommend using a high-quality whey protein concentrate or a plant-based blend (pea protein often works well). Avoid thin, highly hydrolyzed whey isolates or casein, as they can absorb liquid differently and lead to a tougher texture. Unflavored is ideal so you can control the flavor, but a vanilla or subtly flavored powder can also work, just adjust the added vanilla extract accordingly.
Flour Options: Gluten-Free & More: I typically use unbleached all-purpose flour for its consistent texture. However, you can absolutely make these gluten-free! A 1:1 gluten-free baking blend (one that contains xanthan gum) works wonderfully. For a slightly denser, more rustic pancake, you could experiment with up to 50% whole wheat pastry flour, though this will change the texture slightly.
Leavening Agents: For That Lift: We use both baking powder and baking soda. Baking powder provides the initial lift, while baking soda reacts with the slight acidity in the buttermilk (or vinegar in milk) to create additional bubbles, ensuring maximum fluffiness. Don’t skip either!
Milk: Dairy and Non-Dairy Choices: Buttermilk is my top choice for its tangy flavor and its reaction with baking soda, leading to extra tender pancakes. If you don’t have buttermilk, you can easily make your own by adding 1 tablespoon of white vinegar or lemon juice to regular dairy milk (any fat percentage) and letting it sit for 5 minutes before using. Unsweetened almond milk, oat milk, or soy milk are excellent non-dairy alternatives that work equally well.
Sweeteners: Natural & Refined: A small amount of granulated sugar helps with browning and texture. For a more natural approach, you can substitute coconut sugar or even a touch of maple syrup directly into the wet ingredients, just be mindful of the overall liquid content. You can also omit it entirely if your protein powder is already sweet or if you prefer to rely solely on toppings for sweetness.
Fats: For Moisture and Tenderness: Melted butter adds unparalleled flavor and tenderness. Vegetable oil or melted coconut oil (ensure it’s fully melted and slightly cooled if using with cold wet ingredients) are good dairy-free alternatives. A little fat goes a long way in preventing dry pancakes.
Flavor Boosters: Vanilla & Spices: Pure vanilla extract is essential for that classic pancake flavor. A dash of cinnamon or nutmeg can elevate the taste even further, especially if using an unflavored protein powder. Feel free to experiment with other spices like cardamom if you’re feeling adventurous!
Step-by-Step Instructions: Your Visual Pancake Guide
Follow these step-by-step photos:
1. Prepare Your Batter: Mixing Wet and Dry
In a large bowl, whisk together all the dry ingredients: flour, protein powder, sugar, baking powder, baking soda, salt, and any desired spices. In a separate medium bowl, whisk together the wet ingredients: milk (or buttermilk), egg, melted butter (or oil), and vanilla extract. Create a well in the center of your dry ingredients and pour the wet ingredients into it. Stir gently with a spoon or whisk until just combined. A few lumps are perfectly normal and preferred; overmixing will lead to tough pancakes! The batter for these easy protein powder pancakes should be thick but pourable.
2. Cook Your Pancakes: The Perfect Golden Brown
Heat a lightly oiled griddle or non-stick pan over medium-low heat. The key is consistent, not too high, heat. Once hot, pour about 1/4 cup of batter per pancake onto the griddle. Don’t overcrowd the pan; cook 2-3 at a time so you have room to flip. Allow them to cook for 2-3 minutes on the first side. You’ll know they’re ready to flip when bubbles begin to form on the surface and the edges look set and slightly dry. For a good visual, check out this great guide on perfect pancake making from King Arthur Baking.
3. Flip and Finish
Carefully slide a spatula under each pancake and flip. Cook for another 1-2 minutes on the second side, or until golden brown and cooked through. The internal temperature should reach about 200°F (93°C) if you’re using an instant-read thermometer, but visually, they’ll look puffy and golden. Don’t press down on the pancakes with your spatula as they cook; this deflates them and makes them dense.
4. Serve Immediately: Enjoying Freshness
Transfer the cooked easy protein powder pancakes to a plate. If you’re cooking a large batch, you can keep them warm by placing them on a baking sheet in a preheated oven at 200°F (93°C) while you finish cooking the rest. Serve immediately with your favorite toppings and enjoy those fluffy, protein-packed delights!
Expert Tips for Success: Fluffy Pancakes Every Time
- Don’t Overmix the Batter: This is arguably the most crucial tip! Overmixing develops the gluten in the flour, leading to tough, chewy pancakes instead of light, fluffy ones. Mix until the ingredients are just combined; a few lumps are fine.
- Perfect Griddle Temperature: Patience is key. Medium-low to medium heat is ideal. If the griddle is too hot, the outside will burn before the inside cooks through. Too low, and they won’t brown properly or rise as much. Test with a small drop of water – it should sizzle gently and evaporate.
- Knowing When to Flip: Look for bubbles forming and popping on the surface, and the edges appearing set and slightly dry. This indicates that the bottom is cooked and the structure is stable enough to flip without collapsing.
- Resting the Batter: While not strictly necessary, allowing the batter to rest for 5-10 minutes after mixing lets the flour fully hydrate and the leavening agents activate, often resulting in even fluffier pancakes.
- Measure Flour Correctly: For accurate baking, spoon your flour into a measuring cup and then level it off with a straight edge. Dipping the measuring cup directly into the flour bag can compact it, leading to too much flour and a dry batter.
What to Serve With Your Easy Protein Powder Pancakes
Classic Toppings
- Pure Maple Syrup or Honey: The quintessential choice, providing natural sweetness and warmth.
- Fresh Berries: Strawberries, blueberries, raspberries, or mixed berries add freshness, vitamins, and a pop of color.
- Sliced Bananas: A classic pairing, often drizzled with a little extra syrup.
- Whipped Cream or Greek Yogurt: For an extra creamy touch, whipped cream is decadent, while a dollop of Greek yogurt adds more protein and a tangy contrast.
Nutrient-Dense Additions
- Nut Butters: Peanut butter, almond butter, or cashew butter spread thinly on top adds healthy fats and more protein.
- Chopped Nuts or Seeds: A sprinkle of walnuts, pecans, chia seeds, or hemp hearts provides crunch and additional nutrients.
- Cottage Cheese: A surprising but delicious pairing, cottage cheese adds a creamy texture and a serious protein boost.
Savory Pairings
- Bacon or Sausage: The salty crispness of bacon or the savory notes of sausage create a delightful contrast to the sweet pancakes.
- Fried Egg: For a true diner-style breakfast, a perfectly fried egg alongside your protein pancakes offers a substantial and balanced meal.
Storing & Reheating Your Protein Pancakes
Refrigeration
Cooked easy protein powder pancakes can be stored in an airtight container in the refrigerator for up to 3-4 days. Allow them to cool completely before storing to prevent condensation, which can make them soggy.
Freezing for Later
These pancakes freeze beautifully! Place cooled pancakes in a single layer on a baking sheet and freeze for about 30 minutes, or until firm. This prevents them from sticking together. Then, transfer the partially frozen pancakes to a freezer-safe bag or container, separating layers with parchment paper if desired. They can be frozen for up to 2-3 months.
Reheating
- Microwave: Reheat individual pancakes for 30-60 seconds, or until warmed through.
- Toaster Oven/Toaster: This is my preferred method for reheating, as it crisps up the edges beautifully. Toast frozen pancakes on a medium setting until hot and slightly crisp.
- Oven: Place pancakes on a baking sheet and heat in a preheated oven at 350°F (175°C) for 5-10 minutes, or until warmed through.
Easy Protein Powder Pancakes FAQ
Can I use any type of protein powder?
How do I prevent my pancakes from being dry?
Can I make these pancakes ahead of time?
Are these pancakes gluten-free?
What’s the best way to reheat frozen pancakes?
Easy Protein Powder Pancakes: Fluffy & Delicious
- Total Time: 25 minutes
- Yield: 8-10 pancakes (2-3 servings)
Description
Craft fluffy, protein-packed pancakes effortlessly with this simple recipe. Say goodbye to dry protein pancakes and hello to a satisfying, delicious breakfast!
Ingredients
- 1 cup (120g) all-purpose flour (or 1:1 gluten-free blend)
- 1/4 cup (25g) protein powder (whey concentrate or plant-based blend recommended)
- 2 tbsp granulated sugar (optional, or adjust to taste)
- 1 1/2 tsp baking powder
- 1/2 tsp baking soda
- 1/4 tsp salt
- 1/4 tsp ground cinnamon (optional)
- 1 cup (240ml) buttermilk (or milk + 1 tbsp vinegar/lemon juice)
- 1 large egg
- 2 tbsp unsalted butter, melted and slightly cooled (or neutral oil)
- 1 tsp pure vanilla extract
- Neutral oil or butter for greasing the griddle
Instructions
- Prepare Dry Ingredients: In a large bowl, whisk together the flour, protein powder, sugar (if using), baking powder, baking soda, salt, and cinnamon (if using) until well combined.
- Prepare Wet Ingredients: In a separate medium bowl, whisk together the buttermilk (or prepared milk + vinegar), egg, melted butter (or oil), and vanilla extract.
- Combine Batter: Create a well in the center of your dry ingredients. Pour the wet ingredients into the well. Stir gently with a spoon or whisk until just combined. A few lumps are fine; do not overmix. Let the batter rest for 5-10 minutes if time allows.
- Heat Griddle: Heat a lightly oiled griddle or large non-stick pan over medium-low heat.
- Cook Pancakes: Pour about 1/4 cup of batter per pancake onto the hot griddle. Cook for 2-3 minutes per side, or until bubbles form on the surface and the edges are set. Flip and cook for another 1-2 minutes, until golden brown and cooked through.
- Serve: Transfer cooked pancakes to a plate and serve immediately with your favorite toppings. Keep warm in a 200°F (93°C) oven while cooking remaining pancakes.
- Prep Time: 10 mins
- Cook Time: 15 mins