


Table of Contents
- Make Your Own Healthy Frozen Yogurt: A Simple & Delicious Treat
- How This Recipe Delivers Perfect Frozen Yogurt
- Essential Ingredients & Smart Substitutions for Perfect Frozen Yogurt
- Step-by-Step: Crafting Your Healthy Frozen Yogurt
- Expert Tips for Frozen Yogurt Success
- What to Serve With Your Healthy Frozen Yogurt
- Storing & Enjoying Leftover Frozen Yogurt
- Healthy Frozen Yogurt FAQs
Make Your Own Healthy Frozen Yogurt: A Simple & Delicious Treat
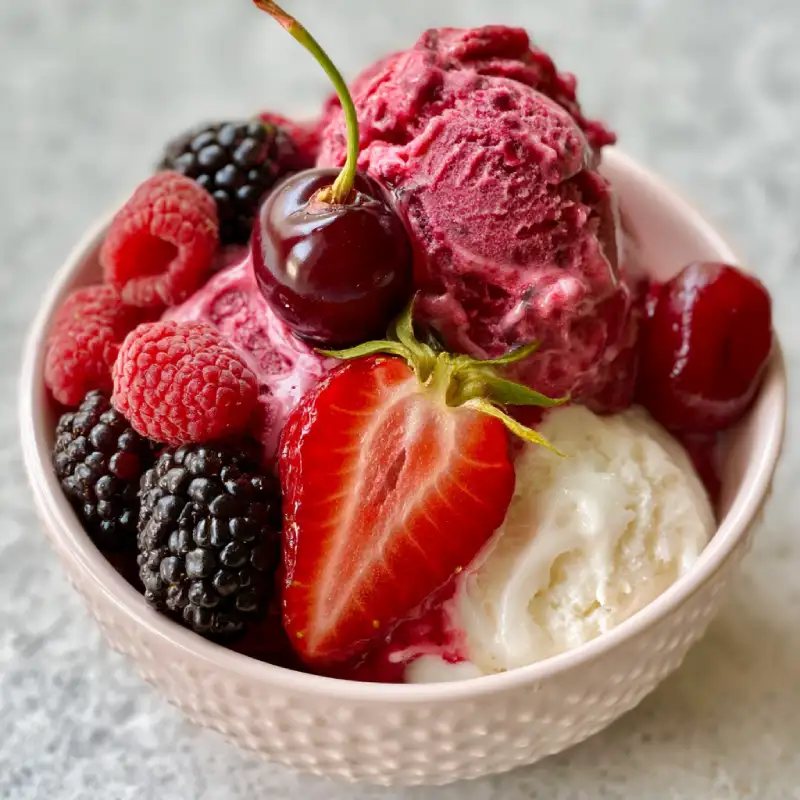
Imagine a spoonful of pure bliss: cold, creamy, and bursting with fresh fruit flavor, melting delicately on your tongue. That’s exactly what you’ll achieve with this incredible healthy frozen yogurt recipe! Forget those store-bought versions often loaded with questionable ingredients and excessive sugar. Making your own Healthy Frozen Yogurt at home means you’re in full control, ensuring a treat that’s not only incredibly delicious but also genuinely good for you. You’ll be amazed at how simple it is to achieve professional-level creaminess and flavor with minimal effort. This isn’t just a dessert; it’s a delightful experience waiting to happen, and you can See more easy recipes to expand your homemade treat repertoire!
How This Recipe Delivers Perfect Frozen Yogurt
- Optimal Flavor Balance: We achieve the perfect equilibrium between natural sweetness and a refreshing tang, making each bite incredibly satisfying without being overly sugary.
- Smooth, Scoopable Texture: Through careful ingredient choices and technique, your homemade frozen yogurt will be wonderfully smooth and easy to scoop, not icy or hard.
- Endlessly Customizable: This recipe is a fantastic base for all your favorite fruits and flavorings, allowing you to create unique combinations every time.
- Ice Cream Maker Optional: Whether you have a fancy machine or just a freezer and a blender, we’ve got you covered with methods for everyone to make delicious Healthy Frozen Yogurt.
Essential Ingredients & Smart Substitutions for Perfect Frozen Yogurt
Here is what you need and why:
Greek Yogurt: For truly creamy Healthy Frozen Yogurt, full-fat Greek yogurt is your best friend. Its higher fat content and thicker consistency contribute significantly to a rich, smooth texture and prevents ice crystals. While you can use low-fat, full-fat yields superior results in terms of creaminess and flavor.
Sweeteners: You have options to tailor this to your taste! Honey or maple syrup are excellent natural liquid sweeteners that also add a subtle depth of flavor. For a more neutral sweetness, fine granulated sugar or even a sugar substitute can be used. Adjust the amount to your preference, keeping in mind fruit adds natural sweetness too.
Flavorings: This is where the magic happens! Fresh fruit, especially berries like strawberries, raspberries, or blueberries, are fantastic. Mangoes, peaches, and bananas also work wonderfully. Make sure your fruit is ripe for maximum flavor. A splash of vanilla extract or almond extract can enhance the overall taste, or try a zest of lemon or lime for an extra zing.
Stabilizers (Optional but Recommended): For that ultra-smooth, scoopable consistency that resists becoming rock-hard, a small amount of corn syrup or a tablespoon of clear alcohol (like vodka) can work wonders. They interfere with ice crystal formation, keeping your frozen yogurt softer. A great resource on the science of homemade ice cream and frozen desserts, including stabilizers, can be found at Serious Eats.
Ingredient ratios explained for consistent results: Generally, aim for about 2 cups of Greek yogurt to 1/4 to 1/2 cup sweetener (depending on sweetness preference and fruit used) and 1-2 cups of fruit. Adjust liquid sweeteners and fruit moisture carefully to maintain a thick base.
Step-by-Step: Crafting Your Healthy Frozen Yogurt
Follow these step-by-step instructions for perfect Healthy Frozen Yogurt:
1. Prep Your Ingredients for Success
Start by ensuring your Greek yogurt is very cold, straight from the refrigerator. If using fresh fruit, wash, hull, or peel it, then chop it into small pieces if necessary. For a smoother frozen yogurt, you might want to lightly mash or purée softer fruits. If you’re using an ice cream maker, make sure its bowl has been frozen for a minimum of 12-24 hours prior.
2. Mixing the Perfect Base
In a large bowl, combine the cold Greek yogurt with your chosen sweetener(s) (honey, maple syrup, or sugar) and any extracts (like vanilla). Whisk until thoroughly combined and the sweetener is dissolved. If you’re adding liquid stabilizers like corn syrup or alcohol, mix them in now. Gently fold in your prepared fruit pieces or purée. Taste and adjust sweetness or tang as needed.
3. Churning Methods: Ice Cream Maker Instructions
Pour your well-chilled frozen yogurt base into your pre-frozen ice cream maker bowl. Churn according to the manufacturer’s instructions, typically for 20-30 minutes, or until it reaches the consistency of soft-serve ice cream. The mixture should be thick and creamy. Over-churning can lead to a grainier texture.
4. No-Churn Method: Freezing and Blending
If you don’t have an ice cream maker, don’t fret! Pour the mixture into a shallow, freezer-safe container. Freeze for 1.5-2 hours, then remove and stir vigorously with a spoon or fork to break up ice crystals. Repeat this stirring process every 30-45 minutes for another 2-3 hours, until thick and partially frozen. For a smoother result, transfer the partially frozen mixture to a food processor or high-speed blender and blend until smooth, then return to the freezer for a final chill until firm.
5. Adding Mix-ins (Optional)
If you have any extra mix-ins like chocolate chips, chopped nuts, or additional fruit, gently fold them into the frozen yogurt during the last 5 minutes of churning in an ice cream maker, or before the final freeze for the no-churn method. This ensures even distribution without crushing delicate ingredients.
Expert Tips for Frozen Yogurt Success
- Start Cold, Stay Cold: Ensure all your liquid ingredients, especially the yogurt, are as cold as possible before churning or freezing. This dramatically helps in achieving a smoother final texture and faster freezing.
- Don’t Be Afraid to Taste: Adjust the sweetness and tanginess of your base before freezing. It’s much harder to correct once frozen! A little extra lemon juice can brighten flavors significantly.
- Embrace the Stabilizer: While optional, a small amount (1-2 tablespoons per 2 cups of yogurt base) of corn syrup or alcohol (like vodka) can make a noticeable difference in preventing iciness and keeping your frozen yogurt soft and scoopable even after extended freezing.
- Chill Your Serving Dishes: For an extra special touch, pop your serving bowls or glasses into the freezer for 10-15 minutes before serving. This keeps your Healthy Frozen Yogurt from melting too quickly.
- A Pinch of Salt: Just like in baking, a tiny pinch of salt (about 1/8 teaspoon) can enhance all the flavors in your frozen yogurt, making the fruit taste fruitier and the sweetness more pronounced without making the yogurt taste salty.
What to Serve With Your Healthy Frozen Yogurt
Your beautiful, homemade Healthy Frozen Yogurt is a star on its own, but these additions can take it to the next level:
- Fresh Berries and Fruit: A classic pairing! Halved strawberries, whole raspberries, or sliced peaches add vibrant color and an extra burst of freshness.
- Granola for Crunch: Sprinkle on your favorite granola for a delightful texture contrast. The oats and nuts complement the creamy frozen yogurt perfectly.
- A Drizzle of Sweetness: A light drizzle of honey, maple syrup, or a homemade chocolate sauce elevates the flavor.
- Chopped Nuts or Seeds: Almonds, pecans, walnuts, or even toasted pumpkin seeds add healthy fats and a satisfying crunch.
Storing & Enjoying Leftover Frozen Yogurt
To keep your Healthy Frozen Yogurt at its best, optimal storage is key. Transfer it to an airtight, freezer-safe container. Press a piece of plastic wrap directly onto the surface of the frozen yogurt before sealing the container; this helps to prevent freezer burn and the formation of ice crystals. Store it in the coldest part of your freezer, typically at the back, away from the door. When you’re ready to enjoy, let it sit out at room temperature for 10-15 minutes to soften slightly for easy scooping. This process, known as tempering, will bring it back to a delightful, scoopable consistency without compromising its texture.
Healthy Frozen Yogurt FAQs
Can I use low-fat yogurt?
How long does homemade frozen yogurt last?
Is it difficult to make without an ice cream maker?
What’s the best way to prevent it from getting too icy?
Healthy Frozen Yogurt
- Total Time: 45 minutes
- Yield: 4-6 servings
Description
Unlock the secret to exquisitely creamy and flavorful homemade frozen yogurt. This recipe is simple, customizable, and yields a healthy dessert that rivals any store-bought option.
Ingredients
- 2 cups full-fat Greek yogurt, very cold
- 1/4 – 1/2 cup honey or maple syrup (adjust to taste)
- 1–2 cups fresh fruit (e.g., berries, mango, peaches), chopped or lightly mashed
- 1/2 teaspoon vanilla extract (optional)
- 1 tablespoon corn syrup or vodka (optional, for scoopability)
- Pinch of salt
Instructions
- Step 1: Prepare Ingredients. Ensure yogurt is very cold. Wash and prepare your fruit. If using an ice cream maker, ensure the bowl is pre-frozen.
- Step 2: Mix the Base. In a large bowl, whisk together the cold Greek yogurt, sweetener, vanilla extract (if using), stabilizer (if using), and a pinch of salt until well combined and smooth. Gently fold in your prepared fruit.
- Step 3: Churn (Ice Cream Maker Method). Pour the mixture into your ice cream maker and churn for 20-30 minutes, or until it reaches a soft-serve consistency.
- Step 4: No-Churn Alternative. Pour the mixture into a shallow, freezer-safe container. Freeze for 1.5-2 hours. Remove and stir well to break up ice crystals. Repeat every 30-45 minutes for another 2-3 hours. For extra smoothness, blend partially frozen mixture in a food processor, then refreeze until firm.
- Step 5: Final Freeze. Transfer the soft-serve consistency frozen yogurt to an airtight container. Press plastic wrap directly onto the surface and seal. Freeze for at least 2-4 hours, or until firm enough to scoop.
- Prep Time: 15 mins
- Cook Time: 30 mins (churning/freezing)