
")
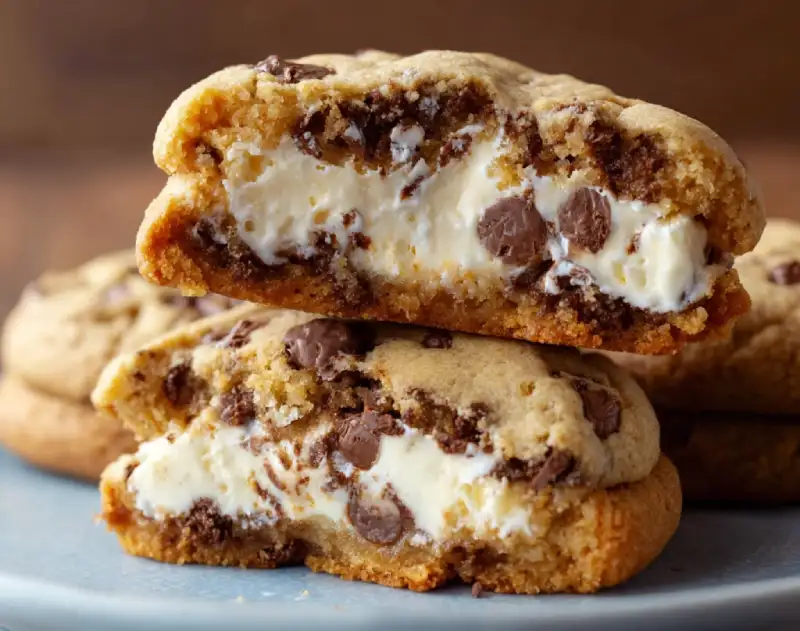
Table of Contents
- Why These Cheesecake Stuffed Cookies Will Be Your New Favorite
- Essential Ingredients & Smart Substitutions
- Your Step-by-Step Guide to Cheesecake Stuffed Cookie Bliss
- Expert Tips for Cheesecake Stuffed Cookie Success
- Serving Suggestions for Your Decadent Cookies
- Storing & Reheating Your Stuffed Cookies
- Cheesecake Stuffed Cookies FAQ
Oh, prepare yourselves, my fellow dessert enthusiasts, because we’re about to embark on a baking adventure that will redefine your understanding of ‘cookie perfection.’ Imagine biting into a warm, chewy, golden-brown cookie, only to discover a lusciously creamy, tangy cheesecake filling nestled right in the center. Yes, we’re talking about See more good recipes here Cheesecake Stuffed Cookies, and trust me, they are every bit as heavenly as they sound. These aren’t just cookies; they’re an experience, a delightful fusion of two all-time favorite desserts that come together in a symphony of textures and flavors. Get ready to impress, because these will be the star of any spread!
Why These Cheesecake Stuffed Cookies Will Be Your New Favorite
My Journey to the Perfect Stuffed Cookie
As a passionate baker, I’m always on the hunt for that next ‘wow’ recipe. I’ve experimented with countless cookie variations and cheesecake recipes over the years, but the idea of combining them into one irresistible bite kept calling to me. My journey to these perfect Cheesecake Stuffed Cookies involved a lot of trial and error – too crumbly cookies, oozing filling, bland flavors – but every ‘failed’ batch brought me closer to this masterpiece. What I’ve landed on today is a recipe that’s not just delicious but also surprisingly approachable, designed to give you bakery-quality results right in your home kitchen.
What Makes This Recipe Special (Texture & Flavor)
What truly sets these Cheesecake Stuffed Cookies apart is their incredible balance. You get the crispy edge and soft, chewy center of a classic cookie, perfectly complemented by the smooth, rich, and slightly tart cream cheese filling. The cookie dough itself is incredibly flavorful, designed to hold its shape around the filling, while the cheesecake center bakes up beautifully, retaining its creamy texture and bright notes. It’s a harmonious blend that delivers both comfort and sophistication in every single bite. The interplay of sweet cookie and tangy cheesecake is simply irresistible.
Essential Ingredients & Smart Substitutions
Let’s dive into the stars of our show – the ingredients! Quality ingredients make all the difference here, but I’ll also share some smart substitutions to ensure your cookies are always a hit.
Cream Cheese Filling: The Heart of the Cookie
For the filling, you absolutely need full-fat cream cheese. This is non-negotiable for that rich, creamy texture and classic tangy flavor. Low-fat variants won’t set properly and can make the filling watery. We’ll also use a little granulated sugar for sweetness, a touch of vanilla extract for warmth, and sometimes a hint of lemon zest to brighten everything up. If you don’t have lemon zest, don’t worry, the cookies will still be fantastic!
Cookie Dough Base: Achieving Soft & Chewy Perfection
Our cookie dough is built for success. You’ll need all-purpose flour – properly measured, of course, a kitchen scale is your best friend here! For fat, we use a combination of unsalted butter and vegetable shortening. The butter provides flavor, while the shortening contributes to that perfect soft, chewy texture. A mix of granulated sugar and light brown sugar balances sweetness and moisture. And no good cookie is complete without an egg (for binding and richness), vanilla extract, baking soda, and a pinch of salt to enhance all those wonderful flavors.
Flavor Enhancers: Zest, Vanilla & More
Beyond the core ingredients, small additions make a big impact. High-quality vanilla extract (or even vanilla bean paste) is key for both the cookie and the filling. A little lemon zest in the cream cheese filling adds a beautiful, subtle brightness that cuts through the richness. Feel free to experiment with other flavor enhancers like a tiny dash of almond extract in the cookie dough, or even a sprinkle of mini chocolate chips into the dough for extra texture.
Your Step-by-Step Guide to Cheesecake Stuffed Cookie Bliss
Ready to get baking? Follow these simple steps for cookie perfection.
1. Prepare the Cheesecake Filling (Chill Time is Key!)
In a small bowl, beat together the softened full-fat cream cheese with granulated sugar, vanilla extract, and optional lemon zest until completely smooth and lump-free. It’s crucial for the cream cheese to be at room temperature for the best consistency. Once mixed, drop spoonfuls (about 1 teaspoon each) onto a parchment-lined baking sheet. You want small, manageable portions. Place this tray in the freezer for at least 30 minutes, or until the cream cheese dollops are firm. This step is vital to prevent the filling from oozing out during baking!
2. Whip Up the Cookie Dough
In a large mixing bowl, cream together the softened unsalted butter and vegetable shortening with both granulated and light brown sugars until light and fluffy. This should take 2-3 minutes with an electric mixer. Beat in the egg and vanilla extract until well combined, scraping down the sides of the bowl as needed. In a separate bowl, whisk together the all-purpose flour, baking soda, and salt. Gradually add the dry ingredients to the wet ingredients, mixing on low speed until just combined. Be careful not to overmix the dough once the flour is added – overmixing develops gluten, leading to tougher cookies.
3. Assemble Your Stuffed Cookies
Take your chilled cream cheese dollops from the freezer. Scoop about 1.5 tablespoons of cookie dough and flatten it slightly in your palm. Place one frozen cream cheese dollop in the center of the flattened dough. Carefully wrap the cookie dough around the cream cheese, sealing it completely so no filling is exposed. Roll it gently into a smooth ball. Repeat with the remaining dough and filling. This sealing step is critical for preventing leaks!
4. Bake to Golden Perfection
Preheat your oven to 375°F (190°C). Line baking sheets with parchment paper. Arrange the stuffed cookie dough balls about 2 inches apart on the prepared baking sheets. Bake for 10-12 minutes, or until the edges are lightly golden and the centers are still soft. They may look slightly underdone in the middle, but they will continue to set as they cool. Overbaking will lead to a dry cookie and potentially a drier filling. For the best results, consider rotating your baking sheet halfway through to ensure even baking. Allow them to cool on the baking sheet for 5 minutes before transferring to a wire rack to cool completely.
Expert Tips for Cheesecake Stuffed Cookie Success
- Don’t Overfill: The Secret to No Leaks. Seriously, a small amount of filling (about a teaspoon) is all you need. Too much, and it will inevitably burst through the cookie dough. Keep those cream cheese balls petite and well-chilled!
- Chilling the Dough: Why It Matters. While the recipe chills the filling, also chilling the assembled cookies briefly (10-15 minutes) before baking can help them hold their shape better and prevent excessive spreading.
- Perfect Baking Temperature & Time. Every oven is different, so know yours! The stated 375°F (190°C) and 10-12 minutes is a guideline. Look for lightly golden edges and a still-soft center for that ideal chewy texture. Avoid overbaking!
- Cooling Completely: Patience for a Reason. I know it’s hard, but these cookies *must* cool completely on a wire rack. This allows the cheesecake filling to fully set and the cookie to achieve its perfect texture. Cutting into a warm cookie will result in a messy, gooey (though still delicious!) experience.
- Measure Flour Correctly: The most common baking mistake! Spoon flour into your measuring cup and level it off with a straight edge, or better yet, use a kitchen scale for accuracy.
- Room Temperature Ingredients: Ensure butter, cream cheese, and egg are all at room temperature for a smooth, homogenous mixture. Cold ingredients will lead to lumpy batter and a less even bake.
Serving Suggestions for Your Decadent Cookies
Simple Pairings
These Cheesecake Stuffed Cookies are incredibly satisfying on their own, but a simple pairing can elevate the experience. A freshly brewed cup of coffee or a tall glass of cold milk is always a classic choice. For a lighter touch, a cup of herbal tea creates a cozy moment. They’re also fantastic alongside a scoop of vanilla bean ice cream for an extra dose of indulgence.
Elevated Dessert Ideas
Want to turn these cookies into a showstopping dessert? Crumble a warm cookie over a bowl of fresh berries for a deconstructed cheesecake effect. Or, for an ultimate treat, gently warm a cookie, top it with a dollop of whipped cream, and drizzle with a raspberry or chocolate sauce. They make excellent individual serving desserts for dinner parties or special occasions. You could even make mini versions for a dessert bar!
Storing & Reheating Your Stuffed Cookies
Short-Term Storage
Because of the cream cheese filling, these cookies are best stored in an airtight container in the refrigerator. They will stay fresh and delicious for up to 3-4 days. While they won’t go bad at room temperature for a day, the texture and safety are much better maintained in the fridge.
Freezing for Later
Yes, you can absolutely freeze these cookies! Once they are completely cooled, place them in a single layer on a parchment-lined baking sheet and freeze until solid. Then, transfer the frozen cookies to a freezer-safe airtight container or heavy-duty freezer bag. They will keep well for up to 2-3 months. Thaw them in the refrigerator overnight or at room temperature for a few hours before serving.
Best Reheating Methods
To enjoy that fresh-baked warmth and gooey center, you can gently reheat your Cheesecake Stuffed Cookies. Pop them in a preheated oven at 300°F (150°C) for about 5-7 minutes, or until warmed through. Alternatively, a quick 10-15 seconds in the microwave can also do the trick, but be careful not to overheat, as this can dry out the cookie. Reheating from frozen will take longer in the oven, about 10-15 minutes.
Cheesecake Stuffed Cookies FAQ
Can I use different cookie dough?
How do I prevent the filling from oozing out?
Can I add fruit or other flavors to the cheesecake filling?
Are these cookies good for make-ahead desserts?
Cheesecake Stuffed Cookies
- Total Time: 42 minutes
- Yield: 18 cookies
Description
These delightful cookies perfectly combine the chewy texture of a classic cookie with a creamy, tangy cheesecake filling. An irresistible treat for any occasion.
Ingredients
- For the Cheesecake Filling:
- 8 oz (226g) full-fat cream cheese, softened
- 1/4 cup (50g) granulated sugar
- 1/2 teaspoon vanilla extract
- 1/4 teaspoon lemon zest (optional)
- For the Cookie Dough:
- 1/2 cup (113g) unsalted butter, softened
- 1/4 cup (56g) vegetable shortening
- 1/2 cup (100g) granulated sugar
- 1/2 cup (100g) light brown sugar, packed
- 1 large egg
- 1 teaspoon vanilla extract
- 2 1/4 cups (270g) all-purpose flour
- 1 teaspoon baking soda
- 1/2 teaspoon salt
Instructions
- Prepare the Cheesecake Filling: In a small bowl, beat cream cheese, granulated sugar, vanilla extract, and lemon zest (if using) until smooth. Drop 1-teaspoon dollops onto a parchment-lined baking sheet. Freeze for at least 30 minutes until firm.
- Prepare the Cookie Dough: In a large bowl, cream together butter, shortening, granulated sugar, and brown sugar until light and fluffy. Beat in the egg and vanilla. In a separate bowl, whisk flour, baking soda, and salt. Gradually add dry ingredients to wet, mixing until just combined.
- Assemble Cookies: Take frozen cream cheese dollops. Scoop about 1.5 tablespoons of cookie dough, flatten, place a frozen cream cheese dollop in the center, and wrap the dough around, sealing completely. Roll into a smooth ball.
- Bake: Preheat oven to 375°F (190°C). Place cookies 2 inches apart on parchment-lined baking sheets. Bake for 10-12 minutes, or until edges are lightly golden. Let cool on the baking sheet for 5 minutes, then transfer to a wire rack to cool completely.
- Prep Time: 30 mins
- Cook Time: 12 mins