
")
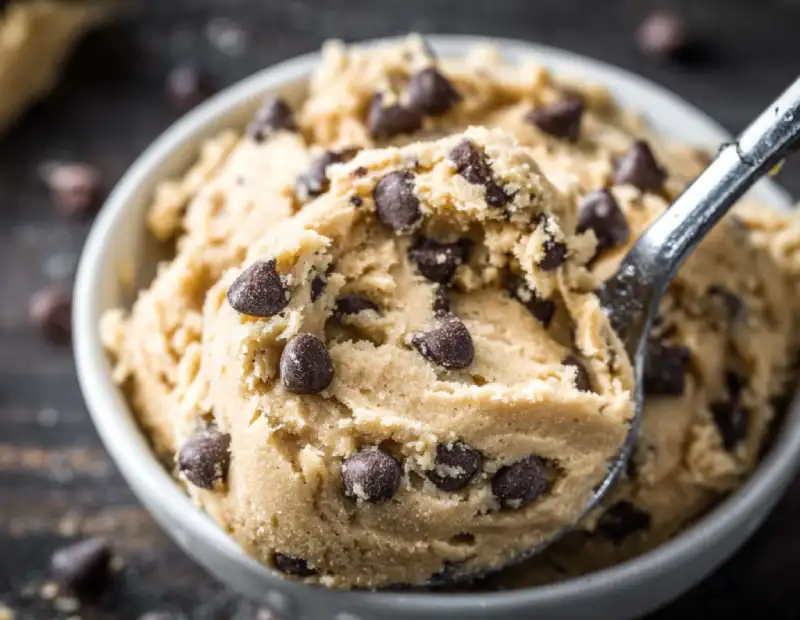
Table of Contents
- The Ultimate Chocolate Chip Cookie Dough: Perfectly Chewy, Every Time
- How This Recipe Works: The Science Behind Perfect Cookie Dough
- Ingredients and Smart Substitutions for Your Best Cookie Dough
- Step-by-Step Instructions: Your Visual Guide to Perfect Cookie Dough
- Expert Tips for Success: Mastering Your Cookie Dough
- What to Bake With Your Chocolate Chip Cookie Dough
- Storing and Reheating Chocolate Chip Cookie Dough
- Frequently Asked Questions About Chocolate Chip Cookie Dough
The Ultimate Chocolate Chip Cookie Dough: Perfectly Chewy, Every Time
There’s nothing quite like the allure of freshly baked chocolate chip cookies, and it all starts with the perfect chocolate chip cookie dough. That irresistible aroma wafting from the oven, the promise of a golden edge giving way to a gooey, molten chocolate center – it’s pure bliss! But achieving that dream cookie isn’t always as simple as combining ingredients. This isn’t just any recipe; it’s the culmination of countless batches, scientific understanding, and a true passion for baking. I’m going to share my go-to chocolate chip cookie dough secret, transforming your baking from good to absolutely legendary. Get ready to elevate your cookie game and discover why this recipe consistently delivers perfectly chewy results, every single time. For more delicious inspiration, you can always See more easy recipes on my site!
Why This Cookie Dough Recipe Works: The Science of Perfect Texture
- Balanced Sugar Ratios: The precise combination of brown and granulated sugars is key to achieving that ideal chewy-crispy balance. Brown sugar provides the moisture and chew, while granulated sugar contributes to crisp edges.
- Strategic Chilling: While it requires patience, chilling the dough is non-negotiable. It allows the flavors to meld, the flour to fully hydrate, and the butter to firm up, resulting in less spread and a richer, more complex taste.
- High-Quality Ingredients: Starting with excellent butter, fresh eggs, and premium chocolate chips genuinely makes a discernible difference in the final product’s flavor and texture.
- Minimal Flour Mixing: Overmixing flour develops gluten, leading to tougher cookies. Our technique ensures just enough mixing for tenderness.
My Go-To Chocolate Chip Cookie Dough Secret
My ultimate secret? It’s a combination of using a higher ratio of brown sugar to white sugar and embracing the power of vanilla bean paste over extract when I can, for that extra depth of flavor. But the most important secret of all is letting the dough rest. Patience, my friends, truly creates perfection!
How This Recipe Works: The Science Behind Perfect Cookie Dough
Baking is as much an art as it is a science, and understanding the ‘why’ behind each step transforms a good baker into a great one. This chocolate chip cookie dough recipe is designed with scientific principles in mind to guarantee incredible results.
Achieving Chewy Centers and Crispy Edges
The magic for that coveted chewy center and crispy edge lies in both the ingredients and the technique. Our blend of sugars, particularly the molasses in brown sugar, contributes significantly to chewiness. The precise oven temperature and baking time allow the edges to crisp up while the center remains delightfully soft.
Balancing Sweetness and Rich Chocolate Flavor
We carefully calibrate the sugar content so it complements, rather than overwhelms, the rich chocolate flavor. A touch of salt is also crucial here, as it acts as a flavor enhancer, making everything taste more vibrant and complex.
The Role of Brown Sugar for Moisture and Chew
Brown sugar is the MVP for chewiness! Its molasses content is hygroscopic, meaning it attracts and retains moisture. This not only keeps your cookies soft and chewy but also contributes to that signature caramel-like depth of flavor.
Ingredients and Smart Substitutions for Your Best Cookie Dough
Here is what you need and why:
Flour: All-Purpose vs. Specialty Flours I always recommend using a good quality all-purpose flour, preferably unbleached, for consistency in baking. It provides the perfect balance of structure without making the cookies tough. While you can experiment with specialty flours like bread flour for more chew or cake flour for a softer crumb, sticking to all-purpose is your safest bet for this recipe.
Butter: Unsalted is Key (and why) Fresh, high-quality unsalted butter is paramount. Using unsalted butter gives you complete control over the salt content in your recipe. Different brands of salted butter can vary wildly in their saltiness, which can throw off the balance of your cookie dough. Ensure it’s at a perfect room temperature for optimal creaming.
Sugars: Brown’s Chew vs. Granulated’s Crisp This recipe employs a blend of light brown sugar and granulated sugar. Light brown sugar, with its molasses content, is instrumental for that signature chewiness and depth of flavor. Granulated sugar, on the other hand, helps with spread and contributes to those delightful crispy edges we all love. Don’t swap ratios without understanding the textural impact!
Eggs: The Binder and Tenderizer Large eggs act as both a binder, holding all the ingredients together, and a tenderizer, adding richness and moisture. They also contribute to the cookie’s rise. Always use eggs at room temperature so they incorporate smoothly into the creamed butter and sugar.
Vanilla Extract: Don’t Skip This Flavor Enhancer A good quality pure vanilla extract (or even better, vanilla bean paste) is non-negotiable. It enhances and deepens all the other flavors in the cookie dough, turning a good cookie into an extraordinary one. It’s not just for sweetness; it’s for complexity.
Leavening Agents: Baking Soda for Spread and Rise Baking soda reacts with the acidic brown sugar in our recipe to create carbon dioxide gas, which causes the cookies to spread and rise, giving them that classic slightly puffed yet chewy texture. Ensure your baking soda is fresh for optimal results.
Salt: Balancing Sweetness A pinch of fine sea salt is crucial. It doesn’t just add saltiness; it balances the sweetness of the sugars and chocolate, making all the flavors pop and preventing the cookies from tasting cloyingly sweet. It’s truly a secret weapon!
Chocolate Chips: Your Preference Matters This is where you can truly personalize your cookie dough! I love a mix of semi-sweet chocolate chips and chopped dark chocolate for complexity, but feel free to use milk chocolate, white chocolate, or even chocolate chunks. Quality matters here – choose a brand you love eating on its own! For high quality baking chocolate resources, I often refer to King Arthur Baking’s guide to chocolate.
Step-by-Step Instructions: Your Visual Guide to Perfect Cookie Dough
Follow these step-by-step instructions to create the ultimate chocolate chip cookie dough:
1. Preparing Your Workspace (Mise en Place)
Before you even think about mixing, gather all your ingredients and tools. This practice, known as ‘mise en place,’ ensures a smooth baking process. Measure your flour, sugars, and chocolate chips, and have your butter and eggs at room temperature. Preheat your oven (if baking immediately) and line baking sheets with parchment paper.
2. Creaming Butter and Sugars: The Foundation
In a large bowl, using an electric mixer, cream together the softened unsalted butter, granulated sugar, and light brown sugar on medium speed. Beat for 2-3 minutes until the mixture is light in color and fluffy in texture. This step incorporates air, which contributes to the cookies’ final texture.
3. Incorporating Eggs and Vanilla: Building Emulsion
Add the room temperature eggs one at a time, beating well after each addition until fully incorporated. Scrape down the sides of the bowl as needed. Stir in the vanilla extract or paste. The mixture should look cohesive and slightly glossy. This builds an emulsion that helps keep your dough stable.
4. Adding Dry Ingredients: Mixing Just Enough
In a separate medium bowl, whisk together the all-purpose flour, baking soda, and salt. Gradually add the dry ingredients to the wet ingredients, mixing on low speed until just combined. Stop mixing as soon as no streaks of flour remain. Overmixing here develops gluten and can lead to tough cookies.
5. Folding in Chocolate Chips: Even Distribution
Remove the bowl from the mixer and, using a rubber spatula, gently fold in your chosen chocolate chips or chunks until they are evenly distributed throughout the dough. Avoid crushing them; maintain their integrity for those delightful pockets of melted chocolate.
6. Chilling the Dough: Why It’s Non-Negotiable
Cover the bowl with plastic wrap and refrigerate the chocolate chip cookie dough for at least 30 minutes, or preferably 2 hours. Chilling allows the flavors to deepen, the butter to firm up (which prevents excessive spreading), and the flour to fully hydrate, leading to a superior texture and richer taste. For best results, chill overnight!
Expert Tips for Success: Mastering Your Cookie Dough
- Don’t Overmix the Flour: Once flour is added, mix only until just combined. Overmixing develops gluten, leading to tougher, less tender cookies.
- Chilling Time Creates Flavor and Texture: While tempting to skip, chilling the dough is crucial. It firms up the fat, prevents excessive spreading, and allows the flavors to meld, resulting in a more complex and satisfying cookie.
- Properly Measure Your Flour: Spoon your flour into the measuring cup and then level it off with a straight edge. Dipping the cup directly into the flour can compact it, leading to too much flour and dry, dense cookies.
- Room Temperature Ingredients Matter: Ensure your butter and eggs are at room temperature. This allows them to cream together properly, creating a smooth emulsion that traps air effectively, leading to a lighter, fluffier texture.
- High-Quality Chocolate Makes a Difference: Invest in good quality chocolate chips or chunks. The flavor of the chocolate is a significant component of a chocolate chip cookie, and using delicious chocolate will elevate your final product immensely.
What to Bake With Your Chocolate Chip Cookie Dough
This versatile chocolate chip cookie dough isn’t just for classic cookies! Here are some fantastic ways to use it:
- Classic Baked Cookies: The obvious choice! Scoop onto baking sheets and bake until golden brown for that timeless treat.
- Cookie Dough Ice Cream Inclusion: Crumble chunks of raw (heat-treated flour, see below) or par-baked cookie dough into your homemade or store-bought vanilla ice cream for a delightful texture and flavor boost.
- Edible Cookie Dough (with heat-treated flour): If you plan to eat the dough raw, ensure you heat-treat your flour first to kill any potential bacteria. Spread flour thinly on a baking sheet and bake at 300°F (150°C) for 5-7 minutes, then cool completely before using.
- Cookie Dough Bars: Press the dough into a baking dish (like an 8×8 or 9×13 inch pan) and bake for thicker cookie bars perfect for cutting into squares.
- Sandwich Cookies: Bake smaller, thinner cookies and sandwich them with your favorite frosting or ice cream.
Storing and Reheating Chocolate Chip Cookie Dough
Proper storage is essential for extending the life of your chocolate chip cookie dough and baked cookies.
- Refrigerating Raw Dough: Wrap the dough tightly in plastic wrap or place it in an airtight container. It will keep well in the refrigerator for up to 3-5 days. This allows flavors to deepen even further!
- Freezing Raw Dough for Later: For longer storage, portion the cookie dough into individual balls, place them on a parchment-lined baking sheet, and freeze until solid. Once frozen, transfer the dough balls to a freezer-safe bag or airtight container. Frozen dough can last for up to 3 months. Bake directly from frozen, adding an extra minute or two to the baking time.
- Best Practices for Baked Cookies: Once baked, allow cookies to cool completely on a wire rack. Store them in an airtight container at room temperature for up to 3-4 days to maintain their softness and freshness. If they start to get a bit firm, you can warm them briefly in the microwave for a few seconds to restore some chewiness.
Frequently Asked Questions About Chocolate Chip Cookie Dough
Why do I need to chill the dough?
Can I use melted butter?
My cookies are spreading too much, what went wrong?
Can I make this dough ahead of time?
Is it safe to eat raw cookie dough?
The Ultimate Chocolate Chip Cookie Dough
- Total Time: 47 minute
- Yield: 3 dozen cookies (approx.)
Description
Learn how to make the ultimate chocolate chip cookie dough for perfectly chewy, rich cookies every time. This recipe yields a dough that bakes up beautifully, with a delightful balance of sweetness and chocolate.
Ingredients
- 2 ½ cups (300g) all-purpose flour
- 1 teaspoon baking soda
- 1 teaspoon fine sea salt
- 1 cup (226g) unsalted butter, softened
- ¾ cup (150g) granulated sugar
- 1 cup (200g) light brown sugar, packed
- 2 large eggs, room temperature
- 2 teaspoons pure vanilla extract (or vanilla bean paste)
- 2 cups (340g) chocolate chips (semi-sweet, milk, or a mix)
Instructions
- Preheat oven to 375°F (190°C) if baking immediately. Line baking sheets with parchment paper.
- In a medium bowl, whisk together the flour, baking soda, and salt. Set aside.
- In a large bowl, cream together the softened butter, granulated sugar, and light brown sugar with an electric mixer until light and fluffy (2-3 minutes).
- Beat in the eggs one at a time, scraping down the bowl after each addition. Stir in the vanilla extract.
- Gradually add the dry ingredients to the wet ingredients, mixing on low speed until just combined. Do not overmix.
- Fold in the chocolate chips until evenly distributed.
- Cover the dough and chill in the refrigerator for at least 30 minutes, or up to 2 hours for best results (or overnight).
- Scoop dough onto prepared baking sheets using a 2-tablespoon scoop, spacing them about 2 inches apart.
- Bake for 10-12 minutes, or until the edges are golden brown and the centers are still slightly soft.
- Let cookies cool on the baking sheet for 5 minutes before transferring to a wire rack to cool completely.
- Prep Time: 15 mins
- Cook Time: 10-12 mins