
")
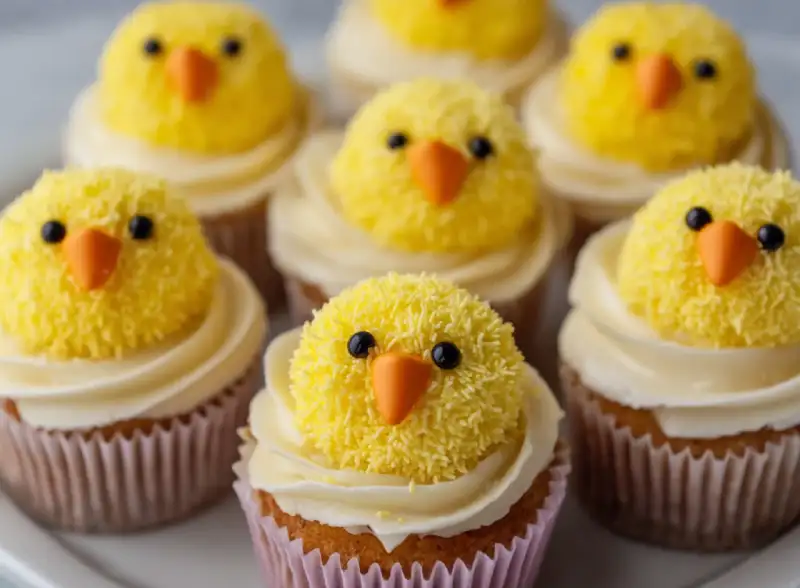
Table of Contents
- Make Adorable Easter Chick Cupcakes: A Fun Holiday Recipe!
- Why These Easter Chick Cupcakes Are a Must-Try
- Essential Ingredients for Perfect Easter Chick Cupcakes
- Step-by-Step Guide to Baking Easter Chick Cupcakes
- Expert Tips for Easter Chick Cupcake Success
- What to Serve with Your Easter Chick Cupcakes
- Storing and Reheating Your Easter Chick Cupcakes
- Easter Chick Cupcakes FAQ
Make Adorable Easter Chick Cupcakes: A Fun Holiday Recipe!
As an expert food blogger with years of baking experience, I can confidently tell you that these Easter chick cupcakes are more than just a treat; they’re a centerpiece of holiday joy! Imagine biting into a fluffy, moist vanilla cupcake, perfectly sweetened, topped with a cloud of vibrant, silken buttercream that practically melts in your mouth. Then, a delightful pop of chocolate from the eyes and an adorable candy beak complete the picture of pure deliciousness. These aren’t just cute; they are genuinely delightful to eat, offering that perfect balance of tender crumb and rich, creamy frosting that everyone craves. They’re sure to bring smiles to any Easter gathering, and for more easy recipes that impress, you can always See more easy recipes right here!
This recipe works by creating a cupcake base that is intensely flavorful yet light, ensuring it’s never dry or crumbly. The secret lies in a carefully balanced ratio of wet to dry ingredients, along with the strategic use of butter and eggs for richness and structure. The buttercream is an American-style classic, engineered for maximum pipeability and a smooth finish, making those adorable chick faces achievable for bakers of all skill levels. We’ll focus on techniques to ensure a truly smooth, lump-free frosting that holds its shape beautifully.
Why These Easter Chick Cupcakes Are a Must-Try (Personal Touch)
- Unrivaled Moisture and Flavor: Our vanilla cupcake base uses a reverse creaming method that locks in moisture and creates an incredibly tender crumb, making these far superior to standard recipes.
- Buttercream Perfection: This recipe delivers a perfectly pipeable buttercream – not too stiff, not too soft – allowing for those precise, charming chick decorations without frustration.
- Approachable for All Skill Levels: While visually impressive, we break down each step, making the decorating process enjoyable and achievable even for novice bakers.
- Spring-Ready Vibrancy: The vibrant yellow frosting and simple yet effective decorations genuinely capture the spirit of Easter, making them a feast for both the eyes and the palate.
Essential Ingredients for Perfect Easter Chick Cupcakes
Here is what you need and why:
Cupcake Base: The foundation of any great cupcake is its cake, and for these Easter chick cupcakes, we need a base that’s both moist and flavorful.
- All-purpose flour: Provides structure. I recommend unbleached for a slightly finer texture.
- Granulated Sugar: Sweetens and helps keeps the cupcakes tender by interfering with gluten development.
- Baking Powder & Baking Soda: Our leavening agents. Baking powder provides the main lift, while a touch of baking soda reacts with the buttermilk for extra tenderness and rise.
- Salt: Essential for balancing and enhancing all the other flavors. Don’t skip it!
- Unsalted Butter: Melted butter creates a moist, dense crumb. Using unsalted allows you to control the total sodium. Its rich flavor is crucial.
- Large Eggs: Bind ingredients, add richness, and contribute to the cake’s structure and rise. Ensure they are at room temperature for better emulsion.
- Buttermilk: Adds moisture and a slight tang, reacting with baking soda for a tender crumb. If you don’t have buttermilk, you can make a substitute by adding 1 tablespoon of white vinegar or lemon juice to regular milk and letting it sit for 5 minutes.
- Vanilla Extract: The soul of vanilla cupcakes! Use a good quality pure vanilla extract for the best flavor. King Arthur Baking has some excellent resources on getting the best vanilla flavor.
Buttercream Frosting: Achieving a smooth, pipeable consistency is key for creating those adorable chick details.
- Unsalted Butter: Softened to room temperature, it’s the base of our luscious buttercream. Its fat content carries flavor and creates the creamy texture.
- Powdered Sugar (Confectioners’ Sugar): Provides sweetness and body, dissolving easily to create a smooth frosting. Sift it to avoid lumps!
- Heavy Cream or Milk: Adjusts the consistency of the frosting, making it smooth and pliable for piping. Heavy cream will result in a richer, slightly firmer frosting.
- Vanilla Extract: Adds depth to the frosting’s flavor.
- Yellow Food Coloring: Gel food coloring works best for vibrant hues without adding too much liquid, which can thin the frosting.
Decorations: These elements bring our charming chicks to life!
- Candy Eyes: Small, edible candy eyes are readily available at craft stores or baking supply shops and make the chicks instantly recognizable.
- Orange Starbursts or Orange Candy Melts: Starbursts can be cut into small triangles for beaks, or you can use melted orange candy melts solidified and cut.
Step-by-Step Guide to Baking Easter Chick Cupcakes
Follow these step-by-step instructions to create your delightful Easter chick cupcakes:
1. Preparing the Cupcake Batter
Preheat your oven to 350°F (175°C) and line a 12-cup muffin tin with paper liners. In a large bowl, whisk together the all-purpose flour, granulated sugar, baking powder, baking soda, and salt. Make sure there are no lumps and the dry ingredients are well combined. In a separate medium bowl, whisk together the melted unsalted butter, large eggs, buttermilk, and vanilla extract until smooth. Gradually add the wet ingredients to the dry ingredients, mixing with a rubber spatula or an electric mixer on low speed just until combined. Be careful not to overmix; a few lumps are okay. The batter should be thick but pourable.
2. Baking the Cupcakes to Perfection
Divide the batter evenly among the 12 prepared cupcake liners, filling each about two-thirds full. Bake for 18-22 minutes, or until a wooden skewer inserted into the center of a cupcake comes out clean. The tops should be lightly golden and spring back when gently pressed. Remove the cupcakes from the oven and let them cool in the muffin pan for 5 minutes before transferring them to a wire rack to cool completely. Ensure they are fully cooled before frosting, or your buttercream will melt!
3. Making the Silky Smooth Buttercream
In a large bowl, using an electric mixer, beat the softened unsalted butter on medium speed until creamy and pale, about 3-4 minutes. Gradually add the sifted powdered sugar, one cup at a time, beating well after each addition until fully incorporated. Add the heavy cream or milk and vanilla extract, then beat on high speed for another 2-3 minutes until the buttercream is light, fluffy, and smooth. Now, add your yellow gel food coloring, starting with a few drops and mixing until you achieve your desired bright chick-yellow hue. If the frosting seems too stiff, add a tiny bit more cream; if too thin, add a tablespoon more powdered sugar.
4. Decorating Your Chick Cupcakes (Visual Guide)
Once the cupcakes are completely cool, transfer the yellow buttercream to a piping bag fitted with a large round tip (like an Ateco 808 or Wilton 1A). Pipe a generous swirl of frosting on top of each cupcake, building it up to create the chick’s body. Next, carefully place two candy eyes on the top part of the frosting swirl. For the beak, take an orange Starburst, flatten it slightly, and cut small triangles. Press one triangle gently below the eyes. Alternatively, if using melted orange candy, pipe tiny triangles. Continue with all cupcakes until your adorable flock of Easter chick cupcakes is complete!
Expert Tips for Easter Chick Cupcake Success
- Room Temperature Ingredients are Key: For both the cupcakes and the buttercream, ensure your butter, eggs, and buttermilk are at room temperature. This allows them to emulsify properly, creating a smoother batter and creamier frosting.
- Don’t Overmix the Batter: Overmixing develops gluten, leading to tough cupcakes. Mix only until the ingredients are just combined.
- Measure Flour Correctly: Spoon your flour into the measuring cup and then level it off with a straight edge. Dipping the cup directly into the flour can compact it, leading to too much flour and dry cupcakes.
- Sift Your Powdered Sugar: This is crucial for lump-free, silky smooth buttercream. Don’t skip this step!
- Achieving Bright Yellow Frosting: Use gel food coloring for the best results. It’s more concentrated than liquid coloring and won’t thin your buttercream. Add it gradually until you reach your desired vibrant yellow.
- Piping Techniques for Chick Faces: For the body, pipe a generous mound. For the eyes and beak, use tweezers or the tip of a small knife to carefully place the candy decorations. Practice on a plate first if you’re new to piping.
- Troubleshooting Common Baking Issues: If cupcakes sink, your oven might be too hot or you opened the door too early. If they’re dry, you likely overbaked them or used too much flour.
What to Serve with Your Easter Chick Cupcakes
These delightful Easter chick cupcakes are fantastic on their own, but pairing them with complementary treats and beverages can elevate your Easter celebration.
- Complementary Holiday Treats: Consider a platter with these cupcakes alongside other festive spring desserts. Lemon bars, carrot cake bites, or classic sugar cookies decorated with Easter themes would be wonderful additions. Mini fruit tarts also offer a fresh contrast.
- Best Beverage Pairings: For adults, a light-bodied sparkling wine or a mimosa makes a lovely celebratory pairing. Coffee and tea are always classic companions. For children, milk, hot chocolate, or a light fruit juice punch would be perfect.
Storing and Reheating Your Easter Chick Cupcakes
Proper storage ensures your Easter chick cupcakes stay fresh and delicious long after they’re baked.
- Proper Storage for Freshness: Store frosted cupcakes in an airtight container at room temperature for up to 2-3 days. If your kitchen is particularly warm, or if they contain dairy components that are sensitive to heat (though our buttercream is quite stable), you can store them in the refrigerator. Just be sure to bring them back to room temperature for about 30 minutes before serving for the best texture and flavor.
- Freezing Cupcakes for Later Enjoyment: You can freeze unfrosted cupcakes for up to 3 months. Wrap them individually in plastic wrap, then place them in a freezer-safe bag or container. Thaw them at room temperature before frosting. Frosted cupcakes can also be frozen, but be aware that the frosting texture might change slightly upon thawing. Place them in the freezer uncovered for about an hour until the frosting is solid, then carefully wrap them individually in plastic wrap and store in an airtight container for up to 1 month. Thaw in the refrigerator overnight, then bring to room temperature before serving.
Easter Chick Cupcakes FAQ
Can I use a box mix for this recipe?
How far in advance can I make these cupcakes?
What if my frosting is too thin/thick?
Delicious Easter Chick Cupcakes
- Total Time: 50 minutes
- Yield: 12 cupcakes
Description
These adorable Easter chick cupcakes feature a moist vanilla cake topped with vibrant, pipeable buttercream. Perfect for a festive spring celebration, they’re as fun to make as they are to eat.
Ingredients
- For the Cupcakes:
- 1 ½ cups (180g) all-purpose flour
- 1 cup (200g) granulated sugar
- 1 ½ tsp baking powder
- ½ tsp baking soda
- ¼ tsp salt
- ⅓ cup (75g) unsalted butter, melted
- 2 large eggs, room temperature
- ⅔ cup (160ml) buttermilk, room temperature
- 1 tsp vanilla extract
- For the Buttercream:
- 1 cup (226g) unsalted butter, softened
- 3–4 cups (360-480g) powdered sugar, sifted
- 2–3 tbsp heavy cream or milk
- 1 tsp vanilla extract
- Yellow gel food coloring
- For Decoration:
- 24 small candy eyes
- 1–2 orange Starburst candies or orange candy melts
Instructions
- Preheat oven to 350°F (175°C). Line a 12-cup muffin tin with paper liners.
- In a large bowl, whisk flour, sugar, baking powder, baking soda, and salt.
- In another bowl, whisk melted butter, eggs, buttermilk, and vanilla. Add wet to dry ingredients; mix until just combined.
- Fill cupcake liners ⅔ full. Bake 18-22 minutes, or until a skewer comes out clean. Cool completely on a wire rack.
- For buttercream: Beat softened butter until creamy. Gradually add sifted powdered sugar. Beat in cream/milk and vanilla. Beat on high until fluffy. Add yellow food coloring until desired shade is reached.
- Transfer buttercream to a piping bag with a large round tip. Pipe a generous swirl onto each cooled cupcake.
- Place two candy eyes on each chick. Cut orange Starbursts into small triangles for beaks and gently press onto the cupcakes.
- Prep Time: 30 mins
- Cook Time: 20 mins