
")
Gluten-Free Blueberry Bagels: Your New Bakery Obsession
Table of Contents
- Gluten-Free Blueberry Bagels: Your New Bakery Obsession
- How This Recipe Works: The Science of Scrumptious
- Ingredients & Intent: Building Your Bagels from Scratch
- Step-by-Step Instructions: Crafting Your Gluten-Free Bagels
- Expert Tips for Success: Essential Bagel-Making Wisdom
- What to Serve With Your Homemade Gluten-Free Bagels
- Storing & Reheating Your Gluten-Free Bagels
- Gluten-Free Blueberry Bagels: Your Questions Answered
Imagine biting into a soft, chewy bagel, bursting with sweet blueberries, and sporting that signature glossy, slightly crisp crust. Now imagine doing that, knowing it’s entirely gluten-free! Yes, fellow food lovers, your search for the perfect gluten-free blueberry bagels ends here. These aren’t just ‘good for gluten-free’ bagels; they are simply good bagels, period. They boast an incredible texture that perfectly balances chewiness with a tender crumb, a golden-brown finish, and a delightful pop of blueberry in every bite. If you’re yearning for that authentic bakery experience right in your own kitchen, get ready to dive in!
My journey to crafting the ultimate gluten-free blueberry bagel has been quite an adventure. I’ve experimented with countless flour blends, hydration levels, and proofing times, all driven by a desire to recreate that specific bagel magic without gluten. The frustratingly dry, crumbly, or overly dense imposters just wouldn’t do! Through trial and error, a little kitchen science, and a lot of passion, I’ve finally landed on a recipe that consistently delivers. These bagels stand out from the rest because they don’t compromise on flavor or texture. They offer a truly satisfying chew, a hint of sweetness from the berries, and that unmistakable bagel character that’s often missing in gluten-free baked goods. You too can See more good recipes here to broaden your baking horizons beyond these delicious bagels!
How This Recipe Works: The Science of Scrumptious
- Achieving chewy texture without gluten: This recipe leverages a precise blend of gluten-free flours and xanthan gum to mimic gluten’s structure. The boiling step is absolutely crucial; it gelatinizes the starches on the bagel’s surface, creating that characteristic chewy crust.
- The secret to rich blueberry flavor: We use fresh (or properly prepared frozen) blueberries and incorporate them carefully to ensure they distribute evenly and burst during baking, releasing their sweet, tart essence.
- Why a short proofing time is key: Unlike traditional bagels, which often have longer proofing times, gluten-free doughs can sometimes over-proof and lose their structure. A shorter, controlled proof allows for just enough yeast activity to develop flavor and rise without compromising the dough’s integrity, ensuring a tender yet structured bagel.
Ingredients & Intent: Building Your Bagels from Scratch
Here is what you need and why:
Gluten-Free All-Purpose Flour Blend: I recommend a good quality, commercially available gluten-free all-purpose flour blend that contains rice flour, tapioca starch, and potato starch. The combination of these flours is essential for achieving the right density and elasticity needed for a bagel. Rice flour provides structure, tapioca starch adds chewiness, and potato starch contributes to overall tenderness. Avoid using single-flour alternatives.
Active Dry Yeast: This is our leavening agent. It’s what makes the bagels rise and gives them their airy crumb. Yeast activation is critical; the water for proofing should be between 105-115°F (40-46°C). Too cold, and the yeast won’t activate; too hot, and you’ll kill it!
Granulated Sugar & Honey/Maple Syrup: Sugar does more than just sweeten! It feeds the yeast, aiding in fermentation, and contributes to browning during baking. Honey or maple syrup in the boiling water bath adds a lovely subtle flavor and helps create that beautiful, glossy, golden crust. Don’t skip it!
Xanthan Gum: This is a non-negotiable ingredient in gluten-free baking, especially for bagels. It acts as a gluten substitute, providing elasticity and structure to the dough, preventing it from becoming crumbly. If your GF flour blend already contains it, you may need to adjust the amount slightly.
Salt: Essential for flavor balance and also helps control yeast activity.
Warm Water: Crucial for activating the yeast and hydrating the flour. Ensure it’s within the correct temperature range.
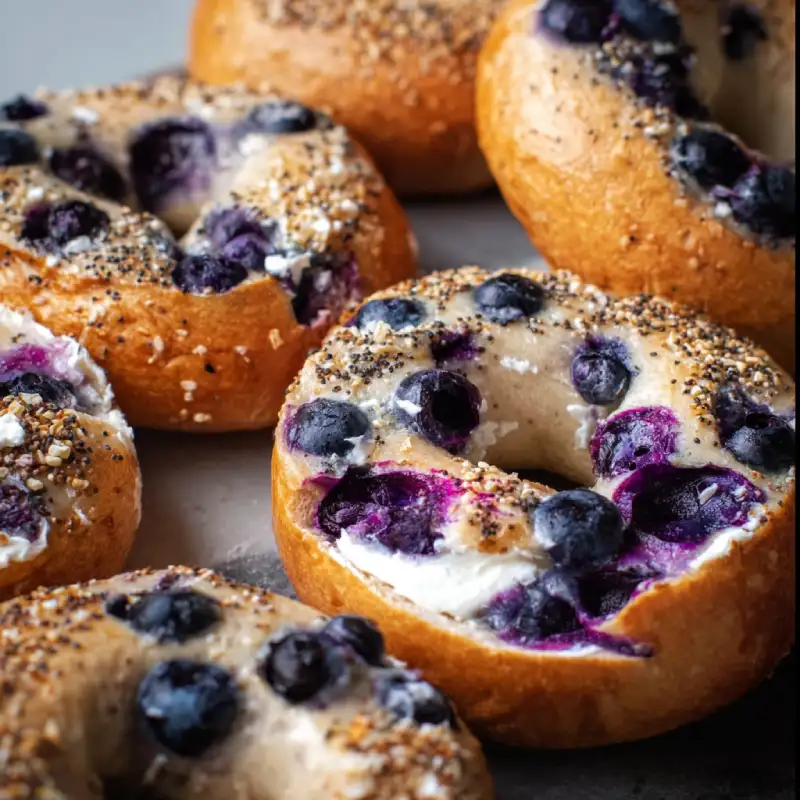
Fresh vs. Frozen Blueberries: Fresh blueberries are ideal as they tend to hold their shape better and bleed less into the dough. If using frozen, do NOT thaw them first; add them directly to the dough. Thawed frozen blueberries can release too much moisture and turn your dough purple. You can toss them lightly with a teaspoon of GF flour beforehand to minimize bleeding.
Egg Wash (optional): A simple egg wash (one egg beaten with a tablespoon of water) brushed on before baking gives the bagels a beautiful shine and helps any toppings adhere.
Step-by-Step Instructions: Crafting Your Gluten-Free Bagels
Follow these step-by-step photos:
1. Activate the Yeast & Prepare the Dough
In a large mixing bowl, combine the warm water, granulated sugar, and active dry yeast. Stir gently and let it sit for about 5-10 minutes until foamy. This confirms your yeast is alive and ready to work! In a separate bowl, whisk together the gluten-free flour blend, xanthan gum, and salt. Add the dry ingredients to the wet ingredients, mixing with a sturdy spoon or a stand mixer with a paddle attachment until a shaggy dough forms. Continue mixing for another 3-5 minutes until the dough comes together and is relatively smooth. It will be stickier than traditional bagel dough.
2. Incorporate Blueberries & First Rise
Gently fold in the fresh or frozen blueberries until they are evenly distributed throughout the dough. Try not to overmix, which can crush the berries. Lightly grease a clean bowl, transfer the dough, and cover it with plastic wrap. Let it rise in a warm place for about 45-60 minutes, or until it has visibly increased in size (about 50%). Gluten-free doughs rise differently than wheat doughs, so don’t expect a double in size.
3. Shape Your Bagels
Gently punch down the risen dough and turn it out onto a lightly floured surface (use gluten-free flour for dusting). Divide the dough into 8 equal pieces. With lightly floured hands, roll each piece into a ball. To create the hole, either poke a hole through the center with your thumb and gently stretch it to about 1-inch in diameter, or roll the dough into a 6-inch rope and pinch the ends together to form a ring. Place the shaped bagels on a parchment-lined baking sheet, spaced apart.
4. The Critical Boil
Preheat your oven to 400°F (200°C). Bring a large pot of water to a rolling boil. Add the honey or maple syrup and a pinch of salt to the boiling water. Carefully drop 2-3 bagels into the boiling water at a time, being careful not to overcrowd the pot. Boil for 1 minute per side. This crucial step creates that signature chewy exterior. Using a slotted spoon, remove the boiled bagels and return them to the parchment-lined baking sheet.
5. Bake for Beauty
If using, brush the tops of the boiled bagels with the egg wash. This gives them a beautiful, golden sheen. Bake for 18-22 minutes, or until the bagels are deeply golden brown and sound hollow when tapped on the bottom. Rotate the baking sheet halfway through baking for even browning. Transfer the baked bagels to a wire rack to cool completely before slicing and enjoying.
Expert Tips for Success: Essential Bagel-Making Wisdom
- Don’t over-flour the surface: Gluten-free dough can tolerate less flour during shaping than traditional dough. Use a light dusting to prevent sticking, but too much flour can make the bagels dry. Keep your hands lightly floured instead.
- The perfect water bath temperature: For boiling, ensure your water is at a consistent rolling boil. Adding the sweetener (honey or maple syrup) is key for color and crust development.
- Preventing blueberry bleed: a simple trick: If using fresh blueberries, ensure they are thoroughly dry. For frozen blueberries, add them directly from the freezer without thawing, and consider tossing them lightly in a teaspoon of gluten-free flour first. This creates a barrier and helps prevent them from coloring the entire dough.
- Knowing when your bagels are truly done: The visual cue is a deep, golden-brown color on the crust. You can also tap the bottom of a bagel; it should sound hollow. If they feel soft and pale, they need more time.
- Patience with proofing: Gluten-free dough will not typically double in size like wheat dough. Look for a noticeable plumpness and a slight increase in volume rather than a full doubling.
What to Serve With Your Homemade Gluten-Free Bagels
Oh, the possibilities! Your fresh, warm gluten-free blueberry bagels are a canvas for culinary creativity.
- Classic cream cheese pairings: A simple schmear of plain cream cheese is always a winner, allowing the blueberry flavor to shine. For something extra special, try lemon zest cream cheese, or even a cinnamon-sugar cream cheese spread.
- Savory and sweet topping ideas: Beyond cream cheese, consider a dollop of ricotta with a drizzle of honey, or a rich almond butter. For a savory twist, a slice of smoked salmon with capers and dill can be heavenly, or even smashed avocado with a sprinkle of everything bagel seasoning (ensure it’s GF!).
- Beyond breakfast: bagel sandwich inspiration: These bagels aren’t just for mornings! Slice them horizontally and use them as the base for a delightful lunch. Think turkey and Swiss, chicken salad, or even a vegetarian delight with hummus, cucumber, and bell peppers.
Storing & Reheating Your Gluten-Free Bagels
To keep your delicious gluten-free blueberry bagels at their best, proper storage is key.
- Keeping them fresh: short-term storage: Once cooled completely, store your bagels in an airtight container or a large zip-top bag at room temperature for up to 2-3 days. While they won’t dry out as quickly as some gluten-free breads, they are best enjoyed fresh.
- Freezing for later: best practices: Bagels freeze wonderfully! Once completely cool, slice them in half (so they’re ready for toasting). Wrap each half individually in plastic wrap, then place them all in a freezer-safe bag. They will keep well in the freezer for up to 3 months.
- Reheating for optimal enjoyment: From the freezer, you can pop a sliced bagel directly into a toaster oven or standard toaster. For room temperature bagels, a quick toast will bring back that delightful warmth and crispness. For a softer texture, you can lightly mist them with water and warm them in a preheated oven at 350°F (175°C) for a few minutes.
Gluten-Free Blueberry Bagels: Your Questions Answered
Can I make these dairy-free?
What if my bagels are too dense?
Troubleshooting sticky dough
Can I use other fruits?
Source for baking tips: King Arthur Baking
Delicious Gluten-Free Blueberry Bagels
- Total Time: 50 minutes
- Yield: 8 bagels
Description
Discover how to make delicious gluten-free blueberry bagels with our step-by-step guide. Easy to bake, these bagels offer the best flavor and a delightful texture.
Ingredients
- 1 ½ cups (360ml) warm water (105-115°F / 40-46°C)
- 1 tablespoon granulated sugar
- 2 ¼ teaspoons active dry yeast (one standard packet)
- 3 cups (420g) gluten-free all-purpose flour blend (containing xanthan gum, or add 1 tsp separately)
- 1 teaspoon xanthan gum (if not in blend)
- 1 ½ teaspoons salt
- ¾ cup (115g) fresh or frozen blueberries
- Optional: 1-2 tablespoons honey or maple syrup (for boiling water)
- Optional: 1 large egg, beaten with 1 tablespoon water (for egg wash)
Instructions
- 1. Activate Yeast & Prepare Dough: In a large bowl, combine warm water, sugar, and yeast. Let foam for 5-10 mins. Whisk flour, xanthan gum (if needed), and salt in a separate bowl. Add dry to wet, mix until shaggy, then mix 3-5 more minutes until dough forms.
- 2. Incorporate Blueberries & First Rise: Gently fold in blueberries. Grease a bowl, transfer dough, cover, and let rise in a warm place for 45-60 minutes, or until visibly plumped.
- 3. Shape Bagels: Gently punch down dough onto a lightly floured surface. Divide into 8 equal pieces. Roll each into a ball, then poke a hole in the center and stretch to a 1-inch diameter, or form a rope and pinch ends to create a ring. Place on a parchment-lined baking sheet.
- 4. The Critical Boil: Preheat oven to 400°F (200°C). Bring a large pot of water to a rolling boil. Add honey/maple syrup if using. Boil 2-3 bagels at a time, 1 minute per side. Remove with a slotted spoon and return to baking sheet.
- 5. Bake for Beauty: If using, brush bagels with egg wash. Bake for 18-22 minutes, or until deeply golden brown and hollow-sounding when tapped. Cool on a wire rack completely before enjoying.
- Prep Time: 30 mins
- Cook Time: 20 mins