
")
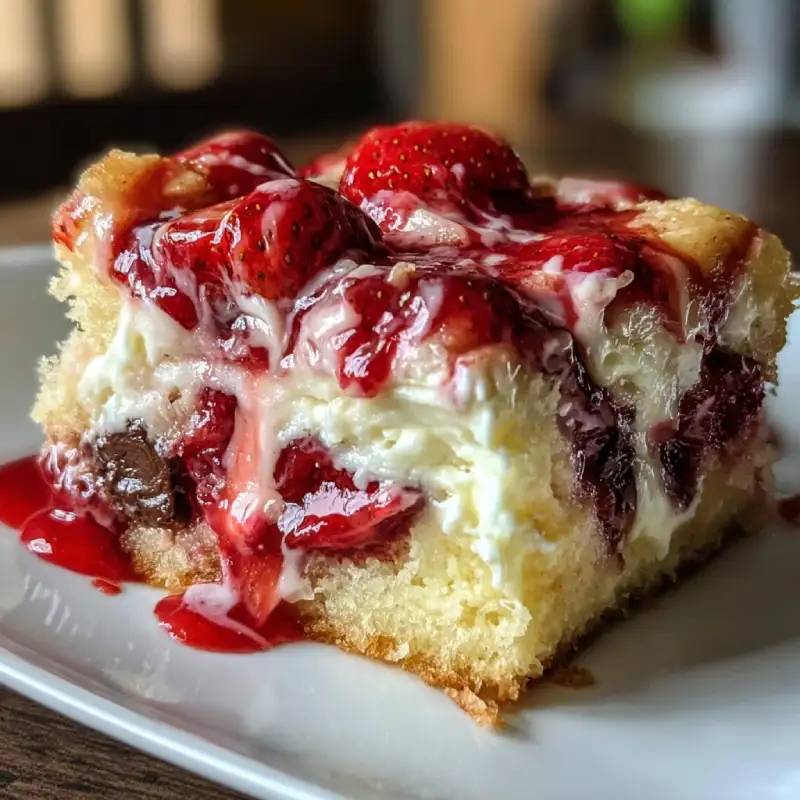
Table of Contents
- Experience the Ultimate Gooey Strawberry Earthquake Cake
- How This Gooey Strawberry Earthquake Cake Works
- Ingredients and Smart Substitutions
- Step-by-Step: Baking Your Strawberry Earthquake Cake
- Expert Tips for a Flawless Earthquake Cake
- What to Serve With Your Strawberry Earthquake Cake
- Storing and Reheating Your Cake
- Gooey Strawberry Earthquake Cake: Your FAQs Answered
Experience the Ultimate Gooey Strawberry Earthquake Cake
Oh, my sweet friends, prepare yourselves for a dessert experience that will truly rock your world! Imagine sinking your fork into a cake that’s impossibly moist, bursting with the fresh, vibrant flavor of strawberries, and riddled with pockets of luscious, gooey cream cheese and sweet condensed milk. That, my friends, is the magic of the Gooey Strawberry Earthquake Cake. It’s not just a cake; it’s an event, a delightful catastrophe of flavor and texture that demands your attention. Every bite is an explosion of sweet, tangy, and utterly decadent goodness. For more easy recipes that deliver on big flavor, you can always see more here, but trust me, this one is a true showstopper!
Why This Cake is a Must-Bake
There are cakes, and then there are cakes. This Gooey Strawberry Earthquake Cake falls firmly into the latter category. It’s a must-bake because it effortlessly combines convenience with an intensely satisfying homemade taste. It’s forgiving, impressive, and delivers on its promise of gooey, strawberry-infused delight every single time. It’s the kind of cake that disappears in a flash at potlucks and family gatherings, leaving everyone begging for the recipe.
My Journey to the Perfect Earthquake Cake
My love affair with Earthquake cakes started years ago, but I always felt there was room for improvement, especially with fruit. Traditional versions were glorious, but I craved a brighter, fresher profile. After numerous trials and delicious errors, experimenting with different fruit-to-gooey-ratio combinations, I finally landed on this strawberry version. It strikes the perfect balance – the tang of fresh strawberries cutting through the richness, creating a harmonious symphony of flavors that truly sets it apart.
How This Gooey Strawberry Earthquake Cake Works
The ‘Earthquake’ Effect Explained
The name ‘Earthquake Cake’ isn’t just for show – it beautifully describes what happens during baking! As the cake bakes, the rich, buttery cream cheese mixture, combined with sweetened condensed milk and dotted with fruit, sinks and swirls into the cake batter. This creates amazing fissures and valleys, resulting in a delightfully uneven, textured surface and pockets of incredible gooeyness throughout the cake. It’s a visually stunning process that promises an exciting adventure with every slice.
Achieving Ultimate Gooeyness
The secret to the unparalleled gooeyness in this Gooey Strawberry Earthquake Cake lies in the dynamic duo of cream cheese and sweetened condensed milk. When these two are combined and baked into the cake, they don’t just sit on top; they melt and meld, caramelizing slightly and creating a lush, sinfully rich, and intensely moist texture that permeates every crumb. It’s a texture so luxurious, it almost feels like a cross between a cake and a warm pudding.
Bright Strawberry Flavor, Naturally
We’re using fresh, vibrant strawberries here! The natural sweetness and subtle tartness of the strawberries burst forth when baked, providing a beautiful counterpoint to the rich, sweet elements. They don’t just add color; they infuse the entire cake with their summery essence, making each bite feel fresh and exciting. This isn’t an artificial strawberry flavor; it’s the real deal, contributing to a truly irresistible treat.
Ingredients and Smart Substitutions
Here is what you need and why:
Cake Mix: The Convenient Base: For this recipe, we embrace the convenience of a good quality white or yellow cake mix. It acts as a fantastic shortcut, ensuring a consistent and reliable crumb every time. You can use your favorite brand! If you prefer a completely from-scratch cake, feel free to substitute with your favorite vanilla or butter cake recipe that yields roughly 9×13 pan volume.
Cream Cheese: For Richness and Tang: Full-fat cream cheese is non-negotiable here! It’s what gives our gooey filling its signature tang and incredible richness. Make sure it’s softened to room temperature for a smooth, lump-free mixture. Low-fat cream cheese won’t yield the same luxurious texture.
Powdered Sugar: Sweetness and Creaminess: Also known as confectioners’ sugar, this fine powder dissolves beautifully into the cream cheese, creating a silky and sweet filling without any grittiness. It’s essential for the smooth texture of our gooey pockets.
Butter: Essential for Texture: Unsalted butter contributes to both the richness of the cream cheese topping and ensures the cake remains incredibly moist. Melted and cooled butter is key for seamless incorporation. Make sure it’s unsalted so you can control the overall salt content of the cake.
Fresh Strawberries: Flavor Burst: Use ripe, juicy fresh strawberries for the best flavor and texture. Hull them and chop them into small pieces so they distribute evenly and burst with flavor throughout the cake. For tips on picking the best berries, check out this great resource from Food Network.
Sweetened Condensed Milk: The Gooey Secret: This magical ingredient is what truly brings the ‘gooey’ to this Gooey Strawberry Earthquake Cake. It caramelizes and melts into the cake, creating those irresistible pockets of sweet, syrupy goodness. Do not confuse it with evaporated milk; they are very different!
Chocolate Chips: An Optional Decadent Layer: While not traditional, a sprinkle of semi-sweet chocolate chips adds another layer of decadence and provides a lovely contrast to the strawberry and cream cheese. Use a good quality brand for the best flavor experience, or omit if you’re a purist!
Step-by-Step: Baking Your Strawberry Earthquake Cake
Follow these simple steps for a truly incredible Gooey Strawberry Earthquake Cake:
1. Prepare the Cake Batter
Begin by preparing your chosen white or yellow cake mix according to the package directions. Make sure to use the specified liquid (water, milk) and fat (oil) amounts. Once the batter is smooth, pour it evenly into a greased 9×13 inch baking pan. This provides the stable foundation for our ‘earthquake’ effect.
2. Whip Up the Cream Cheese Mixture
In a medium mixing bowl, beat the softened cream cheese with powdered sugar and melted butter until the mixture is light, fluffy, and completely smooth. Ensure there are no lumps of cream cheese left, as this will affect the texture of your gooey pockets. A hand mixer or stand mixer works best for this.
3. Layering for the ‘Earthquake’
Spoon dollops of the cream cheese mixture evenly over the cake batter. Don’t worry about spreading it; it will sink and swirl naturally during baking. Then, scatter the chopped fresh strawberries and chocolate chips (if using) over the entire surface. Finally, take your sweetened condensed milk and drizzle it generously over everything. This is where the magic truly begins!
4. Baking to Perfection
Bake your Gooey Strawberry Earthquake Cake in a preheated oven at 350°F (175°C) for 45-55 minutes, or until a wooden skewer inserted into the cake part comes out clean. The top will be golden brown, and you’ll see those delightful ‘earthquake’ cracks and gooey pockets emerging. Don’t overbake, or you’ll lose some of that coveted gooeyness!
5. The Ultimate Drizzle
Once the cake is out of the oven, while it’s still warm, you have the option to drizzle a little extra sweetened condensed milk over the top. This enhances the gooey factor even further, creating an even more indulgent dessert. Let it soak in for a few minutes before moving to the cooling step.
Expert Tips for a Flawless Earthquake Cake
- Don’t Overmix the Batter: Overmixing develops gluten, leading to a tough cake. Mix your cake batter just until combined, with no dry streaks of flour remaining.
- Cream Cheese at Room Temperature: This is crucial! Cold cream cheese will result in a lumpy mixture that won’t blend smoothly. Take it out of the fridge at least an hour before you plan to bake.
- Evenly Distribute Toppings: While the ‘earthquake’ effect creates natural variations, try to scatter your cream cheese dollops, strawberries, and chocolate chips as evenly as possible. This ensures every slice gets a good share of the gooey goodness.
- Cool Completely Before Serving for Best Gooeyness: I know, it’s hard to resist! But allowing the cake to cool fully helps the gooey elements set up to their perfect texture. If you cut it too soon, it might be a bit too runny. For super gooey appeal, you can gently reheat individual slices.
- Use High-Quality Ingredients: While we’re using a cake mix for convenience, investing in good quality cream cheese, butter, and especially fresh strawberries will elevate your Gooey Strawberry Earthquake Cake from great to absolutely extraordinary.
What to Serve With Your Gooey Strawberry Earthquake Cake
This Gooey Strawberry Earthquake Cake is undeniably rich and satisfying on its own, but a few accompaniments can truly elevate the experience.
- Vanilla Bean Ice Cream: A scoop of cold, creamy vanilla bean ice cream is the classic pairing. The cool ice cream contrasts beautifully with the warm, gooey cake, and the vanilla notes complement the strawberries perfectly.
- Fresh Whipped Cream: A cloud of light, unsweetened fresh whipped cream provides a wonderful airy counterpoint to the cake’s richness. A dollop on the side is pure heaven.
- A Simple Fruit Compote: If you want to lean into more fruit, a simple, lightly sweetened berry compote (perhaps raspberry or mixed berries) can add another layer of fresh fruit flavor and a touch of elegance.
Storing and Reheating Your Cake
Room Temperature vs. Refrigeration
Due to the cream cheese in the gooey layer, this Gooey Strawberry Earthquake Cake is best stored in the refrigerator. Cover it tightly with plastic wrap or foil to prevent it from drying out. It will keep well for up to 3-4 days in the fridge.
Best Reheating Methods
While delicious cold, the gooey factor truly shines when the cake is slightly warm. To reheat individual slices, you can place them in the microwave for 15-30 seconds, or until warmed through and gooey. Alternatively, warm slices in a preheated oven at 300°F (150°C) for about 5-10 minutes, especially if you prefer a slightly crispier edge.
Gooey Strawberry Earthquake Cake: Your FAQs Answered
Can I use frozen strawberries?
What if my cake doesn’t ‘sink’ enough?
Can I make this dairy-free?
How far in advance can I make this cake?
Gooey Strawberry Earthquake Cake
- Total Time: 1 hour 10 minutes
- Yield: 12 servings
Description
A truly decadent cake featuring a base of tender cake mix, swirled with a rich, tangy cream cheese and sweetened condensed milk mixture, and bursting with fresh strawberries. This dessert lives up to its ‘earthquake’ name with delicious fissures of gooey goodness.
Ingredients
- 1 (15.25 ounce) box white or yellow cake mix (plus ingredients called for on box)
- 8 ounces cream cheese, softened
- 1 cup powdered sugar
- ½ cup (1 stick) unsalted butter, melted and cooled
- 1 ½ cups fresh strawberries, hulled and chopped
- 1 (14 ounce) can sweetened condensed milk
- ½ cup semi-sweet chocolate chips (optional)
Instructions
- Preheat Oven & Prepare Pan: Preheat your oven to 350°F (175°C). Grease and flour a 9×13 inch baking pan.
- Prepare Cake Batter: Prepare the cake mix according to package directions in a large bowl. Pour the batter into the prepared baking pan, spreading evenly.
- Make Cream Cheese Topping: In a medium bowl, beat the softened cream cheese, powdered sugar, and melted butter with an electric mixer until smooth and creamy.
- Layer Ingredients: Drop spoonfuls of the cream cheese mixture randomly over the cake batter. Sprinkle the chopped fresh strawberries and chocolate chips (if using) evenly over the top.
- Drizzle Condensed Milk: Pour the entire can of sweetened condensed milk evenly over the cake layers.
- Bake: Bake for 45-55 minutes, or until a wooden skewer inserted into the cake (not the gooey pockets) comes out clean. The top will be golden brown, and the gooey parts will have sunk and created cracks.
- Cool: Let the cake cool completely in the pan on a wire rack before serving. This allows the gooey topping to set properly.
- Serve: Serve slightly warm or at room temperature, perhaps with a scoop of vanilla ice cream or fresh whipped cream.
- Prep Time: 20 mins
- Cook Time: 50 mins