
")
Introduction: Why Marbled Candy Apples?
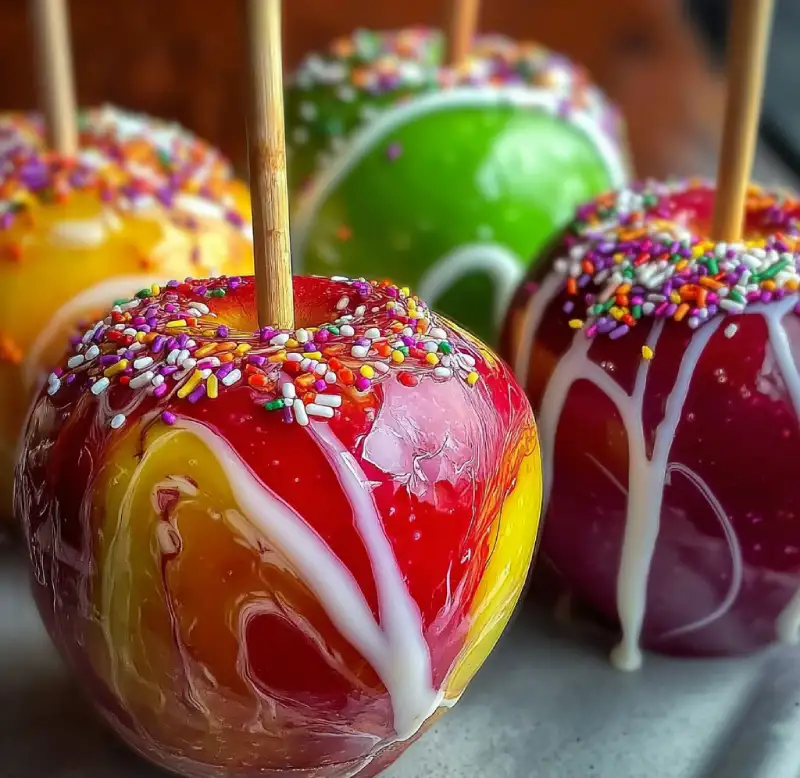
Imagine biting into a perfectly crisp, glossy shell that crackles delightfully before giving way to the sweet-tart explosion of a fresh apple. Now, imagine that shell isn’t just plain, but a mesmerizing swirl of vibrant colors, like a miniature edible masterpiece. That’s the magic of Marbled Effect Candy Apples! These aren’t just your average carnival treat; they’re an artistic expression, a delightful blend of nostalgia and gourmet flair that will elevate any occasion. Every single bite offers a burst of flavor and a beautiful visual experience, making them an instant showstopper. You can find more amazing dessert ideas like this at See more easy recipes for your next baking adventure!
A Touch of Nostalgia, A Dash of Artistry
Candy apples evoke childhood memories of fairs and festivals, but with a marbled effect, we’re taking that classic treat and infusing it with an undeniable elegance. It’s the perfect marriage of a comforting, familiar taste with an elevated, artistic presentation. These aren’t just snacks; they’re conversation starters.
The Ultimate Showstopper Treat
Whether for a holiday gathering, a birthday party, or just a fun weekend project, Marbled Effect Candy Apples command attention. Their vibrant, unique patterns make them incredibly Instagram-worthy and a guaranteed hit with guests of all ages. Prepare for endless compliments!
How Marbled Candy Apples Achieve Their Magic
The allure of these candy apples lies in their multi-sensory appeal – from the satisfying crunch to the beautiful design.
Glassy, Crackling Shell
The candy coating, when made correctly, forms a thin, super-hard, and incredibly glossy shell that shatters beautifully with each bite. This provides a wonderful textural contrast to the juicy apple underneath.
Sweet-Tart Apple Core
The best candy apples balance the intense sweetness of the coating with the refreshing tang of a crisp, tart apple. This harmonious pairing is what makes them so utterly addictive.
Vibrant, Swirled Colors
This is where the ‘marbled effect’ truly shines! By carefully introducing various food colors into the hot syrup, we create swirling patterns that are unique to each apple, making every single one a miniature work of art.
Ingredients for Your Marbled Masterpiece
Crafting perfect Marbled Effect Candy Apples starts with understanding each ingredient’s role.
Corn Syrup: Preventing Crystallization (The science behind it): Corn syrup, specifically light corn syrup, is essential. It acts as an invert sugar, preventing your main sugar from crystallizing too quickly and resulting in a grainy, rather than smooth, coating. It ensures that beautiful, glassy finish.
Water: The Solvent: Simply put, water dissolves the sugar and corn syrup, allowing them to heat evenly and reach the correct temperature for the hard crack stage. It evaporates during the cooking process, leaving behind pure candy.
Food Coloring: Crafting Your Marbled Hues (Gel vs. liquid, layering colors): Gel food colorings are superior for candy making. They are highly concentrated, so you need less to achieve vibrant colors, and they don’t add excess liquid to your syrup, which could alter its consistency. When marbling, strategically drop different colors onto the surface of your syrup just before dipping. Learn more about candy making techniques from Food Network.
Optional Flavorings: Elevating the Taste (Extracts, spices): While classic candy apples are delicious on their own, you can add a clear extract (like pure vanilla, almond, or even cinnamon oil) for an extra layer of flavor. Add these after the syrup has reached temperature, as heat can cook off delicate flavors.
Step-by-Step Instructions: Creating Marbled Candy Apples
Let’s get dipping and swirling! Follow these instructions carefully for the best results.
1. Preparation: Getting Ready to Dip
First things first, wash your apples thoroughly to remove any wax, then dry them completely. Wax can prevent the candy coating from sticking properly. Insert a sturdy stick (like a lollipop stick or a wooden skewer) into the stem end of each apple, about halfway through. Line a baking sheet with parchment paper or a silicone mat and spray it lightly with non-stick spray. Have your gel food colorings ready and open.
2. Making the Candy Coating: Heating and Monitoring
In a heavy-bottomed saucepan, combine the granulated sugar, corn syrup, and water. Stir gently just until the sugar is moistened. Place the pan over medium-high heat. Insert a candy thermometer (ensure it doesn’t touch the bottom of the pan). Bring the mixture to a boil without stirring. If sugar crystals form on the sides of the pan, use a wet pastry brush to gently wash them down into the syrup. Continue to cook until the thermometer reads 300-310°F (149-154°C), which is the ‘hard crack’ stage. This usually takes 15-20 minutes. Remove from heat immediately.
3. Adding Color: The Marbling Technique
This is where the magic happens! Once the syrup is removed from the heat, quickly and carefully add drops of your desired gel food colorings directly onto the surface of the hot syrup. Don’t stir deeply! Use a wooden skewer or lollipop stick to gently swirl the colors just once or twice on the surface of the syrup. The goal is to create swirls, not to fully mix the colors into a uniform shade. Work quickly, as the syrup will cool and thicken.
4. Dipping the Apples: Achieving an Even Coat
Carefully tilt the saucepan slightly to gather the syrup. Take one prepared apple by its stick and quickly dip it into the marbled syrup, turning and swirling it to coat completely. Lift the apple out, allowing any excess candy to drip back into the pan. As you lift, rotate the apple slowly to encourage an even coating and prevent puddles at the bottom.
5. Setting and Cooling: The Final Touch
Place the dipped apple, stick side up, onto your prepared baking sheet. Repeat the dipping process with the remaining apples, re-swirling the colors in the syrup as needed for each apple. Allow the candy apples to cool completely at room temperature. This can take about 30-60 minutes, or even longer depending on humidity. Once cooled, the candy shell will be hard and glossy.
Expert Tips for Success
- Temperature Control is Key (Hard crack stage): Invest in a reliable candy thermometer. Reaching exactly 300-310°F (149-154°C) is crucial for that perfect crackling shell. Too low, and it will be sticky; too high, and it will burn.
- Clean Apples, No Wax (Achieving adhesion): Wash and thoroughly dry your apples. Some commercial apples have a waxy coating that will prevent the candy from sticking. You can remove it by quickly dipping apples in boiling water for 10 seconds, then drying them.
- Working Quickly and Efficiently: Hot syrup cools and thickens rapidly. Have all your mise en place ready, including sticks in apples, prepared baking sheets, and open food colorings so you can work swiftly.
- Creating Your Marbled Patterns (Swirling techniques): Be gentle when swirling your colors! Over-mixing will blend the colors rather than creating distinct marbled patterns. A quick swirl or two on the surface is all you need. You can add more color as the syrup is used up.
- Safety First: Handling Hot Syrup: Be extremely cautious when working with hot sugar syrup. It reaches very high temperatures and can cause severe burns. Keep children and pets away from the work area and have a bowl of ice water nearby just in case of accidental contact.
What to Serve With Marbled Candy Apples
While phenomenal on their own, Marbled Effect Candy Apples can be part of a larger culinary experience.
Standalone Treat
Honestly, these are a showstopper all by themselves! Present them beautifully on a platter for an effortless dessert that will impress.
Festive Desserts Table
They add incredible color and height to any dessert spread – perfect for fall festivals, Halloween parties, or even a whimsical wedding dessert bar.
Party Favors
Wrap individual candy apples in cellophane bags with a ribbon for unique and memorable party favors that guests can take home and enjoy later.
Storing Your Marbled Candy Apples
Airtight Storage for Freshness
Once completely cooled and hardened, store your candy apples individually wrapped in cellophane or placed in an airtight container at room temperature. They are best enjoyed within 1-2 days for optimal freshness and texture.
Avoiding Humidity (Preventing stickiness)
Humidity is the enemy of candy apples! Moisture in the air will cause the candy coating to become sticky and soft. Store them in a cool, dry place. Avoid refrigerating, as condensation can also cause stickiness.
Frequently Asked Questions About Marbled Candy Apples
Why is my candy coating sticky?
Can I use different types of apples?
How do I prevent bubbles in the coating?
Can I make these ahead of time?
Marbled Effect Candy Apples
- Total Time: 50 minutes
- Yield: 6-8 apples
Description
Create stunning marbled effect candy apples with this easy-to-follow, step-by-step recipe. Achieve a perfect glassy, crackling shell and impress everyone!
Ingredients
- 6–8 small to medium firm, tart apples (Granny Smith, Honeycrisp, Fuji)
- 6–8 sturdy wooden skewers or lollipop sticks
- 2 cups (400g) granulated sugar
- 1 cup (240ml) light corn syrup
- ½ cup (120ml) water
- Gel food coloring (2-3 colors for marbling)
- Optional: 1 tsp clear flavor extract (vanilla, almond, or cinnamon oil)
Instructions
- 1. Prepare Apples: Wash and thoroughly dry apples. Insert sticks into the stem end of each apple. Line a baking sheet with parchment paper or a silicone mat and lightly spray with non-stick spray.
- 2. Make Candy Coating: In a heavy-bottomed saucepan, combine sugar, corn syrup, and water. Stir gently to moisten sugar. Insert a candy thermometer. Cook over medium-high heat without stirring until the mixture reaches 300-310°F (149-154°C) (hard crack stage).
- 3. Add Marbled Color: Immediately remove from heat. Carefully drop small amounts of gel food coloring onto the surface of the hot syrup. Use a wooden skewer to gently swirl colors once or twice – do not overmix. Add optional flavor extract if using.
- 4. Dip Apples: Carefully tilt the pan. Take an apple by its stick, quickly dip and swirl to coat completely. Lift, allowing excess to drip back into the pan. Rotate slowly to ensure an even coat.
- 5. Cool and Set: Place dipped apple on the prepared baking sheet. Repeat for remaining apples, re-swirling colors as needed. Allow to cool completely at room temperature until the candy is hard and glossy (30-60 minutes).
- Prep Time: 30 mins
- Cook Time: 20 mins