
")
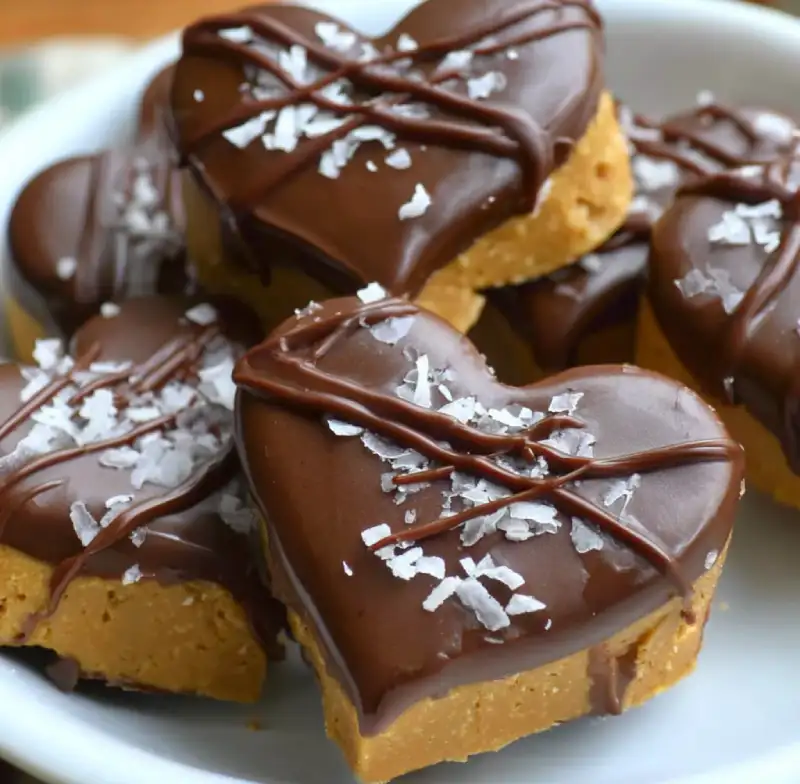
Table of Contents
Get ready to fall head over heels for a treat that’s as delightful to make as it is to devour! These no bake peanut butter hearts are a symphony of creamy, sweet peanut butter enrobed in a crisp, decadent chocolate shell. Imagine a melt-in-your-mouth center that’s rich and satisfying, contrasted beautifully with the snap of perfectly tempered chocolate. It’s the kind of effortless indulgence that tastes like you spent hours, but actually comes together in a flash. Whether you’re looking for a quick pick-me-up or a show-stopping dessert, these hearts deliver every single time. And if you’re craving more hassle-free culinary delights, be sure to see more good recipes here!
Why This Recipe Works
- No Oven Required: Perfect for hot days or when you just don’t feel like turning on the oven. Minimal cleanup and maximum deliciousness!
- Irresistible Texture Contrast: The smooth, dense peanut butter filling pairs exquisitely with the snappy chocolate coating, creating a truly satisfying bite.
- Customizable and Versatile: Easily adapt with different chocolate types, add-ins, or even shape into various forms beyond hearts.
- Crowd-Pleasing Favorite: These treats are universally loved. They disappear quickly at parties, potlucks, and family gatherings!
Ingredients and Substitutions
Here is what you need and why:
Peanut Butter: For the best results with these no bake peanut butter hearts, I strongly recommend using a creamy, processed peanut butter (like Jif or Skippy). Natural peanut butter tends to be oilier and can make the mixture too soft and difficult to shape. If you absolutely must use natural, refrigerate it well and be prepared to adjust the powdered sugar content.
Powdered Sugar: This is the magic ingredient that brings the structure and sweetness to our peanut butter filling. Its fine texture ensures a perfectly smooth, non-gritty consistency. Do not substitute with granulated sugar, as it won’t dissolve properly and will result in a grainy texture.
Butter (or Coconut Oil): A touch of melted butter adds richness and helps bind the mixture together, contributing to that desirable melt-in-your-mouth texture. For a vegan option, or if you prefer, unrefined coconut oil works beautifully here, imparting a subtle coconut flavor that complements the peanut butter and chocolate.
Vanilla Extract: Just a splash of good quality vanilla extract elevates the flavor profile, adding warmth and depth that makes these hearts truly special. Don’t skip it!
Chocolate Coating: I typically use semi-sweet chocolate chips or melting wafers for their balanced flavor and ease of melting. You could also use milk chocolate for a sweeter treat, or dark chocolate for a more intense flavor. Wafers or bark often melt more smoothly and set more quickly than standard chocolate chips due to their composition. For a deep dive into chocolate tempering, a technique that can make your chocolate incredibly shiny and snappy, you might find this guide from ChocolateRecipes.com incredibly useful.
Optional Add-ins: Get creative! A pinch of sea salt to sprinkle on top before the chocolate sets enhances the flavor beautifully. You could also mix in a teaspoon of peanut butter powder (the defatted kind) for an extra peanutty punch without adding too much oil, or finely chopped peanuts for a textural surprise.
How to Make No-Bake Peanut Butter Hearts
Follow these step-by-step photos:
1. Prepare the Peanut Butter Mixture
In a large mixing bowl, combine the creamy peanut butter, softened butter (or melted coconut oil), powdered sugar, and vanilla extract. Mix thoroughly using a sturdy spoon or a stand mixer with the paddle attachment on low speed until all ingredients are well incorporated and a thick, uniform dough forms. The mixture should be pliable but not sticky.
2. Shape the Hearts
Line a baking sheet with parchment paper. Take small portions of the peanut butter mixture, about 1-inch in diameter, and roll them into balls. Gently press each ball into a shallow heart-shaped cookie cutter (if you have one) or carefully mold them by hand to create heart shapes. If shaping by hand, flatten the ball slightly, then pinch one side to form the bottom point of the heart and indent the top center to create the characteristic curve. Repeat until all the mixture is used.
3. Chill for Firmness
Once your hearts are shaped, place the baking sheet into the refrigerator for at least 30 minutes, or in the freezer for about 15-20 minutes. This chilling step is crucial! It helps the hearts firm up, making them much easier to dip in chocolate without falling apart.
4. Melt the Chocolate Coating
While the hearts are chilling, melt your chosen chocolate. You can do this using a double boiler method (a heatproof bowl set over a saucepan of simmering water, ensuring the bowl does not touch the water) or in the microwave. If microwaving, heat in 30-second intervals, stirring well after each interval, until smooth and fully melted. Be careful not to overheat the chocolate, as this can cause it to seize.
5. Dip and Decorate Your Hearts
Remove the chilled peanut butter hearts from the refrigerator or freezer. Using a fork or a dipping tool, carefully dip each heart into the melted chocolate, ensuring it’s fully coated. Lift it out, tapping gently against the side of the bowl to allow excess chocolate to drip off. Place the dipped hearts back onto the parchment-lined baking sheet. If desired, immediately sprinkle with sea salt, finely chopped peanuts, or sprinkles before the chocolate sets.
6. Final Chill for Setting
Once all the hearts are dipped, return the baking sheet to the refrigerator for another 15-30 minutes, or until the chocolate is completely set and firm to the touch. This ensures a beautiful, crisp chocolate shell.
Expert Tips for Success
- Perfect Mixture Consistency: If your peanut butter mixture seems too dry or crumbly, add a tiny bit more melted butter (or coconut oil) 1/2 teaspoon at a time. If it’s too sticky, add a little more powdered sugar until it reaches a firm, pliable dough consistency.
- Troubleshooting Cracking Chocolate: Chocolate can crack if the peanut butter centers are too cold when dipped into warm chocolate, or if the chocolate itself is too thick. Ensure your peanut butter hearts are chilled, but not frozen solid, and ensure your melted chocolate is smooth and not overly hot or thick. A tiny amount of vegetable oil (1/2 tsp per cup of chocolate) can thin it slightly.
- Making Them Allergy-Friendly (Nut-Free Options): To make these nut-free, substitute the peanut butter with a sunflower seed butter (like SunButter). Be aware that sunflower seed butter can sometimes react with baking soda/powder (though not in this recipe) to turn baked goods green. For dipping, ensure your chocolate is also nut-free.
- Batch Prep for Holidays or Parties: These freeze wonderfully! Make a big batch, freeze them, and then thaw slightly before serving. They’re perfect for holiday cookie platters or party favors.
Storing and Reheating
Store your delightful no bake peanut butter hearts in an airtight container in the refrigerator for up to 1-2 weeks. This keeps the chocolate firm and prevents the peanut butter from becoming too soft. Technically, these don’t reheat, but rather reach their optimal texture at slightly below room temperature after being chilled. If you prefer them a little softer, simply let them sit out on the counter for 10-15 minutes before enjoying.
For longer enjoyment, these hearts freeze exceptionally well! Place them in a single layer on a parchment-lined baking sheet and freeze until solid. Once frozen, transfer them to a freezer-safe airtight container or freezer bag. They will keep in the freezer for up to 3 months. To enjoy, simply thaw in the refrigerator overnight or at room temperature for about 30 minutes. They’ll be just as delicious as the day you made them!
What to Serve With No-Bake Peanut Butter Hearts
These no bake peanut butter hearts are truly a stand-alone star, but they pair beautifully with a few simple accompaniments. A tall glass of cold milk is the classic pairing, bringing out the rich flavors. For the adults, a piping hot cup of black coffee or a strong espresso provides a wonderful contrast to the sweetness of the hearts, making them an ideal after-dinner treat. They also make a fantastic addition to a dessert platter alongside other small bites like mini brownies or shortbread cookies, offering a different texture and flavor profile to your spread.
Frequently Asked Questions
Can I use natural peanut butter?
Why is my chocolate seizing?
How long do they last in the fridge?
Can I make them vegan?
No-Bake Peanut Butter Hearts
- Total Time: 20 minutes
- Yield: 24 hearts
Description
These delightful no-bake peanut butter hearts are a creamy, sweet treat enrobed in a crisp chocolate shell. Perfect for satisfying your sweet tooth with minimal effort.
Ingredients
- 1 cup (250g) creamy peanut butter (processed, e.g., Jif or Skippy)
- 1/2 cup (113g) unsalted butter, softened (or coconut oil for vegan)
- 2–2.5 cups (240-300g) powdered sugar, sifted
- 1 teaspoon vanilla extract
- 12–16 oz (340-450g) chocolate chips or melting wafers (semi-sweet, milk, or dark)
- Optional: Sea salt, sprinkles, or chopped peanuts for topping
Instructions
- In a large bowl, combine peanut butter, softened butter (or coconut oil), 2 cups of powdered sugar, and vanilla. Mix until a thick, uniform dough forms. Add more powdered sugar if too sticky.
- Line a baking sheet with parchment paper. Roll 1-inch portions of dough into balls, then shape into hearts (or other shapes). Place on the prepared baking sheet.
- Chill the shaped hearts in the refrigerator for at least 30 minutes or freezer for 15-20 minutes until firm.
- Melt chocolate using a double boiler or in 30-second intervals in the microwave, stirring until smooth.
- Dip each chilled heart into the melted chocolate, allowing excess to drip off. Place back on the parchment paper. Sprinkle with optional toppings immediately.
- Return the dipped hearts to the refrigerator for another 15-30 minutes, or until the chocolate is completely set.
- Prep Time: 20 mins
- Cook Time: 0 mins