
")
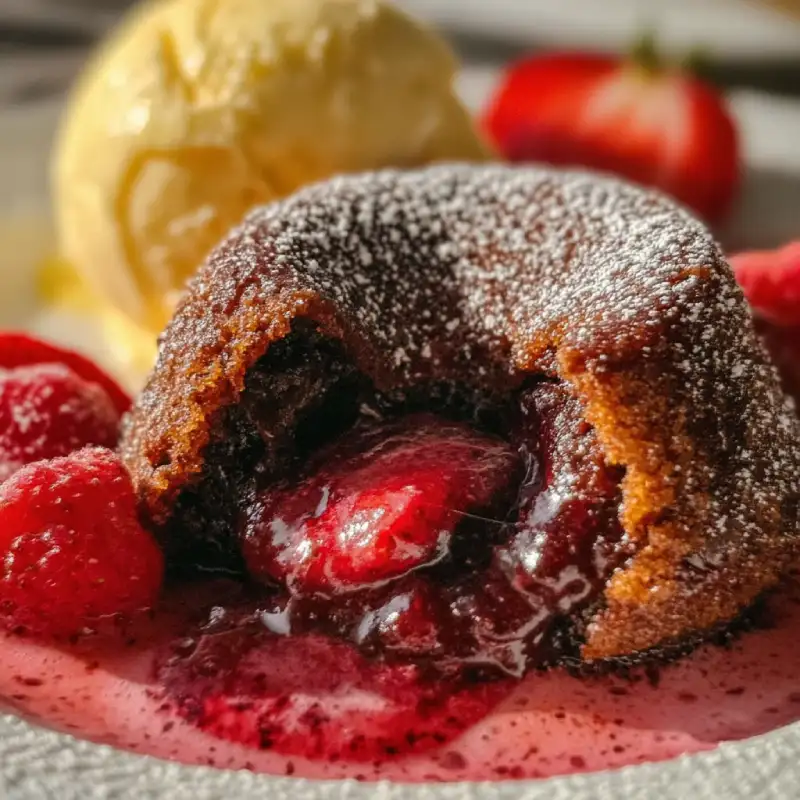
Table of Contents
- Impress Your Valentine with a Pink Lava Cake
- How This Pink Lava Cake Recipe Works – The Perfect Balance
- The Essential Ingredients and Smart Substitutions
- Step-by-Step: Baking Your Pink Lava Cake to Perfection
- Expert Tips for Pink Lava Cake Success
- What to Serve With Your Pink Lava Cake
- Storing and Reheating Your Lava Cakes
- Pink Lava Cake FAQs
Imagine this: a delicate, perfectly baked individual chocolate cake, its exterior just firm enough to hold its shape, but with a gentle tug of the spoon, a luscious, warm, vibrant pink molten center spills out, oozing slowly onto the plate. That, my friends, is the magic of a Pink Lava Cake Valentine’s Day dessert, and it’s about to become your signature romantic treat. This isn’t just a cake; it’s an experience, a symphony of rich chocolate and a sweet, surprising raspberry burst, all culminating in that irresistible gooey core. It’s elegant, deceptively simple, and guaranteed to sweep your Valentine off their feet. If you love discovering show-stopping desserts, See more easy recipes on my blog!
Impress Your Valentine with a Pink Lava Cake
Valentine’s Day calls for something truly special, something that says ‘I love you’ with every decadent bite. A homemade Pink Lava Cake doesn’t just taste incredible; it’s a heartfelt gesture that speaks volumes. It’s intimate, impressive, and surprisingly achievable, even for novice bakers.
Why This Recipe is a Valentine’s Day Must-Have
- Pure Romance: The alluring pink molten center is visually stunning and incredibly romantic.
- Decadent Flavor: The combination of rich dark chocolate and sweet raspberry is simply divine.
- Impressive Presentation: Individual cakes served warm with a dramatic molten flow.
- Surprisingly Simple: We’ll break it down so even beginners can master this showstopper.
The Magic of a Molten Center
The molten center is the star of the show. It’s achieved by underbaking the very center of the cake, leaving it gloriously liquid while the edges set into a tender, crumbly cake. This contrast in textures is what makes lava cakes so utterly addictive. With our recipe, you’ll get that perfect pour every single time.
How This Pink Lava Cake Recipe Works – The Perfect Balance
The secret to a perfect lava cake lies in precision and understanding the interplay of ingredients. Our recipe is crafted for that ideal balance.
Rich Chocolate, Sweet Raspberry, and a Velvety Flow
We start with high-quality dark chocolate for depth, balanced by a hint of raspberry to create that signature pink hue and delightful flavor. The butter provides richness and ensures a velvety smooth lava when melted.
Achieving the Ideal Molten Core
The key here is oven temperature and baking time. Too long, and you have a chocolate cupcake. Too short, and it’s raw batter. We’ll guide you to that sweet spot where the exterior is baked, and the interior is perfectly gooey.
Perfectly Baked Edges, Gooey Center
The structured edges give the cake its form and tender crumb, providing a delicious counterpoint to the free-flowing, warm center. It’s a delightful tactile and taste experience.
The Essential Ingredients and Smart Substitutions
Here is what you need and why:
Quality Chocolate: Why It Matters for Melt and Flavor: Use a good quality dark or semi-sweet chocolate (60-70% cocoa solids). Chocolate chips can work, but a chopped baking bar will melt more smoothly and impart a richer flavor. Avoid milk chocolate as it might be too sweet and not provide the necessary structure.
Butter and Eggs: Foundation for Texture and Richness: Unsalted butter contributes richness and keeps the cake moist. The eggs (whole eggs plus an extra yolk) are crucial for structure, emulsification, and that luxurious custardy texture in the molten center.
Sugar, Flour, and Vanilla: The Basics Explained: Granulated sugar adds sweetness and helps with browning. All-purpose flour provides just enough structure to hold the cake together. Vanilla extract enhances all the other flavors.
Pink Hue: Natural vs. Artificial Coloring Options: For a vibrant pink, a tiny drop of gel food coloring is highly effective. If you prefer natural options, a pinch of beet powder can lend a subtle pink, though it might not be as intense. Fresh raspberry puree will also add color and flavor.
Flavor Boosters: Raspberry Extract or Fresh Puree?: Raspberry extract provides a consistent, strong raspberry flavor. For a more natural and delicate taste, you can use a tablespoon or two of strained fresh raspberry puree (cook down a handful of raspberries with a teaspoon of sugar and strain to remove seeds).
Step-by-Step: Baking Your Pink Lava Cake to Perfection
Follow these step-by-step photos:
1. Prep Your Ramekins
Generously butter and then dust your ramekins with either flour or unsweetened cocoa powder. This creates a non-stick barrier and ensures your cakes release beautifully. Place them on a baking sheet; this makes them easier to transfer to and from the oven.
2. Melt Chocolate and Butter Gently
In a heatproof bowl set over a saucepan of simmering water (a double boiler), gently melt the chopped chocolate and butter together. Stir occasionally until smooth and fully combined. Be careful not to let any water get into the chocolate. Once melted, remove from heat and let it cool slightly for a few minutes.
3. Mix Wet Ingredients for Airiness
In a separate bowl, whisk together the eggs, egg yolk, granulated sugar, vanilla extract, and raspberry extract (or puree) until light in color and slightly frothy. This incorporates air, which contributes to the cake’s texture.
4. Combine Wet and Dry: Don’t Overmix!
Slowly pour the slightly cooled chocolate mixture into the egg mixture, constantly whisking until just combined. Fold in the flour until no streaks remain. Overmixing the flour will develop gluten and result in a tough cake, so stop as soon as it’s incorporated. Add a tiny drop of pink gel food coloring now, if using, and mix until evenly colored.
5. Fill and Bake: Key to the Molten Core
Divide the batter evenly among your prepared ramekins, filling each about three-quarters full. Bake in a preheated oven (usually around 400°F / 200°C) for 12-14 minutes, or until the edges are set and the center still jiggles when gently shaken.
6. The Jiggle Test: Knowing When It’s Done
The best way to tell if your lava cakes are ready is the jiggle test. Gently tap or shake a ramekin; the edges should be firm, but the very center should still tremble like soft jelly. This is your cue for that perfect molten core!
Expert Tips for Pink Lava Cake Success
- Temperature Control: Oven and Ingredients: Ensure your oven is fully preheated. Room temperature eggs mix more evenly and incorporate air better.
- Ramekin Preparation: Butter, Flour, or Cocoa Powder?: For chocolate cakes, cocoa powder dusting is preferable over flour as it prevents any white residue on the finished cake and enhances the chocolate flavor.
- Don’t Overbake: The Molten Core’s Worst Enemy: Keep a close eye on your cakes! Lava cakes bake quickly. Even a minute too long can turn your molten center into a firm cake.
- Troubleshooting: Lava Not Flowing? Cakes Too Dry?: If your lava isn’t flowing, your cakes were likely overbaked. If they’re too dry, it could be overbaking or too much flour. Next time, reduce baking time by a minute, or measure flour by weight if possible.
- Customizing Flavor: Orange Zest, Coffee, or Chili Powder?: Feel free to experiment! A touch of orange zest pairs beautifully with chocolate. A teaspoon of instant espresso powder can deepen the chocolate flavor without tasting like coffee. For an adventurous kick, a tiny pinch of chili powder can add warmth. For more advanced techniques, check out this great resource on King Arthur Baking’s lava cake techniques.
What to Serve With Your Pink Lava Cake
These cakes are delicious on their own, but a few accompaniments can elevate them even further.
Classic Pairings: Vanilla Bean Ice Cream or Whipped Cream
A scoop of cold, creamy vanilla bean ice cream is a quintessential pairing, the contrast in temperature and texture is heavenly. Freshly whipped cream, lightly sweetened, also works beautifully.
Fruit Complements: Fresh Berries or Raspberry Coulis
Fresh raspberries, strawberries, or a mix of berries add a bright, tart counterpoint. For an extra touch of elegance and raspberry flavor, drizzle with homemade raspberry coulis.
Beverage Suggestions: Sparkling Wine or Coffee
A crisp sparkling wine or Champagne is a wonderful celebratory pairing. For a non-alcoholic option, a strong brewed coffee or espresso complements the richness of the chocolate perfectly.
Storing and Reheating Your Lava Cakes
Cooling and Covering for Freshness
While best served immediately, leftover baked lava cakes can be cooled completely and stored, covered tightly, in the refrigerator for up to 2-3 days.
Freezing for Future Indulgences
You can also bake and cool them, then wrap each cake individually in plastic wrap and aluminum foil. Freeze for up to 1 month. Thaw in the refrigerator overnight before reheating.
Best Reheating Methods: Oven vs. Microwave
Oven: For the best results, reheat in a preheated oven at 350°F (175°C) for 8-10 minutes, or until warmed through. This helps maintain a slightly crisp exterior. Microwave: For a quicker option, microwave individual cakes for 20-40 seconds, checking frequently. Be careful not to overheat, or the molten center will solidify.
Pink Lava Cake FAQs
Can I make these ahead of time?
What if I don’t have ramekins?
How do I get a brighter pink color?
Is there a gluten-free option?
Can I use white chocolate instead?
Pink Lava Cakes for Valentine’s Day
- Total Time: 31 minute
- Yield: 4 servings
Description
These elegant individual chocolate cakes boast a stunning pink, molten raspberry center, perfect for a romantic Valentine’s Day dessert. Surprisingly easy to make, they offer rich flavor and an impressive presentation.
Ingredients
- 4 ounces (113g) good quality dark or semi-sweet chocolate, chopped
- 1/2 cup (113g) unsalted butter
- 2 large eggs
- 1 large egg yolk
- 1/4 cup (50g) granulated sugar
- 1 teaspoon vanilla extract
- 1/2 teaspoon raspberry extract (optional, for stronger raspberry flavor)
- 1–2 drops pink gel food coloring (optional, for vibrant color)
- 2 tablespoons (16g) all-purpose flour
- Pinch of salt
- Butter and cocoa powder (for ramekins)
Instructions
- 1. Prepare Ramekins: Generously butter four 6-ounce (170ml) ramekins and dust with cocoa powder, tapping out any excess. Place them on a baking sheet and preheat your oven to 400°F (200°C).
- 2. Melt Chocolate & Butter: In a heatproof bowl set over a saucepan of simmering water (not touching the water), melt the chopped chocolate and butter, stirring until smooth. Remove from heat and let cool slightly.
- 3. Whisk Eggs & Sugar: In a separate medium bowl, whisk together the eggs, egg yolk, granulated sugar, vanilla extract, and raspberry extract (if using) until light yellow and slightly frothy, about 1-2 minutes.
- 4. Combine Mixtures: Slowly pour the slightly cooled chocolate mixture into the egg mixture, whisking constantly until just combined. Fold in the flour and pinch of salt until no dry streaks remain. If using, add 1-2 drops of pink gel food coloring and mix until evenly colored. Do not overmix.
- 5. Fill & Bake: Divide the batter evenly among the prepared ramekins, filling each about three-quarters full. Bake for 12-14 minutes, or until the edges are set and the center still gently jiggles when shaken.
- 6. Serve: Carefully invert each lava cake onto a serving plate. Let sit for a minute, then lift the ramekin. Garnish with fresh berries, a dusting of powdered sugar, or a scoop of vanilla ice cream and serve immediately.
- Prep Time: 15 mins
- Cook Time: 12-14 mins