
")
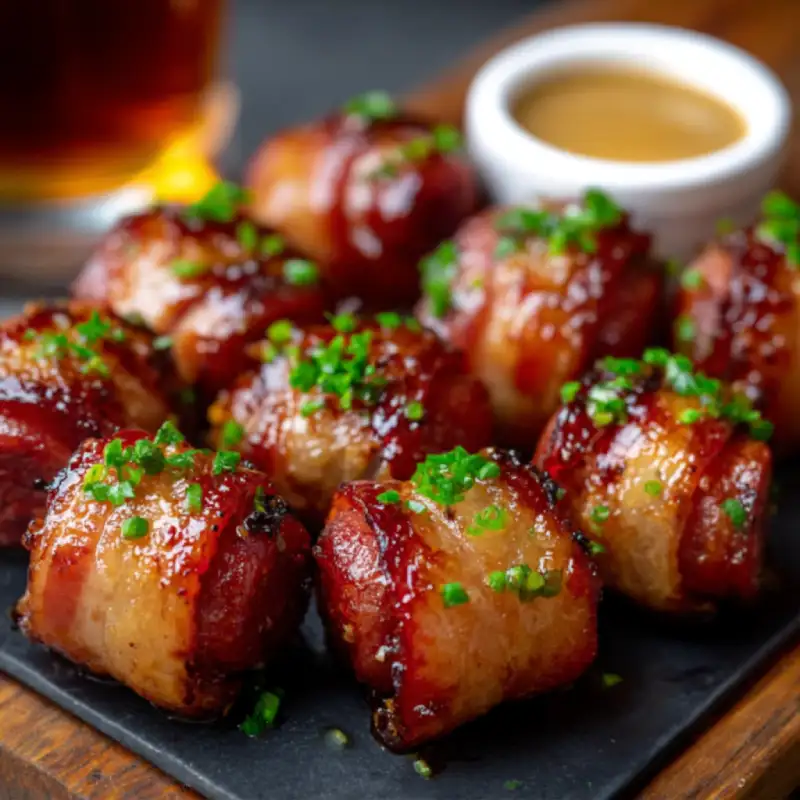
Prepare to tantalize your taste buds with the ultimate party appetizer: bite-sized bacon-wrapped kielbasa snacks! Imagine sinking your teeth into a perfectly crispy, smoky exterior of bacon, yielding to a tender, savory center of kielbasa, all coated in a sticky-sweet and tangy glaze. These aren’t just snacks; they’re explosions of flavor and texture that will have your guests clamoring for the recipe. They are incredibly easy to make, deceptively gourmet, and always the first thing to disappear off the appetizer table. Trust me, once you make these, they’ll become your new favorite go-to for any gathering. For more easy recipes that impress, browse delicious options here.
Table of Contents
- Why These Bites Are Your New Go-To Appetizer
- How This Recipe Works: The Science Behind the Flavor
- Ingredients and Smart Substitutions
- Step-by-Step Instructions: Your Visual Guide to Perfection
- Expert Tips for Success: Avoid Common Pitfalls
- What to Serve With Your Bite-Sized Bacon-Wrapped Kielbasa
- Storing and Reheating Best Practices
- Frequently Asked Questions About Bacon-Wrapped Kielbasa
Introduction: Why These Bacon-Wrapped Kielbasa Bites Are Your New Go-To Appetizer
My culinary journey has been paved with countless attempts to find that one perfect party snack—the one that’s easy enough for a weeknight but impressive enough for a holiday gathering. After many delicious experiments, I landed on these bite-sized bacon-wrapped kielbasa snacks, and let me tell you, they are a game-changer. They’re reliable, always delicious, and consistently crowd-pleasing, disappearing faster than I can make them. They offer a fantastic blend of textures and tastes that cater to almost everyone.
How This Recipe Works: The Science Behind the Flavor
- Crispy Bacon Exterior: The baking process renders the bacon fat, turning it incredibly crisp and flavorful, creating that irresistible crunch in every bite.
- Tender, Savory Kielbasa Core: The kielbasa, whether smoked or fresh, warms through and becomes wonderfully tender, providing a robust, savory counterpoint to the bacon.
- Sweet and Tangy Glaze: A simple yet powerful glaze of brown sugar, with hints of garlic and smoked paprika, caramelizes beautifully in the oven, creating a sticky, irresistible coating.
- Perfectly Balanced Sweet & Savory Profile: The magic lies in the contrast—the rich, salty bacon and savory kielbasa perfectly balanced by the sweetness and tanginess of the glaze, making each bite utterly addictive.
Ingredients and Smart Substitutions
Here is what you need and why:
Kielbasa: Choosing the best sausage (and alternatives). I recommend a good quality fully cooked smoked kielbasa for ease and consistent flavor. Polish kielbasa is excellent. You can experiment with other pre-cooked sausages like chicken sausage or even bratwurst for a different flavor profile, just ensure they are fully cooked before wrapping.
Bacon: Understanding thickness and type. Regular cut bacon works best here. Thick-cut bacon can take significantly longer to crisp up and may not adhere as well to the kielbasa. Avoid thin-cut as it can burn before the kielbasa is heated through. Streaky bacon is ideal for rendering fat and crisping.
Brown Sugar: The secret to caramelization (and healthier options). Light brown sugar is my go-to for its balanced sweetness and moisture, contributing to that crucial caramelization. For a slightly different twist, you could try maple syrup or a sugar-free brown sugar substitute, though the texture of the glaze may vary slightly.
Other Flavor Enhancers: Garlic Powder, Smoked Paprika (and what to omit). Garlic powder adds a foundational savory note, while smoked paprika deepens the smoky flavor, harmonizing perfectly with the bacon and kielbasa. Feel free to omit these if you prefer a simpler taste, or add a pinch of cayenne pepper for a subtle kick. A dash of Worcestershire sauce or a splash of apple cider vinegar can also enhance the glaze’s tanginess.
Step-by-Step Instructions: Your Visual Guide to Perfection
Follow these step-by-step photos:
1. Prep Your Kielbasa and Bacon
Start by slicing your kielbasa into bite-sized pieces, about 1/2 to 3/4 inch thick. Then, cut each strip of bacon into thirds or quarters lengthwise, depending on the size of your kielbasa pieces. The goal is to have enough bacon to wrap around each piece of sausage once, with a slight overlap. This ensures uniform cooking and crispness.
2. Assemble the Bites
Wrap each kielbasa piece with a strip of bacon, securing it with a toothpick. Place the seam side down on your baking sheet to help keep the bacon secure. Arrange them in a single layer on a foil-lined baking sheet fitted with a wire rack. This setup is crucial for allowing air circulation, ensuring crispy bacon all around.
3. Craft the Glaze
In a small bowl, combine the brown sugar, garlic powder, and smoked paprika. Sprinkle this mixture generously over the bacon-wrapped kielbasa bites. The sugar will melt and caramelize, forming that irresistible sticky glaze as it bakes. You can also mix these with a tablespoon or two of water to form a paste for more even coverage.
4. Bake for Optimal Crispness
Preheat your oven to 375°F (190°C). Bake for 25-35 minutes, or until the bacon is beautifully crispy and the kielbasa is heated through and slightly browned. The exact time will depend on your bacon thickness and oven calibration. Keep an eye on them during the last few minutes to prevent burning, especially with the sugar glaze. See this article from Food Network for other great bacon-wrapped ideas.
5. Final Glazing and Serving
Once out of the oven, use a pastry brush to coat any less-glazed areas with the delicious caramelized drippings from the bottom of the pan. Let them cool slightly before serving; the glaze will become tackier as it cools. Remove toothpicks before serving if preferred, especially for younger guests, or leave them in for easy grabbing.
Expert Tips for Success: Avoid Common Pitfalls
- Don’t Overcrowd the Pan: Ensure there’s enough space between each bite on the baking sheet. Overcrowding leads to steaming instead of crisping. Use multiple baking sheets if necessary.
- Achieving Uniform Bacon Crispness: The wire rack is your best friend here! It elevates the bites, allowing hot air to circulate underneath, ensuring even browning and crisping of the bacon.
- The Importance of a Wire Rack: Seriously, don’t skip it! Without it, the bottoms of your bacon will sit in rendered fat and become soggy, not crispy.
- Adjusting Cooking Time for Different Bacon Thicknesses: Regular cut bacon takes about 25-35 minutes. If using slightly thicker bacon, you might need an additional 5-10 minutes. Thin bacon will cook faster, so watch it closely to prevent burning.
- Pre-cooked Kielbasa is Key: Using fully cooked kielbasa ensures you only need to focus on crisping the bacon and caramelizing the glaze.
What to Serve With Your Bite-Sized Bacon-Wrapped Kielbasa
These savory-sweet morsels are delightful on their own, but pairing them with the right accompaniments elevates the experience!
Dipping Sauce Pairings:
- Creamy Horseradish Sauce: The sharp, zesty kick cuts through the richness beautifully.
- Spicy Mustard: A grainy Dijon or a hot German mustard adds a fantastic tang.
- Maple Dijon Glaze: A mixture of maple syrup and Dijon mustard can enhance the existing flavors.
- Ranch or Blue Cheese Dip: For a cool and creamy contrast.
Complementary Appetizers:
- Alongside a fresh vegetable platter with a light dip.
- Miniature potato skins or stuffed mushrooms.
- A simple green salad with a vinaigrette to provide a fresh element.
Drinks That Enhance the Flavor:
- Craft Beer: A crisp lager, a smoky porter, or an amber ale would be excellent.
- Red Wine: A light-bodied Pinot Noir or a robust Zinfandel.
- Hard Cider: The crisp apple notes really complement the pork.
- Sparkling Water with Lemon: For a refreshing, non-alcoholic option.
These bite-sized bacon-wrapped kielbasa snacks are truly versatile and pair well with a wide array of flavors, making them perfect for any menu!
Storing and Reheating Best Practices
Leftovers (if there are any!) can be just as delicious if stored and reheated properly.
Storing Cooked Bites:
Allow the bite-sized bacon-wrapped kielbasa snacks to cool completely. Store them in an airtight container in the refrigerator for up to 3-4 days. For best flavor and texture, it’s always best to enjoy them fresh, but they hold up surprisingly well.
Reheating for Optimal Texture:
To bring back that crispy bacon, the oven is your best bet. Preheat your oven to 300-325°F (150-160°C). Arrange the bites in a single layer on a wire rack set over a baking sheet. Reheat for 10-15 minutes, or until warmed through and the bacon has re-crisped. The microwave can warm them, but the bacon will likely lose its crispness and become chewy.
Freezing for Future Enjoyment (and thawing instructions):
You can freeze these both before and after baking! If freezing unbaked, arrange the assembled bites (without the sugar sprinkled on yet) on a baking sheet and freeze until solid. Then transfer to a freezer-safe bag or container for up to 1 month. Thaw in the refrigerator overnight, then proceed with the sugar glaze and baking instructions. If freezing baked bites, allow them to cool completely, then freeze on a baking sheet before transferring to an airtight container. Reheat from frozen in the oven at 350°F (175°C) for about 20-25 minutes, or until thoroughly heated.
Frequently Asked Questions About Bacon-Wrapped Kielbasa
Can I make these ahead of time?
Absolutely! You can assemble the bacon-wrapped kielbasa bites up to 24 hours in advance and store them in the refrigerator. Wait to sprinkle on the brown sugar mixture until just before baking to prevent the sugar from drawing out too much moisture from the bacon. If baking from chilled, you might need an extra 5-10 minutes of baking time.
What if my bacon isn’t getting crispy?
There are a few culprits! Ensure your oven is hot enough (375°F is ideal). Make sure you’re using a wire rack to allow fat to drip away and air to circulate. Don’t overcrowd the pan. If all else fails, you can carefully flip them halfway through baking. Also, check your bacon thickness – very thick bacon will take significantly longer to crisp.
Can I use turkey bacon or vegetarian sausage?
You can! Turkey bacon tends to be leaner and won’t render as much fat, so it might not get quite as crispy, but it will still be delicious. Adjust baking time as needed. For vegetarian sausage, choose a firm, fully cooked variety that can hold its shape when wrapped and baked. The texture will be different, but the sweet and savory glaze will still be fantastic.
How spicy can I make the glaze?
As spicy as you like! For a mild kick, add 1/4 teaspoon of cayenne pepper to the brown sugar mixture. For more heat, increase the cayenne to 1/2 teaspoon or more, or add a pinch of red pepper flakes. You could also mix in a little sriracha or hot sauce into the brown sugar glaze before sprinkling, though this will add moisture and might affect crisping slightly.
Bite-Sized Bacon-Wrapped Kielbasa Snacks
- Total Time: 45 minutes
- Yield: 24-30 bites
Description
These addictive bite-sized snacks feature savory kielbasa wrapped in crispy bacon, all coated in a sticky-sweet and tangy brown sugar glaze. They are the ultimate crowd-pleasing appetizer for any gathering.
Ingredients
- 1.5 lbs (about 2 large) fully cooked smoked kielbasa sausage
- 1 lb regular-cut bacon (about 12–16 slices)
- 1/2 cup light brown sugar, packed
- 1/2 teaspoon garlic powder
- 1/2 teaspoon smoked paprika
- Wooden toothpicks, for securing
Instructions
- 1. Prepare Ingredients: Preheat oven to 375°F (190°C). Line a large baking sheet with foil and place a wire rack on top. Cut kielbasa into 1/2 to 3/4-inch thick pieces. Cut each bacon slice into thirds or quarters lengthwise.
- 2. Assemble Bites: Wrap each kielbasa piece with a strip of bacon, securing with a toothpick. Place seam-side down on the prepared wire rack.
- 3. Glaze: In a small bowl, combine brown sugar, garlic powder, and smoked paprika. Sprinkle generously over all the bacon-wrapped kielbasa bites.
- 4. Bake: Bake for 25-35 minutes, or until bacon is crispy and golden brown, and the glaze is bubbly and caramelized. Cooking time may vary based on bacon thickness.
- 5. Serve: Carefully remove from the oven. If desired, brush any pooled glaze onto the bites. Let cool for a few minutes before serving. Remove toothpicks if preferred before serving.
- Prep Time: 15 mins
- Cook Time: 30 mins