
")
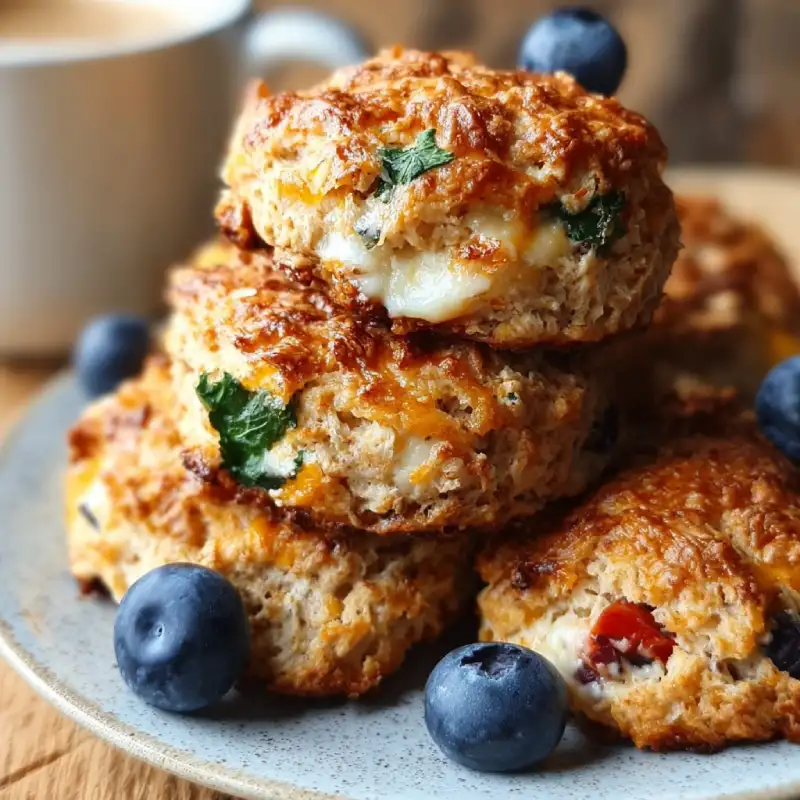
Table of Contents
- Start Your Day Strong with My Go-To Protein Biscuits
- How This Recipe Works: Achieving Pillowy, Flavorful Biscuits
- Essential Ingredients & Smart Substitutions for Breakfast Protein Biscuits
- Step-by-Step Instructions: Bake Your Best Biscuits
- Expert Tips for Biscuit Success
- What to Serve With Your Protein Biscuits
- Storing and Reheating Your Biscuits
- Breakfast Protein Biscuits: Your Questions Answered
Start Your Day Strong with My Go-To Protein Biscuits
Imagine biting into a warm, tender, and subtly sweet biscuit that not only melts in your mouth but also fuels your body for the day ahead. That’s exactly what my Breakfast Protein Biscuits deliver! These aren’t just any biscuits; they’re an experience – fluffy on the inside with a perfectly golden-brown crust, and that delightful hint of protein that keeps you satisfied well into your morning. They bring comfort and nutrition together in every perfect bite. For more delightful recipes that hit all the right notes, you simply must See more easy recipes.
Why These Biscuits?
After countless experiments and a deep dive into the science of baking, I finally perfected these protein-packed beauties. Traditional biscuits are wonderful, but I wanted something that offered more sustained energy without sacrificing that incredible texture. These Breakfast Protein Biscuits are quick to whip up, making even hurried mornings feel a little more luxurious. Plus, they’re incredibly versatile – perfect on their own, or as a base for sweet or savory toppings!
My Journey to the Perfect Protein Biscuit
My quest began years ago, driven by a desire for a healthier breakfast that didn’t involve a smoothie every day. I love a good biscuit, but often found them lacking in the satiety department. Incorporating protein powder seemed like a logical step, but it took many attempts to get the balance just right – avoiding dense, dry bricks and instead achieving these pillowy, flavorful marvels. This recipe is the culmination of those efforts, guaranteeing a result you’ll be proud to share.
How This Recipe Works: Achieving Pillowy, Flavorful Biscuits
There’s a subtle science behind achieving truly remarkable Breakfast Protein Biscuits. This recipe leverages key techniques and ingredient ratios to ensure every batch is consistent and delicious.
Light & Fluffy Texture
The secret to their incredible lightness lies in the handling of the dough. By keeping ingredients cold and minimizing handling, we prevent gluten overdevelopment, resulting in a tender crumb. The leavening agents work their magic, creating pockets of air that make these biscuits irresistibly fluffy.
Subtle Protein Boost
I’ve carefully integrated protein powder so it enhances the nutritional profile without compromising taste or texture. The chosen type and quantity melt seamlessly into the dough, providing a satisfying boost without any chalkiness or off-flavors. You’ll simply enjoy a more substantial biscuit!
Balanced Flavor Profile
From the richness of the butter to the slight sweetness and the gentle tang of buttermilk (or its substitute), each ingredient contributes to a wonderfully balanced flavor. The protein powder, rather than dominating, adds a subtle depth that complements the other components beautifully.
Essential Ingredients & Smart Substitutions for Breakfast Protein Biscuits
Understanding your ingredients is key to successful baking. Here’s a breakdown of what makes these Breakfast Protein Biscuits special, and how you can adapt them to your pantry and preferences.
Flour Power: All-Purpose vs. Whole Wheat: I typically use unbleached all-purpose flour for the lightest, fluffiest results. It provides the ideal structure. If you’re looking for a bit more fiber and a nuttier flavor, you can substitute up to half of the all-purpose flour with white whole wheat flour. Regular whole wheat flour can make them a bit denser, so start small.
The Protein Punch: Whey vs. Plant-Based Powders: This recipe shines with a high-quality whey protein isolate (unflavored or vanilla is best). It blends seamlessly. For plant-based options, a neutral-tasting pea protein powder or a good quality plant-based blend (ensure it’s not overly gritty) can work, though you might need to slightly adjust the liquid as plant proteins can absorb differently. Always opt for unflavored or vanilla to maintain the biscuit’s classic taste.
Fats for Flakiness: Cold Butter vs. Coconut Oil: Super cold unsalted butter is non-negotiable for flaky biscuits! The cold butter creates steam pockets as it melts in the oven, lifting the layers. If you need a dairy-free option, ensure your coconut oil is solid and very cold, or use a high-quality vegan butter stick, keeping it well-chilled and grating it if necessary.
Liquid Gold: Milk Options Explained: Buttermilk is my go-to for its tangy flavor and its reaction with baking soda, promoting a beautiful rise. If you don’t have buttermilk, you can easily make a substitute: add 1 tablespoon of lemon juice or white vinegar to a measuring cup, then fill to 1 cup with regular milk (dairy or non-dairy). Let it sit for 5-10 minutes until it curdles slightly. Whole milk or even a rich unsweetened plant milk (like almond or oat milk) can work, though the tang and rise might be slightly different.
Sweetness & Leavening: A touch of sugar (granulated or a light brown sugar) balances the flavors and aids in browning. Our leavening duo of baking powder and baking soda is crucial. Baking powder provides the initial lift, while baking soda reacts with the acidic buttermilk (or substitute) for an extra boost. Don’t forget a pinch of salt; it enhances all the other flavors!
Step-by-Step Instructions: Bake Your Best Biscuits
Ready to bake? Follow these detailed steps to create your perfect batch of Breakfast Protein Biscuits!
1. Prepping Your Workspace
Start by preheating your oven to 425°F (220°C). Line a baking sheet with parchment paper. Gather all your ingredients, ensuring your butter (and buttermilk, if using) is as cold as possible. Grate your butter onto a plate and pop it back in the fridge or freezer for a few minutes while you prepare the dry ingredients. This step is crucial for that signature flakiness!
2. Mixing the Dry Ingredients
In a large bowl, whisk together the all-purpose flour, protein powder, sugar, baking powder, baking soda, and salt. Make sure everything is thoroughly combined to ensure even distribution of leavening and flavoring. A well-aerated mixture here sets the stage for light biscuits.
3. Cutting in the Cold Fat
Add the super-cold, grated butter to your dry ingredients. Using a pastry blender, a fork, or your fingertips, cut the butter into the flour mixture until it resembles coarse crumbs with some pea-sized pieces of butter remaining. Avoid overworking it; the goal is to keep the butter cold and distinct to create steamy pockets in the oven.
4. Adding the Wet Ingredients
Make a well in the center of your flour-butter mixture and pour in the cold buttermilk (or milk substitute). With a spatula or wooden spoon, gently mix until just combined. The dough will still look a bit shaggy and sticky; that’s perfectly normal and desired. Do not overmix, as this develops gluten and can lead to tough biscuits.
5. Folding and Shaping the Dough
Turn the shaggy dough out onto a lightly floured surface. Gently pat it into a rough rectangle. Fold the dough over onto itself in thirds (like a letter). Rotate it 90 degrees and repeat the patting and folding process 2-3 more times. This layering technique helps create those wonderful flaky layers! Pat the dough to about 3/4 to 1-inch thickness. Use a biscuit cutter (or a floured glass) to cut out biscuits, pressing straight down without twisting. Re-roll scraps gently if needed.
6. Baking to Golden Perfection
Place the cut biscuits onto your prepared baking sheet, ensuring they are slightly touching if you prefer softer sides, or spaced apart for crispier edges. Bake for 12-15 minutes, or until the tops are golden brown and the biscuits have risen beautifully. The exact time will depend on your oven. Once baked, transfer them to a wire rack to cool slightly before serving. Enjoy your delicious Breakfast Protein Biscuits!
Expert Tips for Biscuit Success
- Keep Ingredients Cold: This is the golden rule for flaky biscuits! Cold butter and cold liquid prevent the butter from melting too soon, creating steam pockets for lift.
- Don’t Overmix: Mix just until the ingredients are combined. Overmixing develops gluten, leading to tougher biscuits. A lightly shaggy dough is your friend.
- Proper Dough Folding: The folding technique (laminating) is what creates those desirable layers. Aim for 3-4 gentle folds without overworking or compressing the dough.
- Mind Your Oven: Ovens vary! Watch your biscuits closely, especially towards the end of the baking time. A perfectly golden-brown top signifies readiness.
- Use a Sharp Cutter: A sharp biscuit cutter (or knife) that presses straight down ensures clean edges, which contributes to a better rise. Twisting the cutter can seal the edges and inhibit rise.
What to Serve With Your Protein Biscuits
These versatile Breakfast Protein Biscuits are fantastic on their own, but they also serve as a perfect canvas for countless delicious additions.
Sweet Toppings
- A dollop of homemade jam or fruit preserves.
- A drizzle of maple syrup or honey.
- Fresh berries and a spoonful of Greek yogurt for an extra protein boost.
- Nut butter (peanut, almond, cashew) for healthy fats and even more protein.
Savory Pairings
- Scrambled eggs and a slice of avocado for a quick, balanced meal.
- Build a breakfast sandwich with a fried egg, cheese, and a lean turkey sausage patty.
- Serve alongside a bowl of hearty chili for a comforting meal.
Complete Breakfast Ideas
Pair two biscuits with a side of scrambled eggs (or an egg white scramble), a few slices of turkey bacon or chicken sausage, and a small fruit salad for a well-rounded and energizing start to your day. They also make a fantastic addition to a brunch spread with fruit, yogurt, and other breakfast mains.
Storing and Reheating Your Biscuits
To keep your delicious Breakfast Protein Biscuits fresh and ready for enjoyment, follow these storage and reheating tips.
Room Temperature Storage
Once completely cooled, store your biscuits in an airtight container at room temperature for up to 2-3 days. While they are best enjoyed fresh, they remain tender for a couple of days.
Freezing Instructions
These biscuits freeze beautifully! Once cooled, place them in a single layer on a baking sheet and freeze until solid (about 1-2 hours). Transfer the frozen biscuits to a freezer-safe bag or airtight container, removing as much air as possible. They can be stored in the freezer for up to 3 months. You can also freeze unbaked biscuit dough: cut out the biscuits, place them on a parchment-lined baking sheet, freeze until solid, then transfer to a freezer bag. Bake from frozen, adding an extra few minutes to the bake time.
Best Reheating Methods
- From Room Temperature: Pop them in a toaster oven or conventional oven at 300-325°F (150-160°C) for 5-7 minutes, or until warmed through. You can also briefly microwave them (10-20 seconds), but this might affect their flaky texture.
- From Frozen: For best results, reheat frozen baked biscuits in a preheated oven at 300-325°F (150-160°C) for 10-15 minutes, or until thoroughly thawed and warmed.
Breakfast Protein Biscuits: Your Questions Answered
Here are some common questions I get about making these fabulous Breakfast Protein Biscuits.
Can I make these gluten-free?
What kind of protein powder works best?
How do I prevent dry biscuits?
Can I add mix-ins?
Are these suitable for meal prep?
Breakfast Protein Biscuits
- Total Time: 18 minute
- Yield: 8-10 biscuits
Description
These delightful biscuits combine the classic fluffy texture with a satisfying protein boost, perfect for a healthy and energizing breakfast. Easy to prepare, they’re a fantastic way to start your day strong.
Ingredients
- 2 cups (240g) All-Purpose Flour
- 1/2 cup (60g) Unflavored or Vanilla Protein Powder (whey isolate or neutral plant-based)
- 2 tsp Baking Powder
- 1/2 tsp Baking Soda
- 1 tsp Granulated Sugar
- 1/2 tsp Salt
- 1/2 cup (113g) Unsalted Butter, very cold and grated
- 3/4 cup (180ml) Cold Buttermilk (or milk + 1 tbsp lemon juice/vinegar)
Instructions
- Preheat oven to 425°F (220°C). Line a baking sheet with parchment paper.
- In a large bowl, whisk together flour, protein powder, baking powder, baking soda, sugar, and salt.
- Add grated cold butter to the dry ingredients and cut in with a pastry blender or fingertips until mixture resembles coarse crumbs with some pea-sized butter pieces.
- Pour cold buttermilk into the center of the mixture. Mix gently with a spatula until just combined and a shaggy dough forms. Do not overmix.
- Turn the dough onto a lightly floured surface. Gently pat into a rectangle, then fold into thirds (like a letter). Rotate 90 degrees and repeat patting and folding 2-3 more times.
- Pat the dough to about 3/4 to 1-inch thickness. Cut out biscuits with a floured biscuit cutter, pressing straight down. Place on the prepared baking sheet.
- Bake for 12-15 minutes, or until golden brown and risen. Transfer to a wire rack to cool slightly before serving.
- Prep Time: 15 mins
- Cook Time: 12-15 mins