
")
My Go-To Cotton Candy Cake Recipe: A Sweet Indulgence
Imagine biting into a cloud of pure joy – light, fluffy, and bursting with that unmistakable, whimsical flavor of the carnival. That’s exactly what my Cotton Candy Cake offers. This isn’t just any cake; it’s a vibrant, tender crumb masterpiece swathed in a dreamy, melt-in-your-mouth cotton candy frosting that will transport you straight back to childhood. The magic lies in how beautifully the cotton candy essence infuses every layer, creating a truly unforgettable dessert. For more delectable baking adventures, you can find inspiration and see more easy recipes right here on my blog!
Why This Cotton Candy Cake Recipe Works
- Perfectly Balanced Sweetness: This recipe carefully balances the sweetness, ensuring the cotton candy flavor shines without being overwhelming.
- Moist and Tender Crumb: We use a combination of oil and buttermilk to achieve a remarkably moist and tender cake that stays fresh for days.
- Authentic Flavor Infusion: Special techniques are employed to ensure the cotton candy flavor deeply permeates both the cake layers and the luscious frosting.
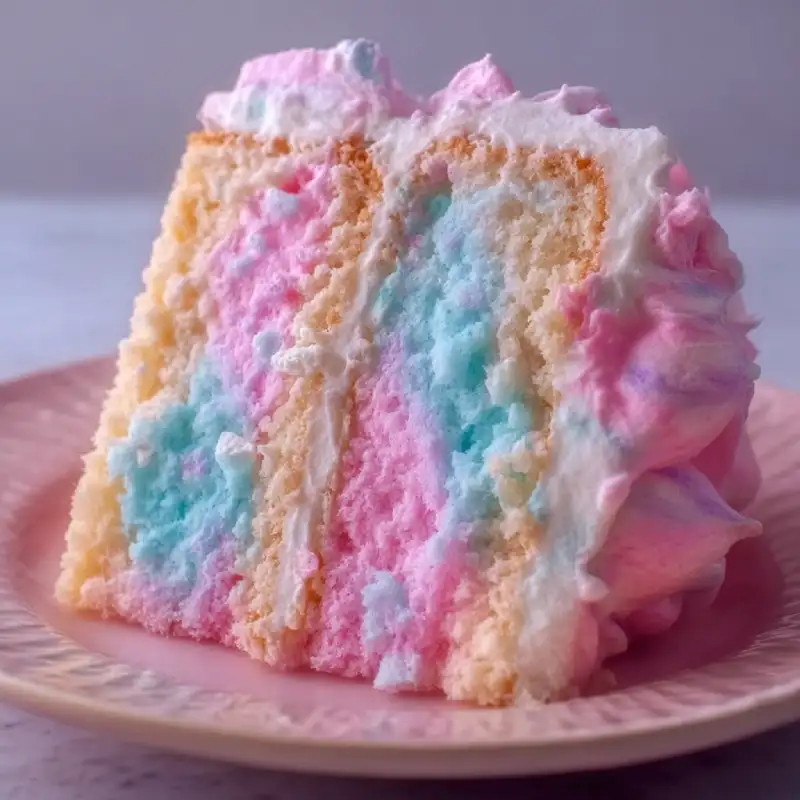
- Visually Stunning: The vibrant colors, whether natural or artificial, make this cake a showstopper, perfect for celebrations.
What Makes This Recipe Stand Out?
What truly sets this Cotton Candy Cake apart is its commitment to flavor and texture excellence. Unlike some recipes that only give a hint of cotton candy, ours ensures a full-bodied, authentic taste experience. The frosting isn’t just colored; it’s genuinely flavored, and the cake itself is subtly infused, creating a harmonious symphony of sweetness. Plus, the detailed instructions ensure even a novice baker can achieve professional-level results.
Ingredients for the Perfect Cotton Candy Cake
Here is what you need and why:
All-Purpose Flour: The backbone of our cake. I recommend Spoon & Sweep method for accurate measurement. While all-purpose works wonderfully, you can substitute a high-quality cake flour for an even finer, more delicate crumb.
Granulated Sugar: Provides sweetness and helps with the tender structure of the cake. Don’t skimp here; it’s essential for that classic cake texture.
Baking Powder & Baking Soda: Our leavening agents! Baking powder gives it lift, while baking soda reacts with the buttermilk to create a tender, airy texture.
Salt: A crucial ingredient that enhances all other flavors and balances the sweetness.
Unsalted Butter (Melted & Cooled): Contributes richness and moisture to the cake. Melting it ensures it fully incorporates into the batter for a consistently tender crumb.
Vegetable Oil: Adds an extra layer of moisture and helps keep the cake soft for longer. Canola or sunflower oil are good alternatives.
Buttermilk: Essential for tenderizing the crumb and activating the baking soda, resulting in a light and fluffy cake. If you don’t have buttermilk, you can make a substitute by adding 1 tablespoon of lemon juice or white vinegar to regular milk and letting it sit for 5 minutes before using.
Eggs: Provide structure, richness, and help bind the ingredients together. Ensure they are at room temperature for better emulsification.
Vanilla Extract: A universal flavor enhancer, it complements the cotton candy beautifully.
Cotton Candy Flavoring: This is where the magic happens! High-quality concentrated flavoring is key. I’ve found great success with LorAnn Oils or a good bakery emulsion. King Arthur Baking has a fantastic selection.
Food Coloring (Optional): Gel food coloring works best for vibrant, concentrated colors without adding too much liquid. Pinks and blues are classic for cotton candy!
Powdered Sugar: The foundation of our dreamy frosting, ensuring a smooth, melt-in-your-mouth texture.
Heavy Cream: Provides richness and helps achieve the perfect frosting consistency.
Step-by-Step: Baking Your Cotton Candy Cake
Follow these step-by-step photos:
1. Prepare the Cake Layers
Preheat your oven to 350°F (175°C). Grease and flour two 8-inch round cake pans, or line with parchment paper. In a large bowl, whisk together the dry ingredients: flour, sugar, baking powder, baking soda, and salt. In a separate medium bowl, whisk together the wet ingredients: melted butter, vegetable oil, buttermilk, eggs, and vanilla extract until well combined. Gradually add the wet ingredients to the dry ingredients, mixing on low speed until just combined. Be careful not to overmix, as this can lead to a tough cake. Divide the batter evenly between the prepared cake pans. If desired, add a few drops of pink or blue gel food coloring to each pan and gently swirl for a marbled effect. Bake for 28-32 minutes, or until a wooden skewer inserted into the center comes out clean. Let the cakes cool in the pans for 10 minutes before inverting them onto a wire rack to cool completely.
2. Whip Up the Cotton Candy Frosting
While the cakes are cooling, prepare the frosting. In a large bowl, using an electric mixer, beat the softened unsalted butter on medium speed until creamy and pale, about 3-4 minutes. Gradually add the powdered sugar, one cup at a time, mixing on low speed until combined, then increase to medium-high and beat until light and fluffy. Slowly add the heavy cream, 1-2 tablespoons at a time, along with the cotton candy flavoring, beating until the frosting is smooth, light, and spreadable. If desired, divide the frosting and tint with a few drops of pink and blue gel food coloring for a classic cotton candy look. Beat until the color is evenly distributed.
3. Assemble and Decorate
Once the cake layers are completely cool, level them with a serrated knife if needed. Place one cake layer on your serving plate or cake stand. Spread a generous layer of cotton candy frosting evenly over the top. Carefully place the second cake layer on top. Frost the top and sides of the entire cake with the remaining cotton candy frosting, using an offset spatula to create smooth sides or decorative swirls. For an extra festive touch, garnish with a few wisps of actual cotton candy just before serving (be aware that cotton candy dissolves quickly when exposed to air and moisture).
Expert Tips for a Flawless Cotton Candy Cake
- Room Temperature Ingredients: Ensure your eggs and buttermilk are at room temperature. This helps them emulsify better with the fats, creating a smoother, more uniform batter and a finer crumb.
- Do Not Overmix: Overmixing develops gluten, leading to a tough cake. Mix wet and dry ingredients until just combined; a few small lumps are perfectly fine.
- Accurate Flour Measurement: Always spoon your flour into the measuring cup and level it off with a straight edge. Dipping the cup directly into flour can compact it, leading to too much flour and a dry cake.
- Achieving Vibrant Color: Gel food colorings are best for intense, concentrated hues without altering the batter’s consistency. Add them gradually until you reach your desired shade. Remember, a little goes a long way!
- Maintaining Cotton Candy Flavor: Add the cotton candy flavoring to the frosting at the very end of the mixing process to preserve its delicate notes. If using actual cotton candy for garnish, add it just before serving, as it melts quickly.
- Cool Cakes Completely: Attempting to frost warm cakes will cause your frosting to melt and slide off. Patience is key!
Serving Suggestions for Your Cotton Candy Cake
This delightful Cotton Candy Cake is a celebration in itself, but a few thoughtful pairings can elevate the experience even further:
- Complementary Desserts: Keep it light! Mini vanilla bean panna cottas or simple fresh berries with a dollop of whipped cream would provide a beautiful counterpoint to the cake’s sweetness.
- Beverage Pairings: For the ultimate nostalgic treat, pair slices with a tall glass of sparkling lemonade or a classic cream soda. For adults, a light Moscato d’Asti or a dry sparkling wine would beautifully cut through the sweetness, while a simple cup of Earl Grey tea provides a sophisticated balance.
- Toppings: A sprinkle of edible glitter for extra sparkle, or a few colorful sprinkles can enhance the whimsical look. Just remember to add any actual cotton candy garnishes right before serving!
Storing and Reheating Your Cotton Candy Cake
To keep your Cotton Candy Cake tasting fresh and fabulous:
- Optimal Storage Practices: Store the cake, tightly covered, at room temperature for up to 2-3 days. If your kitchen is particularly warm, or if it contains fresh fruit, it’s best to refrigerate it. Place it in an airtight cake carrier or cover loosely with plastic wrap to prevent it from drying out.
- Extending Freshness and Flavor: To store for longer, individual slices or the entire unfrosted cake layers can be wrapped tightly in plastic wrap, then foil, and frozen for up to 1 month.
- Reheating (Thawing): Thaw frozen cake overnight in the refrigerator, then bring to room temperature before serving for the best texture and flavor. If the cake is frosted, it’s best to thaw it directly on the counter, still covered, to prevent condensation from forming on the frosting.
Cotton Candy Cake FAQ
Can I use store-bought cotton candy for flavor?
How do I prevent the cotton candy from dissolving in the frosting?
Can this cake be made gluten-free or dairy-free?
Why This Cotton Candy Cake Recipe Works
- Perfectly Balanced Sweetness: This recipe carefully balances the sweetness, ensuring the cotton candy flavor shines without being overwhelming.
- Moist and Tender Crumb: We use a combination of oil and buttermilk to achieve a remarkably moist and tender cake that stays fresh for days.
- Authentic Flavor Infusion: Special techniques are employed to ensure the cotton candy flavor deeply permeates both the cake layers and the luscious frosting.
- Visually Stunning: The vibrant colors, whether natural or artificial, make this cake a showstopper, perfect for celebrations.
What Makes This Recipe Stand Out?
What truly sets this Cotton Candy Cake apart is its commitment to flavor and texture excellence. Unlike some recipes that only give a hint of cotton candy, ours ensures a full-bodied, authentic taste experience. The frosting isn’t just colored; it’s genuinely flavored, and the cake itself is subtly infused, creating a harmonious symphony of sweetness. Plus, the detailed instructions ensure even a novice baker can achieve professional-level results.
Dreamy Cotton Candy Cake
- Total Time: 1 hour
- Yield: 12 servings
Description
Indulge in a whimsical treat with this tender, flavorful Cotton Candy Cake, featuring moist layers and a fluffy cotton candy-infused frosting. Perfect for birthdays, parties, or any occasion that calls for a touch of magic.
Ingredients
- 2 ½ cups all-purpose flour
- 1 ½ cups granulated sugar
- 1 tablespoon baking powder
- 1 teaspoon baking soda
- ¼ teaspoon salt
- ½ cup unsalted butter, melted and cooled
- ¼ cup vegetable oil
- 1 cup buttermilk
- 2 large eggs, room temperature
- 2 teaspoons vanilla extract
- 2 teaspoons cotton candy flavoring (for cake)
- Food coloring (pink, blue, optional)
- For the Frosting:
- 1 cup (2 sticks) unsalted butter, softened
- 4–5 cups powdered sugar
- ¼ cup heavy cream
- 1 teaspoon vanilla extract
- 2–3 teaspoons cotton candy flavoring (for frosting)
- Pinch of salt
Instructions
- Prepare Cake Layers: Preheat oven to 350°F (175°C). Grease and flour two 8-inch round cake pans. Whisk flour, sugar, baking powder, baking soda, and salt. In another bowl, whisk melted butter, oil, buttermilk, eggs, vanilla, and 1 tsp cotton candy flavoring. Add wet to dry, mixing until just combined. Divide batter, add optional food coloring, and bake for 28-32 minutes. Cool completely.
- Whip Cotton Candy Frosting: In a large bowl, beat softened butter until creamy. Gradually add powdered sugar, then heavy cream, vanilla extract, a pinch of salt, and 2-3 tsp cotton candy flavoring, beating until fluffy. Divide and tint with food coloring if desired.
- Assemble and Decorate: Level cooled cake layers. Place one layer on a serving plate, spread with a generous layer of frosting. Top with the second cake layer and frost the top and sides of the entire cake. Garnish with real cotton candy just before serving, if using.
- Prep Time: 30 mins
- Cook Time: 30 mins