
")
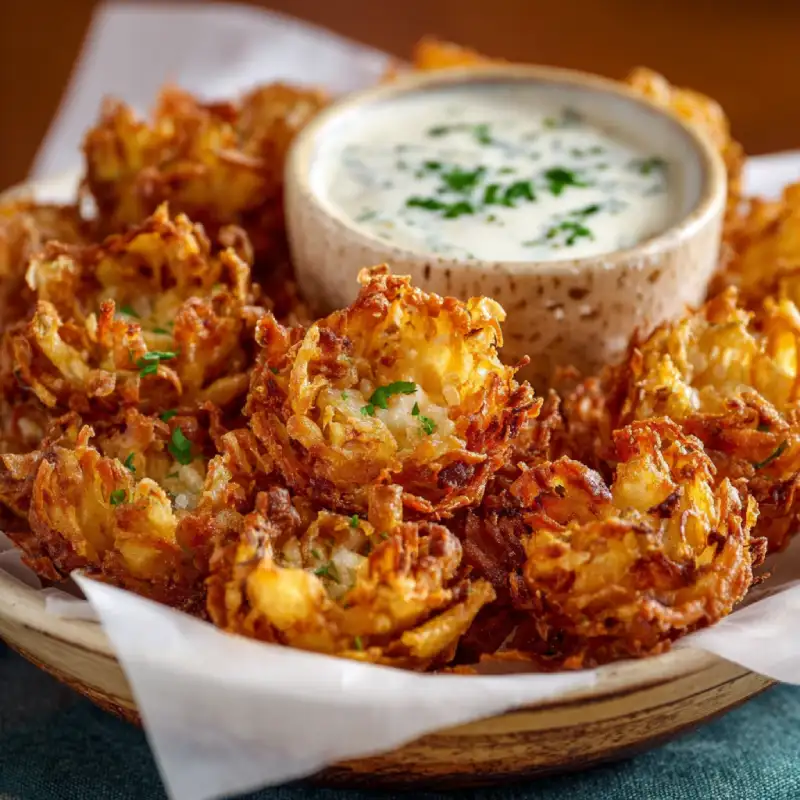
Table of Contents
- Make Restaurant-Quality Mini Bloomin’ Onions at Home (Seriously!)
- How This Recipe Works: Your Crispy Bloomin’ Onion Blueprint
- Ingredients and Substitutions: Building Your Bloomin’ Onion Base
- Step-by-Step Instructions: Frying Up Perfection
- Expert Tips for Success: Don’t Skip These!
- What to Serve With Your Mini Bloomin’ Onions
- Storing and Reheating: Keep Them Crispy
- FAQ: Your Mini Bloomin’ Onion Questions Answered
Make Restaurant-Quality Mini Bloomin’ Onions at Home (Seriously!)
Oh, the glorious Bloomin’ Onion! That iconic, crispy, golden-fried masterpiece of an appetizer. Is there anything more satisfying than pulling apart those perfectly seasoned petals, dipping them into a creamy, zesty sauce, and experiencing that incredible crunch followed by the tender sweetness of onion? For years, I adored them at restaurants, always convinced they were some impossible culinary magic reserved only for professional fry cooks. But oh, how wrong I was! I’ve cracked the code, and I’m here to tell you that making Crispy Mini Bloomin’ Onions at home is not only achievable but wildly rewarding. Trust me, once you taste your own homemade version, bursting with flavor and unparalleled crispness, you’ll wonder why you ever bothered with the drive-thru. Need more kitchen inspiration? See more good recipes here to elevate your home cooking game!
My journey to this perfect recipe has been one of delicious experimentation. Countless onions sliced, batters tweaked, and oil temperatures monitored, all in pursuit of that elusive, restaurant-quality crisp. What I discovered is that it’s all about technique and a few key ingredients that work in harmony. And the best part? We’re making Crispy Mini Bloomin’ Onions, which are perfectly portioned for individual enjoyment or sharing amongst a smaller group without the usual bloomin’ onion monstrosity that takes up an entire table. Get ready to impress yourself and everyone you share these with!
How This Recipe Works: Your Crispy Bloomin’ Onion Blueprint
- Achieving maximum crispness: The genius double-dredge method. This isn’t just a simple dip and fry! We employ a two-stage dredging process that creates an incredibly robust, flavorful, and shatteringly crispy crust that adheres beautifully to every onion petal. It’s the secret weapon for that satisfying crunch.
- Flavor layering: Not just fried, but seasoned right. We infuse flavor at every stage – from the buttermilk soak to the spiced flour mixture. This ensures every bite of your Crispy Mini Bloomin’ Onions is packed with deliciousness, not just grease.
- Miniature marvel: Perfectly sized for individual servings. Forget the struggle of sharing one colossal onion. These mini versions are easier to cut, fry, and serve, making them ideal appetizers or snack-sized treats.
- The ideal texture: Tender onion encased in a golden, crunchy crust. The buttermilk tenderizes the onion just enough, while the strategic combination of flour and cornstarch in the coating provides that perfect golden, bubbly, and incredibly crunchy exterior.
Ingredients and Substitutions: Building Your Bloomin’ Onion Base
Here is what you need and why:
The right onion: Why yellow onions are key (and how to cut them perfectly). For classic Bloomin’ Onions, yellow onions are your best friend. They have a perfect balance of sweetness and sharpness, and they hold up well to frying. Their size also allows for those beautiful ‘petals.’ The cutting technique is paramount – you want to cut from the top, not the root, to keep the onion intact for blooming.
Buttermilk: The tenderizing secret (and dairy-free alternatives). Buttermilk does more than just help the coating stick; its acidity gently tenderizes the onion, ensuring a soft, flavorful interior. If you don’t have buttermilk, you can easily make your own by adding a tablespoon of lemon juice or white vinegar to regular milk and letting it sit for 5-10 minutes until it curdles slightly. For a dairy-free option, use a non-dairy milk (like almond or soy) with lemon juice/vinegar.
Flour and cornstarch: The crisp-making duo (and gluten-free options). All-purpose flour forms the base of our crispy coating, but cornstarch is the real hero here! It creates that extra-crisp shell that stays crunchy longer. For a gluten-free version, a 1:1 gluten-free all-purpose flour blend (like Bob’s Red Mill or King Arthur Baking’s GF Flour) mixed with cornstarch works wonderfully. Check out King Arthur Baking’s tips for gluten-free frying for more excellent advice!
Essential spices: Paprika, garlic powder, onion powder and why they matter. These are the flavor backbone of your Bloomin’ Onion. Paprika adds warmth and a reddish hue, garlic powder brings that irresistible savory depth, and extra onion powder (yes, more onion for your onion!) amplifies the natural sweetness. Don’t skimp on these!
Oil for frying: Choosing the best one for high heat and flavor. You need an oil with a high smoke point for deep frying. Vegetable oil, canola oil, peanut oil, or sunflower oil are all excellent choices. They are neutral in flavor and can handle the high temperatures needed to get your onions golden and crispy without burning.
Step-by-Step Instructions: Frying Up Perfection
Follow these step-by-step photos:
1. Preparing your onions: The critical cutting technique
Trim off the very top of each small-medium yellow onion, but leave the root end intact, as this will hold the onion together. Place the onion root-side up on your cutting board. Using a very sharp knife, make 4-6 evenly spaced cuts from about 1/2 inch from the root almost all the way down to the board, but do not cut through the root. You want to create petals but keep them connected at the base. Gently separate the petals with your fingers. Watch a video if you’re uncertain; precision here ensures a beautiful bloom!
2. The buttermilk soak: Infusing flavor and moisture
Place your cut onions in a bowl. Pour enough buttermilk over them to fully immerse them. Make sure all the petals get drenched. Let them soak for at least 30 minutes, or even better, an hour in the refrigerator. This step is crucial for tenderizing the onion and helping the coating adhere.
3. Crafting the dredge: Your crispy coating mixture
While the onions are soaking, prepare your dredging station. In a large, shallow dish, whisk together the all-purpose flour, cornstarch, paprika, garlic powder, onion powder, salt, and black pepper. Mix thoroughly until all the spices are evenly distributed. In another shallow dish, have your remaining buttermilk ready.
4. Dredging perfection: The double-dip method explained
Remove an onion from the buttermilk, letting excess drip off. Dredge it thoroughly in the dry flour mixture, ensuring every petal is coated. Gently pat off any excess flour. Now, dip the floured onion back into the buttermilk, letting excess drip off. Finally, return it to the dry flour mixture for a second, thorough coating. Press the flour mixture onto the onion petals to ensure full coverage. This double dredge is key for that thick, crispy crust! Repeat for all onions, resting dredged onions on a wire rack while you heat your oil.
5. Frying: Temperature control and achieving golden brown
Heat about 3-4 inches of high smoke point oil in a large, heavy-bottomed pot or Dutch oven to 350°F (175°C). Use a candy/deep-fry thermometer – this is non-negotiable for perfectly cooked, non-greasy fried foods. Carefully lower one or two Crispy Mini Bloomin’ Onions into the hot oil, ensuring not to overcrowd the pot. Fry for 5-7 minutes, turning occasionally, until deeply golden brown and crispy. Remove with a spider or slotted spoon, draining excess oil, and transfer to a wire rack set over paper towels. Immediately sprinkle with a pinch of extra salt while hot.
Expert Tips for Success: Don’t Skip These!
- Onion cutting specifics: Exact cuts for bloom. Aim for 4-6 cuts, going almost to the root but not through it. The more cuts, the more petals, but too many can make it fragile. Practice on an extra onion if you’re nervous!
- Oil temperature matters: Using a thermometer is non-negotiable. Frying at the right temperature (350-375°F or 175-190°C) is crucial. Too low, and your onions will be greasy; too high, and they’ll burn before cooking through.
- Don’t overcrowd the pot: Fry in batches for crispiness. Frying too many onions at once will drop the oil temperature significantly, leading to soggy results. Give them space to get golden and crispy.
- Season immediately: Salt sticks best when hot. As soon as the bloomin’ onions come out of the oil, give them a generous sprinkle of fine sea salt. It adheres beautifully to the hot, crispy surface.
What to Serve With Your Mini Bloomin’ Onions
The fun doesn’t end with the frying! These Crispy Mini Bloomin’ Onions beg for a fantastic dipping sauce. My go-to is a simple, zesty horseradish sauce:
- Classic Dipping Sauce: Whisk together 1/2 cup mayonnaise, 2 tablespoons ketchup, 1-2 tablespoons prepared horseradish (to taste), 1 teaspoon paprika, 1/2 teaspoon garlic powder, and a squeeze of lemon juice. Adjust seasonings as desired!
- Other Sauce Ideas: Get creative! Ranch dressing, sriracha mayo, a smoky barbecue sauce, or even a spicy queso are all fantastic choices.
- Pairing Suggestions: These are fabulous as a stand-alone appetizer for game day or a casual get-together. They also make a perfect sidekick to hearty meals like grilled burgers, juicy steaks, or crispy oven-baked chicken. They elevate any meal into a fun, restaurant-style experience!
Storing and Reheating: Keep Them Crispy
While Crispy Mini Bloomin’ Onions are best enjoyed fresh, sometimes you have leftovers (it’s rare, but it happens!).
- Best storage practices: Allow any leftover bloomin’ onions to cool completely. Store them in an airtight container in the refrigerator for up to 2-3 days. Avoid stacking them if possible, as this can lead to sogginess.
- Reheating methods: To revive their crispness, avoid the microwave!
- Oven: Preheat your oven to 375°F (190°C). Place the bloomin’ onions on a wire rack set over a baking sheet and bake for 8-12 minutes, or until heated through and crispy.
- Air Fryer: This is my favorite method! Preheat your air fryer to 350°F (175°C). Place the bloomin’ onions in a single layer in the air fryer basket and cook for 5-7 minutes, shaking halfway through, until hot and crisp.
Frequently Asked Questions
Can I use a different type of onion?
How do I prevent the coating from falling off?
Can I bake or air fry these instead of deep frying?
What’s the best way to cut an onion for blooming?
Crispy Mini Bloomin’ Onions
- Total Time: 50 minutes
- Yield: 4-6 servings
Description
Unlock the secret to perfectly crispy, restaurant-quality Mini Bloomin’ Onions right in your own kitchen. This simple guide ensures a crunchy, flavorful appetizer every time.
Ingredients
- 3–4 small-medium yellow onions
- 2 cups buttermilk (plus extra for dredging)
- 2 cups all-purpose flour
- 1/2 cup cornstarch
- 1 tbsp smoked paprika
- 1 tbsp garlic powder
- 1 tsp onion powder
- 1 tsp salt (plus more for seasoning)
- 1/2 tsp black pepper
- Oil for deep frying (vegetable, canola, or peanut)
Instructions
- Prepare Onions: Trim the top of each onion, leaving the root intact. Place root-side up and make 4-6 deep cuts from the top almost to the root (not through), creating petals. Gently separate.
- Soak in Buttermilk: Place cut onions in a bowl and pour buttermilk over them, ensuring they are fully submerged. Soak for 30-60 minutes in the refrigerator.
- Prepare Dredge: In a shallow dish, whisk together flour, cornstarch, paprika, garlic powder, onion powder, salt, and pepper. In another shallow dish, have extra buttermilk ready.
- Double Dredge Onions: Remove an onion from buttermilk, draining excess. Dredge thoroughly in flour mixture, then dip back into buttermilk, letting excess drip. Finally, dredge again in flour mixture, pressing to coat well. Place dredged onions on a wire rack.
- Fry: Heat oil in a heavy-bottomed pot to 350°F (175°C). Carefully lower 1-2 onions into the hot oil. Fry for 5-7 minutes, turning occasionally, until golden brown and crispy.
- Season & Serve: Remove from oil, drain briefly, and immediately sprinkle with extra salt. Serve hot with your favorite dipping sauce.
- Prep Time: 20 mins
- Cook Time: 30 mins