
")
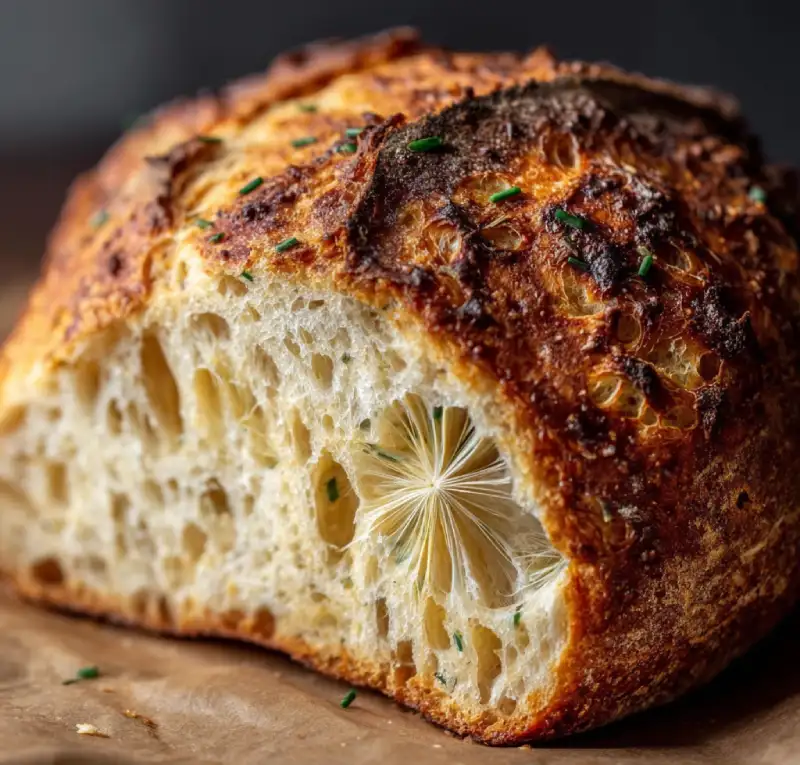
Table of Contents
- Introduction: My Journey to Dandelion Bread Delight
- How This Dandelion Bread Delight Recipe Works
- Ingredients and Smart Substitutions for Dandelion Bread
- Step-by-Step Instructions: Baking Your Dandelion Bread Delight
- Expert Tips for Dandelion Bread Success
- What to Serve With Dandelion Bread Delight
- Storing and Reheating Your Dandelion Bread
- Frequently Asked Questions About Dandelion Bread Delight
Introduction: My Journey to Dandelion Bread Delight
There’s a magic to baking homemade bread, a sensory experience that starts long before the first slice. But what if I told you that magic could deepen, flavored by the wild? The Dandelion Bread Delight isn’t just a recipe; it’s a story. Imagine pulling a golden-crusted loaf from your oven, its aroma a delicate dance of earthy sweetness and the subtle perfume of spring. Then, that first bite – a tender crumb, hints of floral sunshine, and a satisfying chew. It’s a revelation, a taste of nature’s bounty transformed into pure comfort. My journey to this particular Dandelion Bread Delight began with a foraging curiosity, an urge to connect with the forgotten flavors all around us. What started as an experiment quickly blossomed into a kitchen staple, a bread that truly embodies the vibrant spirit of the season. If you’re looking to elevate your baking and try something truly unique, this Dandelion Bread Delight is an absolute must-try. You can See more good recipes here, but trust me, this one is special!
How This Dandelion Bread Delight Recipe Works
This recipe isn’t just about adding dandelions; it’s meticulously crafted to highlight their unique characteristics while ensuring a perfect loaf every single time. Here’s what makes this Dandelion Bread Delight stand out:
- Achieving the Perfect Golden Crust: We’ll discuss the ideal oven temperature and a clever trick to develop that enviable, crackling golden crust that encases a soft interior.
- Developing a Subtle, Earthy Flavor: The dandelion petals contribute a delicate, slightly sweet, and earthy note that’s never overpowering, but always intriguing. It’s a flavor that makes people ask, “What *is* that delicious secret ingredient?”
- Ensuring a Soft, Tender Crumb: Precise measurements for flour and liquid, combined with optimal kneading and rising times, guarantee a consistently moist and tender crumb that practically melts in your mouth.
Ingredients and Smart Substitutions for Dandelion Bread
Here is what you need and why to create your perfect Dandelion Bread Delight:
The Star Ingredient: Fresh Dandelion Petals (and how to pick them): This is where the magic truly happens! You’ll need about 1/2 to 3/4 cup of fresh dandelion petals. When foraging, choose dandelions from areas free of pesticides and pollutants, well away from roadsides. Pick them in the morning after the dew has dried. Carefully pinch off only the yellow petals, leaving the green parts behind, as they can be bitter. Rinse them gently and pat dry.
Flour Power: All-Purpose vs. Whole Wheat: For a light and airy loaf, I recommend using unbleached all-purpose flour. It provides sufficient gluten structure without weighing down the bread. However, if you prefer a nuttier, denser crumb with added fiber, you can substitute up to 1/2 of the all-purpose flour with whole wheat flour. Just remember that whole wheat absorbs more liquid, so you might need a tiny splash more water.
Sweeteners: Honey vs. Maple Syrup (and why): A touch of sweetness helps to balance the dandelions’ earthy notes and also aids in yeast activation and browning. Runny honey is my preferred choice for its floral undertones that complement the dandelion beautifully. King Arthur Baking has some fantastic resources on baking with honey. If you prefer a vegan option or a different flavor profile, maple syrup works wonderfully, adding its own distinct richness without being overly sweet.
Fats: Butter vs. Oil (and their impact): Unsalted butter, melted, contributes richness, a lovely golden color to the crust, and helps keep the crumb tender. It’s an excellent choice for flavor. If you’re looking for a dairy-free alternative, a neutral-flavored vegetable oil (like canola or grapeseed) can be used, though it will impart a slightly less rich flavor.
Leavening Agents: Yeast Essentials for a Perfect Rise: We’ll be using active dry yeast for this recipe. It’s reliable and readily available. Ensure your yeast is fresh by checking the expiration date. Fresh yeast is crucial for a vigorous rise and a light, airy texture. If your yeast doesn’t foam when activated, it’s likely dead, and your bread won’t rise.
Step-by-Step Instructions: Baking Your Dandelion Bread Delight
Follow these step-by-step instructions to create your perfect Dandelion Bread Delight:
1. Harvesting and Preparing Your Dandelions
Head to a clean, pesticide-free area and collect your dandelions. Gently pull off only the yellow petals, discarding all green bits, which can add bitterness. You’ll need about 1/2 to 3/4 cup of loosely packed petals. Give them a quick, gentle rinse under cool water and spread them on a clean towel or paper towels to thoroughly air dry. Excess moisture can affect your dough’s consistency.
2. Activating the Yeast: The Foundation of Good Bread
In a large mixing bowl, combine 1 cup of warm water (around 105-115°F / 40-46°C – bathwater warm, not hot!), 1 tablespoon of your chosen sweetener (honey or maple syrup), and 2 1/4 teaspoons (one standard packet) of active dry yeast. Stir gently and let it sit for 5-10 minutes. It should become foamy and bubbly, which indicates your yeast is alive and ready to work its magic. If it doesn’t foam, your yeast is likely expired, and you’ll need to start with new yeast.
3. Mixing and Kneading the Dough: Key to Texture
To the activated yeast mixture, add 1/4 cup of melted butter (or oil), 1 teaspoon of salt, and 2 cups of all-purpose flour. Stir with a wooden spoon until just combined. Gradually add the remaining 1 to 1 1/2 cups of flour, a half cup at a time, mixing until a shaggy dough forms. Turn the dough out onto a lightly floured surface. Knead for 8-10 minutes until the dough is smooth, elastic, and no longer sticky. It should spring back when lightly poked. During the last minute of kneading, gently knead in your prepared dandelion petals until evenly distributed.
4. First Rise: Allowing Flavors to Develop
Lightly grease a clean large bowl with a little oil. Place the kneaded dough in the bowl, turning it once to coat with oil. Cover the bowl tightly with plastic wrap or a clean kitchen towel. Let it rise in a warm, draft-free place for 1 to 1.5 hours, or until doubled in size. This slow rise is crucial for developing the bread’s full flavor and a tender crumb.
5. Shaping Your Loaf: From Rustic to Refined
Gently punch down the risen dough to release the air. Turn it out onto a lightly floured surface. Shape the dough into your desired loaf. For a classic sandwich loaf, flatten the dough into a rectangle, roll it up tightly, and pinch the seam closed. Place it seam-side down in a lightly greased 9×5-inch loaf pan. For a rustic round boule, gently tuck the edges underneath to form a taut ball and place it on a parchment-lined baking sheet.
6. Second Rise: The Final Proof
Cover the shaped loaf lightly with a clean kitchen towel or plastic wrap. Let it rise again in a warm, draft-free place for another 30-45 minutes, or until it has nearly doubled in size and looks puffy. This second rise, often called proofing, gives the bread its final lightness and height.
7. Baking to Golden Perfection
Preheat your oven to 375°F (190°C) with a rack in the center. If desired, lightly brush the top of the loaf with a little milk or egg wash for an even shinier, browner crust. Bake for 30-35 minutes, or until the crust is deeply golden brown and the internal temperature reaches 200-210°F (93-99°C) when measured with an instant-read thermometer. If the top is browning too quickly, you can loosely tent it with foil. Once baked, remove the bread from the pan immediately and let it cool completely on a wire rack before slicing. Slicing too early can result in a gummy texture.
Expert Tips for Dandelion Bread Success
- Temperature Control for Yeast Activation: Always check your water temperature with a thermometer for yeast activation. Too cold, and the yeast won’t activate; too hot, and you’ll kill it. 105-115°F (40-46°C) is the sweet spot.
- Don’t Over-Flour Your Dough: Resist the urge to add too much flour during kneading. A slightly sticky dough will often turn smooth and elastic with time and proper kneading. Over-flouring leads to a dense, dry loaf.
- The Water Bath Secret for a Crispier Crust (Optional): For an extra crispy crust, place a shallow pan of hot water on the bottom rack of your oven during baking. The steam will help create a beautiful, crackly exterior.
- Knowing When Your Bread Is Done: In addition to the golden color, fully baked bread will sound hollow when tapped on the bottom. The most accurate method is to use an instant-read thermometer; the internal temperature should be between 200-210°F (93-99°C).
- Patience is a Virtue: Resist cutting into your warm, fresh-from-the-oven bread immediately. It’s tempting, but cooling on a wire rack allows the starches to set, resulting in a much better texture.
What to Serve With Dandelion Bread Delight
This delightful bread offers a unique flavor profile that pairs beautifully with a variety of dishes and spreads:
- Savory Pairings: Soups and Cheeses: The subtle earthiness of the Dandelion Bread Delight makes it an excellent accompaniment to light, creamy vegetable soups or hearty stews. It also shines alongside a cheese board featuring soft goat cheese or a mild cheddar.
- Sweet Complements: Jams and Spreads: Smeared with a dollop of apricot jam, a vibrant lemon curd, or even a simple homemade applesauce, this bread transforms into a delightful breakfast or snack.
- Herbal Butters: Elevating the Experience: Whisk together softened butter with fresh chives, parsley, or a hint of garlic for a truly elevated experience. The herbal notes will harmonize wonderfully with the dandelion flavor.
Storing and Reheating Your Dandelion Bread
To keep your Dandelion Bread Delight as fresh as possible and enjoy every last crumb:
- Keeping It Fresh: Room Temperature and Freezing Options: Once completely cooled, store the bread at room temperature in an airtight container or a bread box for up to 3-4 days. You can also wrap individual slices or the whole loaf tightly in plastic wrap, then aluminum foil, and freeze for up to 3 months.
- Reviving Stale Bread: Tips for Perfect Reheating: To revive a slightly stale loaf, lightly mist it with water and warm it in a 300°F (150°C) oven for 5-10 minutes. If frozen, thaw at room temperature, then warm as directed. This will bring back some of its warmth and softness, making it almost as good as fresh.
Frequently Asked Questions About Dandelion Bread Delight
Can I use dried dandelions?
How do I prevent my bread from being too dense?
What other herbs can I add?
Is this recipe suitable for bread machines?
Dandelion Bread Delight
- Total Time: 1 hour 5 minutes
- Yield: 1 loaf (approx. 12 slices)
Description
Discover the delicious Dandelion Bread Delight with this step-by-step recipe. Easy to bake, this bread offers a unique, subtle earthy and floral flavor.
Ingredients
- 1 cup warm water (105-115°F / 40-46°C)
- 1 tbsp honey or maple syrup
- 2 1/4 tsp active dry yeast (1 packet)
- 1/4 cup unsalted butter, melted (or neutral oil)
- 1 tsp salt
- 3 1/2 to 4 cups all-purpose flour, plus more for dusting
- 1/2 to 3/4 cup fresh dandelion petals (yellow parts only)
Instructions
- 1. Prepare Dandelions: Harvest dandelions from a clean area. Gently pull off only the yellow petals (discarding green parts). Rinse lightly and pat thoroughly dry.
- 2. Activate Yeast: In a large bowl, combine warm water, sweetener, and yeast. Stir and let sit 5-10 minutes until foamy.
- 3. Mix Dough: Add melted butter, salt, and 2 cups of flour to the yeast mixture. Stir. Gradually add remaining flour (1-1.5 cups) until a shaggy dough forms.
- 4. Knead: Turn dough onto a lightly floured surface. Knead 8-10 minutes until smooth and elastic. In the last minute, knead in dandelion petals.
- 5. First Rise: Lightly grease a bowl, place dough in it, turning to coat. Cover and let rise in a warm place 1-1.5 hours, or until doubled.
- 6. Shape Loaf: Gently punch down dough. Shape into a loaf and place in a greased 9×5-inch loaf pan or on a parchment-lined baking sheet.
- 7. Second Rise: Cover loaf and let rise in a warm place 30-45 minutes, or until nearly doubled.
- 8. Bake: Preheat oven to 375°F (190°C). Bake for 30-35 minutes, until golden brown and internal temperature is 200-210°F (93-99°C).
- 9. Cool: Remove from pan immediately and cool completely on a wire rack before slicing.
- Prep Time: 30 mins
- Cook Time: 35 mins