
")
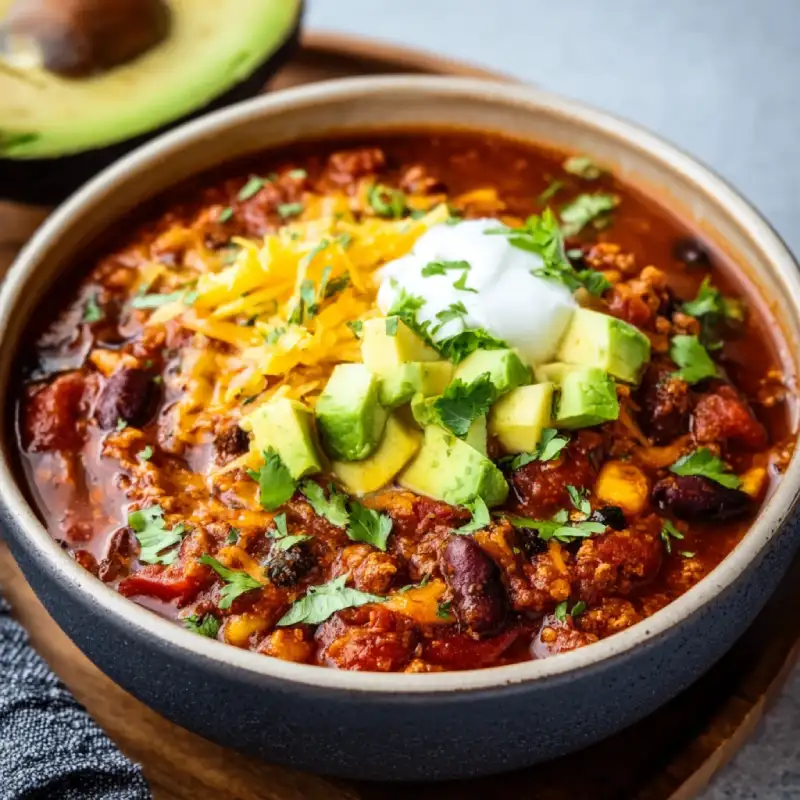
Table of Contents
- Introduction: Your New Go-To Easy Diabetic Chili Recipe
- How This Easy Diabetic Chili Recipe Works
- Ingredients and Smart Substitutions for Easy Diabetic Chili
- Step-by-Step Instructions: Crafting Your Easy Diabetic Chili
- Expert Tips for Success with Easy Diabetic Chili
- What to Serve With Your Easy Diabetic Chili
- Storing and Reheating Your Easy Diabetic Chili
- Frequently Asked Questions About Easy Diabetic Chili
Introduction: Your New Go-To Easy Diabetic Chili Recipe
Imagine a bowl of something warm, comforting, and deeply flavorful – a dish that hugs you from the inside out without any guilt. That’s precisely what you’ll find in this easy diabetic chili recipe! It’s rich, hearty, and packed with savory goodness, offering a thick, satisfying texture that lingers delightfully on your palate. As someone who believes delicious food should be accessible to everyone, crafting recipes that cater to specific dietary needs like diabetes, while still bursting with incredible taste, is a passion of mine. This recipe isn’t just for those managing blood sugar; it’s for anyone who craves a truly fantastic bowl of chili that also happens to be incredibly healthy and straightforward to make. See more easy recipes that blend health and flavor seamlessly!
Get ready to redefine your comfort food experience. This isn’t just another healthy alternative; it’s a vibrant, robust chili that stands tall on its own, promising both health-conscious benefits and an explosion of delightful flavors you’ll want to come back to again and again. It truly is the health-conscious comfort food you’ve been waiting for.
How This Easy Diabetic Chili Recipe Works
- Rich, Hearty Texture Without Excess Carbs: We achieve that satisfying thickness by carefully selecting ingredients and allowing ample simmering time, rather than relying on carb-heavy thickeners.
- Deep, Satisfying Flavor Profile: A thoughtful blend of spices, aromatic vegetables, and quality proteins creates a complex taste that will trick your taste buds into thinking you’re indulging.
- Simple Ingredients, Maximum Impact: No obscure items here! We use everyday pantry staples in smart ways to bring out their best, ensuring big flavor with minimal fuss.
- Quick Prep for Weeknight Meals: Designed for efficiency, this chili comes together quickly, making it a perfect solution for busy evenings when you need something nutritious and delicious.
Ingredients and Smart Substitutions for Easy Diabetic Chili
Here is what you need and why:
Lean Protein: Ground Turkey or Beef: For this easy diabetic chili recipe, I strongly recommend choosing lean ground turkey (93/7 or 99/1) or lean ground beef (90/10 or leaner). These options significantly reduce the saturated fat content while still providing essential protein to keep you feeling full and satisfied without spiking blood sugar. If you prefer, diced chicken breast can also work, though it will yield a different texture.
Low-Sugar Tomatoes: Crushed, Diced, and Paste: Tomatoes are the heart of any good chili. Opt for canned varieties with no added sugar or low-sodium options. Crushed tomatoes provide a nice base, diced tomatoes add texture, and a small amount of tomato paste deepens the umami flavor without adding excessive carbs or sweetness. Always check labels for sugar content!
Fiber-Rich Beans: Kidney, Black, or Pinto: Beans are nutritional powerhouses, packed with fiber and protein, which are crucial for managing blood sugar levels. Feel free to use kidney beans, black beans, pinto beans, or even a mix! Rinse them thoroughly before adding to reduce sodium and any residual starches. They contribute significantly to the hearty texture of this easy diabetic chili recipe.
Flavor Boosters: Onions, Bell Peppers, Garlic: These aromatic vegetables are non-negotiable for building a robust flavor base. Onions (yellow or white), bell peppers (any color for visual appeal and sweetness), and fresh garlic are naturally low in carbohydrates and high in flavor, making them perfect for diabetic-friendly cooking. They add depth without relying on unhealthy fats or sugars.
Spice Blend: Chili Powder, Cumin, Smoked Paprika: The soul of this easy diabetic chili recipe! A generous amount of good quality chili powder is essential. Cumin brings warmth and earthiness, while smoked paprika adds a wonderful depth and a hint of smoky flavor without needing to add bacon. Adjust quantities to your preference, but don’t hold back too much!
Broth: Low-Sodium Chicken or Vegetable: Using low-sodium broth is key for controlling the overall sodium content of your chili. Chicken broth often provides a rich background flavor, but vegetable broth is an excellent alternative for a vegetarian option or for those who prefer it. Just ensure it’s low-sodium to give you control over the final seasoning.
Optional Add-ins: Chipotle in Adobo, Green Chiles: For an extra layer of smoky heat, a chopped chipotle pepper in adobo sauce can be a game-changer. For a milder but distinct pepper flavor, diced canned green chiles are fantastic. These add-ins enhance the complexity of your easy diabetic chili recipe beautifully.
Step-by-Step Instructions: Crafting Your Easy Diabetic Chili
Follow these step-by-step instructions to create your perfect bowl of chili:
1. Brown the Meat and Aromatics
In a large pot or Dutch oven over medium-high heat, brown your lean ground turkey or beef, breaking it up with a spoon. Drain any excess fat. Add the diced onions and bell peppers to the pot and cook until softened, about 5-7 minutes. Stir in the minced garlic and cook for another minute until fragrant, being careful not to burn it. This step is crucial for building the foundational flavors of your easy diabetic chili recipe.
2. Add Tomatoes, Beans, and Spices
Stir in the tomato paste and cook for 1-2 minutes, allowing it to slightly caramelize. Then add the crushed tomatoes, diced tomatoes, rinsed beans (kidney, black, or pinto), low-sodium broth, chili powder, cumin, and smoked paprika. If using, now is the time to add the chopped chipotle in adobo or green chiles. Stir everything together thoroughly to combine all the wonderful ingredients for your easy diabetic chili recipe.
3. Simmer for Flavor Development
Bring the chili to a gentle simmer. Once simmering, reduce the heat to low, cover the pot, and let it cook for at least 30 minutes, or up to an hour for the flavors to meld and deepen. Stir occasionally to prevent sticking. The longer it simmers, the more complex and rich your easy diabetic chili recipe will become.
4. Adjust Seasoning to Taste
After simmering, taste the chili and adjust seasonings as needed. Add salt and freshly ground black pepper to your preference. If it needs a bit more heat, a pinch of cayenne pepper can be added. If you desire a touch more acidity, a tiny splash of apple cider vinegar can brighten the overall flavor. This final touch makes all the difference in your perfect easy diabetic chili recipe.
Expert Tips for Success with Easy Diabetic Chili
- Don’t Skip Browning for Flavor Depth: Properly browning your meat creates a flavorful crust (Maillard reaction) that adds incredible depth to your chili. Always get a good sear on your meat and sauté your aromatics until sweet and tender.
- Control Sodium Levels Effectively: Always opt for low-sodium broth, canned tomatoes, and beans. This allows you to control the salt added later, preventing an overly salty dish, which is especially important for managing blood pressure. For more insights on healthy eating, check out reputable sources like The American Diabetes Association.
- Customize Spice Levels Safely: Start with the suggested amount of chili powder and cumin, then add a tiny pinch of cayenne or a bit more smoked paprika if you like it spicier. Taste as you go!
- Slow Cooker & Instant Pot Adaptations: For a slow cooker, brown meat and aromatics first on the stovetop (highly recommended for flavor), then combine all ingredients in the slow cooker and cook on low for 6-8 hours or high for 3-4 hours. For an Instant Pot, use the sauté function to brown meat and aromatics, then add remaining ingredients (use slightly less broth as less liquid evaporates), and pressure cook on high for 15-20 minutes with a natural release.
What to Serve With Your Easy Diabetic Chili
This easy diabetic chili recipe is fantastic on its own, but these accompaniments truly elevate the experience while keeping it diabetic-friendly:
- Low-Carb Toppings: A dollop of creamy avocado, a spoonful of plain Greek yogurt (an excellent sour cream substitute), or a sprinkle of low-fat shredded cheese (in moderation) add fat, protein, and texture without excess carbs.
- Healthy Sides: A crisp green salad with a light vinaigrette makes for a refreshing contrast. If you absolutely love cornbread, opt for a small piece of whole-grain cornbread made with ingredients like almond flour or limited sugar, and enjoy in moderation.
- Garnishes for Freshness: Fresh cilantro and sliced green onions provide a vibrant burst of flavor and color, lifting the chili and making it even more inviting.
Storing and Reheating Your Easy Diabetic Chili
One of the best things about this easy diabetic chili recipe is how well it stores, often tasting even better the next day as the flavors deepen!
- Refrigeration Guidelines: Once cooled to room temperature (within 2 hours of cooking), transfer the chili to airtight containers. It will keep beautifully in the refrigerator for up to 3-4 days.
- Freezing for Future Meals: Chili freezes exceptionally well! Portion it into freezer-safe containers or heavy-duty freezer bags. Lay bags flat to save space. It can be stored in the freezer for up to 3 months. Thaw overnight in the refrigerator before reheating.
- Best Reheating Methods: Reheat chili gently on the stovetop over medium-low heat, stirring occasionally, until heated through. You can also microwave individual portions in a microwave-safe bowl, stirring every minute or so, until hot. Add a splash of broth or water if it seems too thick after reheating.
Frequently Asked Questions About Easy Diabetic Chili
Is this chili really suitable for diabetics?
Can I make this vegetarian or vegan?
How can I make this spicier?
What’s the best way to thicken chili?
Can I use fresh tomatoes instead of canned?
Easy Diabetic Chili Recipe: Delicious and Simple
- Total Time: 1 hour
- Yield: 8 servings
Description
Discover an easy diabetic chili recipe that’s packed with flavor, hearty, and perfectly suited for managing blood sugar. This comforting meal is simple to prepare and stores wonderfully for future enjoyment.
Ingredients
- 1 tbsp olive oil
- 1 lb lean ground turkey or beef (93/7 or leaner)
- 1 large yellow onion, diced
- 1 large bell pepper (any color), diced
- 3 cloves garlic, minced
- 28 oz can crushed tomatoes (no added sugar)
- 15 oz can diced tomatoes (no added sugar)
- 6 oz can tomato paste (no added sugar)
- 15 oz can kidney beans, rinsed and drained
- 15 oz can black beans, rinsed and drained
- 4 cups low-sodium chicken or vegetable broth
- 2 tbsp chili powder
- 1 tbsp ground cumin
- 1 tsp smoked paprika
- 1/2 tsp salt (or to taste)
- 1/4 tsp black pepper (or to taste)
- Optional: 1 chipotle pepper in adobo, minced (for heat)
- Optional: 1 small can diced green chiles (for mild flavor)
Instructions
- In a large pot or Dutch oven, heat olive oil over medium-high heat. Add ground meat and brown, breaking it up with a spoon. Drain any excess fat.
- Add diced onion and bell pepper to the pot. Cook, stirring occasionally, until softened, about 5-7 minutes. Stir in minced garlic and cook for 1 minute until fragrant.
- Stir in tomato paste and cook for 1-2 minutes. Add crushed tomatoes, diced tomatoes, rinsed beans, low-sodium broth, chili powder, cumin, smoked paprika, salt, pepper, and optional chipotle or green chiles. Stir well to combine.
- Bring the chili to a gentle simmer. Reduce heat to low, cover, and cook for at least 30 minutes (up to 1 hour) for flavors to meld. Stir occasionally.
- Taste and adjust seasonings as needed, adding more salt, pepper, or a pinch of cayenne for extra heat. Serve hot with your favorite low-carb toppings.
- Prep Time: 15 mins
- Cook Time: 45 mins